Battle City in Unity Part 24 : Bonus Crates - Level Up
This article is Part 24 in a 25-Part Series.
- Introduction - Battle City in Unity Prequel
- Part 1 - Battle City in Unity Part l: Single(ton) Sole Survivor
- Part 2 - Battle City in Unity Part 2: Level Creation using Tilemaps
- Part 3 - Battle City in Unity Part 3: Creation of the Protagonist and Antagonists(Tanks)
- Part 4 - Battle City in Unity Part 4: Tank Movement
- Part 5 - Battle City in Unity Part 5: Player Controller
- Part 6 - Battle City in Unity Part 6: Enemy AI
- Part 7 - Battle City in Unity Part 7: Creating Projectiles
- Part 8 - Battle City in Unity Part 8: Hurting the tanks
- Part 9 - Battle City in Unity Part 9: Firing the shots
- Part 10 - Battle City in Unity Part 10: The Spawn
- Part 11 - Battle City in Unity Part 11 : The Gamemaker - Starting the Stage and Game Over
- Part 12 - Battle City in Unity Part 12 : Level Manager
- Part 13 - Battle City in Unity Part 13 : The Gamemaker - Spawning
- Part 14 - Battle City in Unity Part 14 : The Gamemaker - Stage Cleared or Game Over
- Part 15 - Battle City in Unity Part 15 : Spawning Invincibility
- Part 16 - Battle City in Unity Part 16 : Exploding Tank animation
- Part 17 - Battle City in Unity Part 17 : Score Calculation
- Part 18 - Battle City in Unity Part 18 : Battle Status Board
- Part 19 - Battle City in Unity Part 19 : Bonus Crates - Generation
- Part 20 - Battle City in Unity Part 20 : Bonus Crates - Tank Extra Live
- Part 21 - Battle City in Unity Part 21 : Bonus Crates - Tank Invincibility
- Part 22 - Battle City in Unity Part 22 : Bonus Crates - Grenade
- Part 23 - Battle City in Unity Part 23 : Bonus Crates - Stopwatch
- Part 24 - This Article
- Part 25 - Battle City in Unity Part 25 : Bonus Crates - Shovel
This one is probably the hardest of the bonus crates to create as it has multi-tier changes. Let’s look at what we should expect with the upgrades
- Level 2 (second tier): canonball speed increase.
- Level 3 (third tier): can fire 2 canonballs at a time.
- Level 4 (fourth tier): canonballs can destroy steel walls There is also a tank appearance change per upgrade.
Let’s go straight into creating the routine. The task will be handled by the
[SerializeField]
Sprite level2Tank, level3Tank, level4Tank;
Now create a public integer variable called level defaulting it to 1, this is for the tank level tracking and create a new public routine called
public int level=1;
public void UpgradeTank()
{
    if (level < 4)
    {
        level++;
        if (level == 2)
        {
        	//change appearance to level2Tank
            //upgrade canonball speed
        }
        else if (level == 3)
        {
        	//change appearance to level3Tank
            //2 canonball shots at any time
        }
        else if (level == 4)
        {
        	//change appearance to level4Tank
            //canonball with destroysteel ability
        }
    }
}We can now code for the changes due to the level up. Since all the changes are on the projectile itself, the best place to write the code will be at the
Upgrade projectile speed
Create a new public routine called
public void UpgradeProjectileSpeed()
{
	speed = 20;
    canon.speed = speed; //initial speed is 10
}
That’s all we need.
2 shots per time
This is probably the most tricky of the 3. Because we are only using a single canonball for all the shots, we will need to create a second canonball. Create a new routine called
GameObject canonBall, canonBall2, fire;
private Projectile canon, canon2;
public void GenerateSecondCanonBall()
{
    canonBall2 = Instantiate(projectile, transform.position, transform.rotation) as GameObject;
    canon2 = canonBall2.GetComponent<Projectile>();
    canon2.speed = speed;
}
We can now update the Fire routine in WeaponController to take in the additional projectile if it is present to have a second shot.
public void Fire()
{
    if (canonBall.activeSelf == false)
    {
        //move the projectile back to Gunport
        canonBall.transform.position = transform.position;
        //set the projectile rotation to that of Gunport
        canonBall.transform.rotation = transform.rotation;
        //set the projectile to be active
        StartCoroutine(ShowFire());
        canonBall.SetActive(true);
    }
    else
    {
        if (canonBall2 != null)
        {
            if (canonBall2.activeSelf == false)
            {
                //move the projectile back to canon barrel
                canonBall2.transform.position = transform.position;
                //set the projectile rotation to canon barrel front;
                canonBall2.transform.rotation = transform.rotation;
                //set the projectile to be active
                StartCoroutine(ShowFire());
                canonBall2.SetActive(true);
            }
        }
    }
}
We also need to update the OnDestroy routine to take in the fact that the 2nd canonball needs to be destroyed if the tank is destroyed.
private void OnDestroy()
{
    //if the tank is destroyed. Send command to destroy the projectile once inactive
    if (canonBall != null) canon.DestroyProjectile();
    if (canonBall2 != null) canon2.DestroyProjectile();
}
Canonball with destroy steel wall ability
This is probably the easiest of the lot as we have done the preparation work in advance. Create a public routine called
public void CanonBallPowerUpgrade()
{
    if (canonBall != null) canon.destroySteel = true;
    if (canonBall2 != null) canon2.destroySteel = true;
}
Consolidating everything
Now we can map back all the changes to the UpgradeTank routine in Player script.
public void UpgradeTank()
{
    if (level < 4)
    {
        level++;
        if (level == 2)
        {
            transform.Find("Body").gameObject.GetComponent<SpriteRenderer>().sprite = level2Tank;
            wc.UpgradeProjectileSpeed();
        }
        else if (level == 3)
        {
            transform.Find("Body").gameObject.GetComponent<SpriteRenderer>().sprite = level3Tank;
            wc.GenerateSecondCanonBall();
        }
        else if (level == 4)
        {
            transform.Find("Body").gameObject.GetComponent<SpriteRenderer>().sprite = level4Tank;
            wc.CanonBallPowerUpgrade();
        }
    }
}
Create the bonus crate
Now we will create the bonus crate. Start by dragging and dropping the Sprite you have for Level up bonus crate into the hierarchy which Unity will help to create the Game Object for you. Call the Game Object
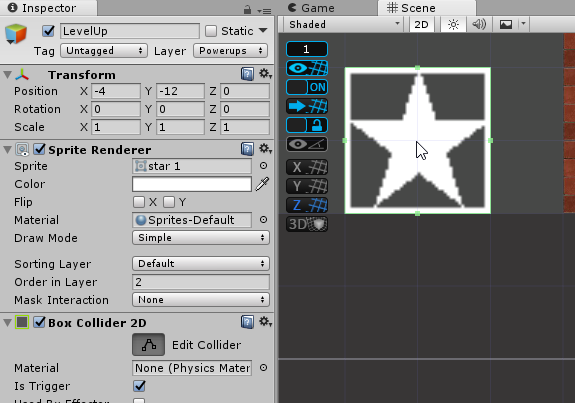
Now we will create the code for the LevelUp crate. Add a new script called
using System.Collections;
using System.Collections.Generic;
using UnityEngine;

public class LevelUp : PowerUps
{
    protected override void Start()
    {
        base.Start();
    }
    private void OnTriggerEnter2D(Collider2D collision)
    {
        collision.gameObject.GetComponent<Player>().UpgradeTank();
        Destroy(this.gameObject);
    }
}
Now we are ready to try out! I updated the map with Steel Walls to test all the upgrades.
Level up tank to next stage
One of the important features for the Level Up crate is that the level upgrade gets carried over to next stage. For the information to get carried over to the next stage we will need something that does not get destroyed when moving to next scene, so we will need
public static int playerLevel = 1;Then we need to pass the information of the Tank Level from the stage to MasterTracker before it completes, the place to do this will be the
void LevelCompleted()
{
    tankReserveEmpty = false;
    Player player = GameObject.FindGameObjectWithTag("Player").GetComponent<Player>();
    MasterTracker.playerLevel = player.level;
    SceneManager.LoadScene("Score");
}
Then we can add the code of upgraded tank. This will be done at the
void Start () {
    wc = GetComponentInChildren<WeaponController>();
    rb2d = GetComponent<Rigidbody2D>();
    if (MasterTracker.playerLevel > 1)
    {
        transform.Find("Body").gameObject.GetComponent<SpriteRenderer>().sprite = level2Tank;
        wc.level = 2;
        if (MasterTracker.playerLevel > 2)
        {
            transform.Find("Body").gameObject.GetComponent<SpriteRenderer>().sprite = level3Tank;
            wc.level = 3;
            if (MasterTracker.playerLevel > 3)
            {
                transform.Find("Body").gameObject.GetComponent<SpriteRenderer>().sprite = level4Tank;
                wc.level = 4;
            }
        }
    }
}Now we go to the WeaponController to add in the code for the powerups. Same as the Player script, we will be adding in the Start Monobehaviour. Also remember to create the public integer variable
public int level=1;
void Start () {
    canonBall = Instantiate(projectile, transform.position, transform.rotation) as GameObject;
    canon = canonBall.GetComponent<Projectile>();
    canon.speed = speed;
    fire = transform.GetChild(0).gameObject;
    if (level > 1) UpgradeProjectileSpeed();
    if (level > 2) GenerateSecondCanonBall();
    if (level > 3) CanonBallPowerUpgrade();
}The tank’s level will also be reset if it gets destroyed and respawns. So we need to update the Death routine in Health script so that it will reset the MasterTracker’s playerLevel value to 1.The updated code for Death routine as below.
void Death()
{
    GamePlayManager GPM = GameObject.Find("Canvas").GetComponent<GamePlayManager>();
    if (gameObject.CompareTag("Player"))
    {
        MasterTracker.playerLevel = 1;
        GPM.SpawnPlayer();
    }
    else {
        if (!divineIntervention)
        {
            if (gameObject.CompareTag("Small")) MasterTracker.smallTanksDestroyed++;
            else if (gameObject.CompareTag("Fast")) MasterTracker.fastTanksDestroyed++;
            else if (gameObject.CompareTag("Big")) MasterTracker.bigTanksDestroyed++;
            else if (gameObject.CompareTag("Armored")) MasterTracker.armoredTanksDestroyed++;
        }
        if (this.gameObject.GetComponent<BonusTank>().IsBonusTankCheck()) GPM.GenerateBonusCrate();
    }
    Destroy(gameObject);
}
Now 1 last test to see if the level gets carried over to the next stage. We will put 3 LevelUp crates in the scene and leave only 1 enemy so we can destroy it quickly and see if the level up gets moved over.
All cleared! Let’s move to the last bonus crate- Spade.
This article is Part 24 in a 25-Part Series.
- Introduction - Battle City in Unity Prequel
- Part 1 - Battle City in Unity Part l: Single(ton) Sole Survivor
- Part 2 - Battle City in Unity Part 2: Level Creation using Tilemaps
- Part 3 - Battle City in Unity Part 3: Creation of the Protagonist and Antagonists(Tanks)
- Part 4 - Battle City in Unity Part 4: Tank Movement
- Part 5 - Battle City in Unity Part 5: Player Controller
- Part 6 - Battle City in Unity Part 6: Enemy AI
- Part 7 - Battle City in Unity Part 7: Creating Projectiles
- Part 8 - Battle City in Unity Part 8: Hurting the tanks
- Part 9 - Battle City in Unity Part 9: Firing the shots
- Part 10 - Battle City in Unity Part 10: The Spawn
- Part 11 - Battle City in Unity Part 11 : The Gamemaker - Starting the Stage and Game Over
- Part 12 - Battle City in Unity Part 12 : Level Manager
- Part 13 - Battle City in Unity Part 13 : The Gamemaker - Spawning
- Part 14 - Battle City in Unity Part 14 : The Gamemaker - Stage Cleared or Game Over
- Part 15 - Battle City in Unity Part 15 : Spawning Invincibility
- Part 16 - Battle City in Unity Part 16 : Exploding Tank animation
- Part 17 - Battle City in Unity Part 17 : Score Calculation
- Part 18 - Battle City in Unity Part 18 : Battle Status Board
- Part 19 - Battle City in Unity Part 19 : Bonus Crates - Generation
- Part 20 - Battle City in Unity Part 20 : Bonus Crates - Tank Extra Live
- Part 21 - Battle City in Unity Part 21 : Bonus Crates - Tank Invincibility
- Part 22 - Battle City in Unity Part 22 : Bonus Crates - Grenade
- Part 23 - Battle City in Unity Part 23 : Bonus Crates - Stopwatch
- Part 24 - This Article
- Part 25 - Battle City in Unity Part 25 : Bonus Crates - Shovel

