Battle City in Unity Part 21 : Bonus Crates - Tank Invincibility
This article is Part 21 in a 25-Part Series.
- Introduction - Battle City in Unity Prequel
- Part 1 - Battle City in Unity Part l: Single(ton) Sole Survivor
- Part 2 - Battle City in Unity Part 2: Level Creation using Tilemaps
- Part 3 - Battle City in Unity Part 3: Creation of the Protagonist and Antagonists(Tanks)
- Part 4 - Battle City in Unity Part 4: Tank Movement
- Part 5 - Battle City in Unity Part 5: Player Controller
- Part 6 - Battle City in Unity Part 6: Enemy AI
- Part 7 - Battle City in Unity Part 7: Creating Projectiles
- Part 8 - Battle City in Unity Part 8: Hurting the tanks
- Part 9 - Battle City in Unity Part 9: Firing the shots
- Part 10 - Battle City in Unity Part 10: The Spawn
- Part 11 - Battle City in Unity Part 11 : The Gamemaker - Starting the Stage and Game Over
- Part 12 - Battle City in Unity Part 12 : Level Manager
- Part 13 - Battle City in Unity Part 13 : The Gamemaker - Spawning
- Part 14 - Battle City in Unity Part 14 : The Gamemaker - Stage Cleared or Game Over
- Part 15 - Battle City in Unity Part 15 : Spawning Invincibility
- Part 16 - Battle City in Unity Part 16 : Exploding Tank animation
- Part 17 - Battle City in Unity Part 17 : Score Calculation
- Part 18 - Battle City in Unity Part 18 : Battle Status Board
- Part 19 - Battle City in Unity Part 19 : Bonus Crates - Generation
- Part 20 - Battle City in Unity Part 20 : Bonus Crates - Tank Extra Live
- Part 21 - This Article
- Part 22 - Battle City in Unity Part 22 : Bonus Crates - Grenade
- Part 23 - Battle City in Unity Part 23 : Bonus Crates - Stopwatch
- Part 24 - Battle City in Unity Part 24 : Bonus Crates - Level Up
- Part 25 - Battle City in Unity Part 25 : Bonus Crates - Shovel
Continuing with the Bonus Crates. We will touch on the Invincibility bonus crate which is symbolized by the helmet symbol. Its effects is to grant the PlayerTank a prolonged period of invincibility.
Start by dragging and dropping the Sprite you have for invincibility bonus crate into the hierarchy which Unity will help to create the Game Object for you. Call the Game Object

Creating the invincibility effect
There is not much we need to do about the invincibility effect as it is just an extension of the electric aura the tank has when it first gets spawned. So all we need to do is to create a state in the Animator and add the TankCreated animation to it.
Drag and drop the PlayerTank prefab to the hierarchy and select it. Open up its Animator Window and 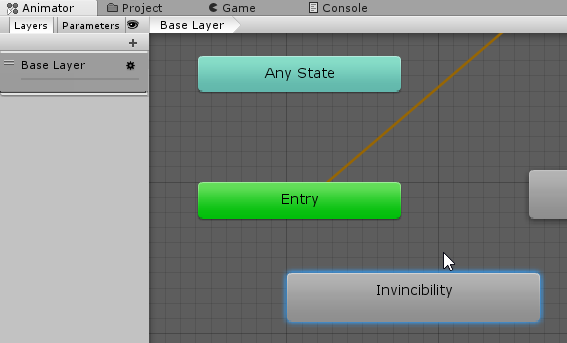
Create a new Parameter called 
- Right-click on the Entry and select
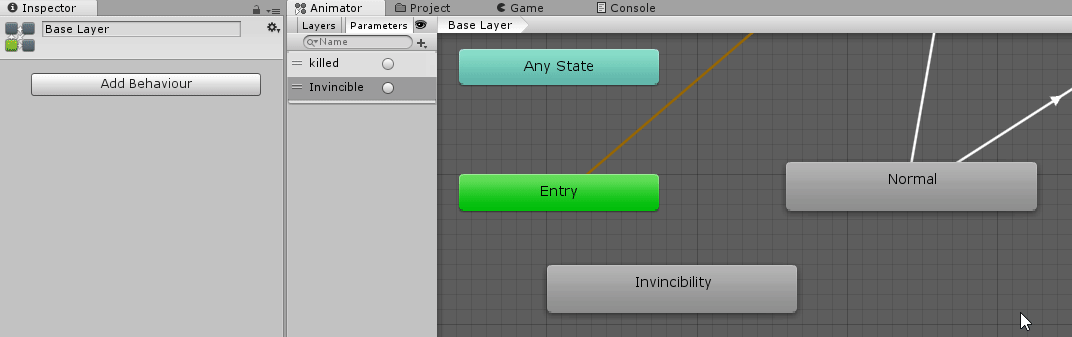
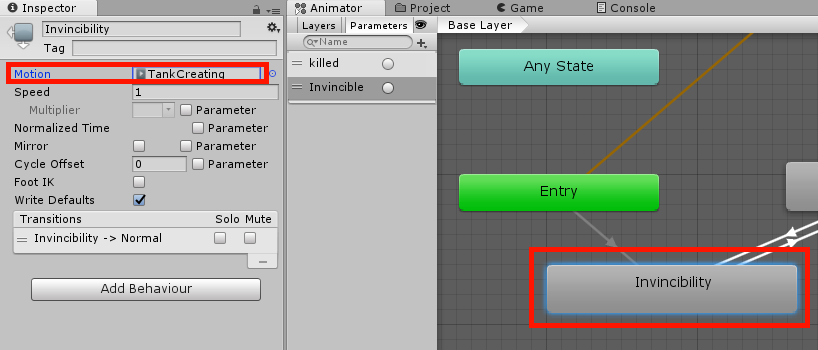
Make Transition , drag the arrow to Invincibility. After the boxes are joined together by the arrow, click on the arrow and add condition Invincible to it. - Do the same for
TankCreating box to Invincibility Box, but this time also uncheckHas Exit Time . - Do the same for
Normal box to Invincibility Box, also uncheckHas Exit Time . - Lastly, right-click on the Invincibilty and select
Make Transition , drag the arrow to Normal.
After the boxes are joined together by the arrow, click on the arrow and draw down the Settings in the Inspector and set Exit Time to 10. This will mean the animation will run for 10 seconds before moving back to Normal.
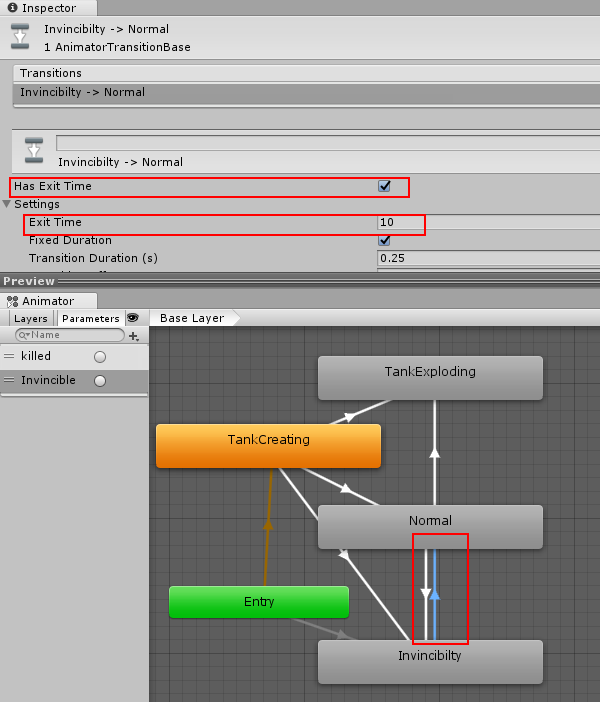
Now click on the Invincibility Box again and set the Motion in the Inspector to TankCreating.
Coding the invincibility
Now we can creating the triggering of the invincibility. Create a script called Helmet in the Helmet Game Object. Set the class to inherit from PowerUps. The full code for Helmet as below.
using System.Collections;
using System.Collections.Generic;
using UnityEngine;

public class Helmet : PowerUps
{
    // Use this for initialization
    protected override void Start()
    {
        base.Start();
    }
    private void OnTriggerEnter2D(Collider2D collision)
    {
        collision.gameObject.GetComponent<Animator>().SetTrigger("Invincible");
        Destroy(this.gameObject);
    }
}That’s all! We can test it already. 
Then press play!
Testing successfully! Next stop, will be on the Grenade Bonus Crates.
This article is Part 21 in a 25-Part Series.
- Introduction - Battle City in Unity Prequel
- Part 1 - Battle City in Unity Part l: Single(ton) Sole Survivor
- Part 2 - Battle City in Unity Part 2: Level Creation using Tilemaps
- Part 3 - Battle City in Unity Part 3: Creation of the Protagonist and Antagonists(Tanks)
- Part 4 - Battle City in Unity Part 4: Tank Movement
- Part 5 - Battle City in Unity Part 5: Player Controller
- Part 6 - Battle City in Unity Part 6: Enemy AI
- Part 7 - Battle City in Unity Part 7: Creating Projectiles
- Part 8 - Battle City in Unity Part 8: Hurting the tanks
- Part 9 - Battle City in Unity Part 9: Firing the shots
- Part 10 - Battle City in Unity Part 10: The Spawn
- Part 11 - Battle City in Unity Part 11 : The Gamemaker - Starting the Stage and Game Over
- Part 12 - Battle City in Unity Part 12 : Level Manager
- Part 13 - Battle City in Unity Part 13 : The Gamemaker - Spawning
- Part 14 - Battle City in Unity Part 14 : The Gamemaker - Stage Cleared or Game Over
- Part 15 - Battle City in Unity Part 15 : Spawning Invincibility
- Part 16 - Battle City in Unity Part 16 : Exploding Tank animation
- Part 17 - Battle City in Unity Part 17 : Score Calculation
- Part 18 - Battle City in Unity Part 18 : Battle Status Board
- Part 19 - Battle City in Unity Part 19 : Bonus Crates - Generation
- Part 20 - Battle City in Unity Part 20 : Bonus Crates - Tank Extra Live
- Part 21 - This Article
- Part 22 - Battle City in Unity Part 22 : Bonus Crates - Grenade
- Part 23 - Battle City in Unity Part 23 : Bonus Crates - Stopwatch
- Part 24 - Battle City in Unity Part 24 : Bonus Crates - Level Up
- Part 25 - Battle City in Unity Part 25 : Bonus Crates - Shovel

