Battle City in Unity Part 23 : Bonus Crates - Stopwatch
This article is Part 23 in a 25-Part Series.
- Introduction - Battle City in Unity Prequel
- Part 1 - Battle City in Unity Part l: Single(ton) Sole Survivor
- Part 2 - Battle City in Unity Part 2: Level Creation using Tilemaps
- Part 3 - Battle City in Unity Part 3: Creation of the Protagonist and Antagonists(Tanks)
- Part 4 - Battle City in Unity Part 4: Tank Movement
- Part 5 - Battle City in Unity Part 5: Player Controller
- Part 6 - Battle City in Unity Part 6: Enemy AI
- Part 7 - Battle City in Unity Part 7: Creating Projectiles
- Part 8 - Battle City in Unity Part 8: Hurting the tanks
- Part 9 - Battle City in Unity Part 9: Firing the shots
- Part 10 - Battle City in Unity Part 10: The Spawn
- Part 11 - Battle City in Unity Part 11 : The Gamemaker - Starting the Stage and Game Over
- Part 12 - Battle City in Unity Part 12 : Level Manager
- Part 13 - Battle City in Unity Part 13 : The Gamemaker - Spawning
- Part 14 - Battle City in Unity Part 14 : The Gamemaker - Stage Cleared or Game Over
- Part 15 - Battle City in Unity Part 15 : Spawning Invincibility
- Part 16 - Battle City in Unity Part 16 : Exploding Tank animation
- Part 17 - Battle City in Unity Part 17 : Score Calculation
- Part 18 - Battle City in Unity Part 18 : Battle Status Board
- Part 19 - Battle City in Unity Part 19 : Bonus Crates - Generation
- Part 20 - Battle City in Unity Part 20 : Bonus Crates - Tank Extra Live
- Part 21 - Battle City in Unity Part 21 : Bonus Crates - Tank Invincibility
- Part 22 - Battle City in Unity Part 22 : Bonus Crates - Grenade
- Part 23 - This Article
- Part 24 - Battle City in Unity Part 24 : Bonus Crates - Level Up
- Part 25 - Battle City in Unity Part 25 : Bonus Crates - Shovel
The stopwatch is the hardest for me to figure out of the bonus crates effects. The additional things we need to add on is not a lot, but somehow all the ways I tried did not seem to work. Probably someone can later comment on how it can be done better as my way does not appear as straightforward. The effects of the stopwatch are to freeze all the enemy tanks for a period.
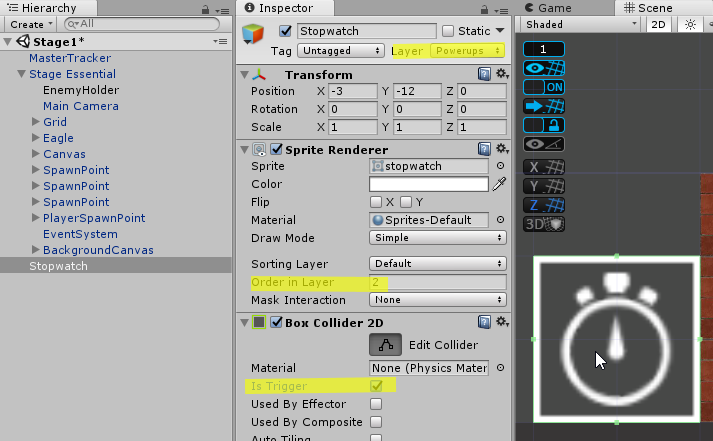
Start by dragging and dropping the Sprite you have for stopwatch bonus crate into the hierarchy which Unity will help to create the Game Object for you. Call the Game Object
Creating the freezing effect
Same as the Grenade, the key to this effect is to be able to find all the enemy tanks on the scene. Fortunately, we have already done the hard work at the last post to find all the enemy tanks, so we need just to reuse it.
Now we will create the code for the Stopwatch. Add a new script called
using System.Collections;
using System.Collections.Generic;
using UnityEngine;

public class Stopwatch : PowerUps
{
    GameObject[] enemies;
    GameObject enemyHolder;
    // Use this for initialization
    protected override void Start()
    {
        base.Start();
    }
    private void OnTriggerEnter2D(Collider2D collision)
    {
        GamePlayManager GPM = GameObject.Find("Canvas").GetComponent<GamePlayManager>();
        GPM.ActivateFreeze();
        Destroy(this.gameObject);
    }
}Through trial and error, I have realized the only way to freeze the enemy tanks is through the following sequence:
- Disable the tank Game Object.
- Stop coroutine and invoke triggered from the EnemyAI script.
- Disable the EnemyAI component.
- Enable the tank Game Object.
Just disabling the EnemyAI component won’t work as it will get enabled back by itself during runtime(I am not sure why this is happening).
To overcome this, I need to disable the GameObject first. The stopping of coroutine and invoke is to prevent the tank from moving or shooting. Then we can disable the EnemyAI safely before enabling back the Game Object for it to be visible.
There are 2 types of freezing scenario; one is the freezing of enemy tanks in the gameplay area, the other is the freezing of the enemy tanks that got spawned during the freezing timeline. The freezing of enemy tanks in the gameplay area will be handled by the GamePlayManager while the Spawner script will handle those that get spawned during the freeze period.
The stopping and resumption of invoke and coroutine will be handled inside the EnemyAI script becausing the cancelling of invoke and coroutine triggered by
Create 2 routines
public static bool freezing= false;
public void ToFreezeTank()
{
    CancelInvoke();
    StopAllCoroutines();
}
public void ToUnfreezeTank()
{
    isMoving = false;
    RandomDirection();
    Invoke("FireWhenWanted", Random.Range(0.5f, 1));
}
For those tanks in the gameplay area, add the below code to the GamePlayManager script.
Transform enemyHolder;
public void ActivateFreeze()
{
    StartCoroutine(FreezeActivated());
}

IEnumerator FreezeActivated()
{
    EnemyAI.freezing = true;
    enemyHolder = GameObject.Find("EnemyHolder").transform;
    for (int i = 0; i < enemyHolder.childCount; i++)
    {
        enemyHolder.GetChild(i).gameObject.SetActive(false);
        enemyHolder.GetChild(i).gameObject.GetComponent<EnemyAI>().ToFreezeTank();
        enemyHolder.GetChild(i).gameObject.GetComponent<EnemyAI>().enabled = false;
        enemyHolder.GetChild(i).gameObject.SetActive(true);
    }
    yield return new WaitForSeconds(10);
    for (int i = 0; i < enemyHolder.childCount; i++)
    {
        enemyHolder.GetChild(i).gameObject.SetActive(false);
        enemyHolder.GetChild(i).gameObject.GetComponent<EnemyAI>().enabled = true;
        enemyHolder.GetChild(i).gameObject.GetComponent<EnemyAI>().ToUnfreezeTank();
        enemyHolder.GetChild(i).gameObject.SetActive(true);
    }
    EnemyAI.freezing = false;
}ActivateFreeze might appear redundant but it is required as StopWatch script cannot trigger the coroutine as the script component will get destroyed before the coroutine completes which will mean the coroutine will get canceled. So we can only get StopWatch to trigger a routine in GamePlayManager which will in turn trigger a coroutine.
The first half of the coroutine is to do disable of EnemyAI component and stopping of the coroutines and Invoke triggered by EnemyAI. Then there will be a wait for 10 seconds before enabling back EnemyAI and starting back the coroutine and invoke by EnemyAI script. The static boolean freezing will be set to true at the start of the freezing period and back to false at the end.
We now head to the Spawner script to add in the portion of freezing the tank when spawned. This will be added at the SpawnNewTank routine as the tank Game Object will be set active then. The code is similar to the first half of FreezeActivated coroutine. There is no need to do the unfreeze as it will be handled by the second half of the FreezeActivated coroutine which will check for all the child of EnemyHolder and activate all their EnemyAI component.
public void SpawnNewTank()
{
    if (tank != null)
    {
        tank.SetActive(true);
        if (EnemyAI.freezing == true)
        {
            tank.SetActive(false);
            tank.GetComponent<EnemyAI>().ToFreezeTank();
            tank.GetComponent<EnemyAI>().enabled = false;
            tank.SetActive(true);
        }
    }
}
Now let’s test it!
Mission accomplished. Next up is the Level up Bonus Crate.
This article is Part 23 in a 25-Part Series.
- Introduction - Battle City in Unity Prequel
- Part 1 - Battle City in Unity Part l: Single(ton) Sole Survivor
- Part 2 - Battle City in Unity Part 2: Level Creation using Tilemaps
- Part 3 - Battle City in Unity Part 3: Creation of the Protagonist and Antagonists(Tanks)
- Part 4 - Battle City in Unity Part 4: Tank Movement
- Part 5 - Battle City in Unity Part 5: Player Controller
- Part 6 - Battle City in Unity Part 6: Enemy AI
- Part 7 - Battle City in Unity Part 7: Creating Projectiles
- Part 8 - Battle City in Unity Part 8: Hurting the tanks
- Part 9 - Battle City in Unity Part 9: Firing the shots
- Part 10 - Battle City in Unity Part 10: The Spawn
- Part 11 - Battle City in Unity Part 11 : The Gamemaker - Starting the Stage and Game Over
- Part 12 - Battle City in Unity Part 12 : Level Manager
- Part 13 - Battle City in Unity Part 13 : The Gamemaker - Spawning
- Part 14 - Battle City in Unity Part 14 : The Gamemaker - Stage Cleared or Game Over
- Part 15 - Battle City in Unity Part 15 : Spawning Invincibility
- Part 16 - Battle City in Unity Part 16 : Exploding Tank animation
- Part 17 - Battle City in Unity Part 17 : Score Calculation
- Part 18 - Battle City in Unity Part 18 : Battle Status Board
- Part 19 - Battle City in Unity Part 19 : Bonus Crates - Generation
- Part 20 - Battle City in Unity Part 20 : Bonus Crates - Tank Extra Live
- Part 21 - Battle City in Unity Part 21 : Bonus Crates - Tank Invincibility
- Part 22 - Battle City in Unity Part 22 : Bonus Crates - Grenade
- Part 23 - This Article
- Part 24 - Battle City in Unity Part 24 : Bonus Crates - Level Up
- Part 25 - Battle City in Unity Part 25 : Bonus Crates - Shovel

