Battle City in Unity Part 16 : Exploding Tank animation
This article is Part 16 in a 25-Part Series.
- Introduction - Battle City in Unity Prequel
- Part 1 - Battle City in Unity Part l: Single(ton) Sole Survivor
- Part 2 - Battle City in Unity Part 2: Level Creation using Tilemaps
- Part 3 - Battle City in Unity Part 3: Creation of the Protagonist and Antagonists(Tanks)
- Part 4 - Battle City in Unity Part 4: Tank Movement
- Part 5 - Battle City in Unity Part 5: Player Controller
- Part 6 - Battle City in Unity Part 6: Enemy AI
- Part 7 - Battle City in Unity Part 7: Creating Projectiles
- Part 8 - Battle City in Unity Part 8: Hurting the tanks
- Part 9 - Battle City in Unity Part 9: Firing the shots
- Part 10 - Battle City in Unity Part 10: The Spawn
- Part 11 - Battle City in Unity Part 11 : The Gamemaker - Starting the Stage and Game Over
- Part 12 - Battle City in Unity Part 12 : Level Manager
- Part 13 - Battle City in Unity Part 13 : The Gamemaker - Spawning
- Part 14 - Battle City in Unity Part 14 : The Gamemaker - Stage Cleared or Game Over
- Part 15 - Battle City in Unity Part 15 : Spawning Invincibility
- Part 16 - This Article
- Part 17 - Battle City in Unity Part 17 : Score Calculation
- Part 18 - Battle City in Unity Part 18 : Battle Status Board
- Part 19 - Battle City in Unity Part 19 : Bonus Crates - Generation
- Part 20 - Battle City in Unity Part 20 : Bonus Crates - Tank Extra Live
- Part 21 - Battle City in Unity Part 21 : Bonus Crates - Tank Invincibility
- Part 22 - Battle City in Unity Part 22 : Bonus Crates - Grenade
- Part 23 - Battle City in Unity Part 23 : Bonus Crates - Stopwatch
- Part 24 - Battle City in Unity Part 24 : Bonus Crates - Level Up
- Part 25 - Battle City in Unity Part 25 : Bonus Crates - Shovel
This will be a short post as it is more about the animation than anything else. You will need a explosion sprite for effects.
I will be doing animation by manipulating of transform.
Start by dragging your
.
Then
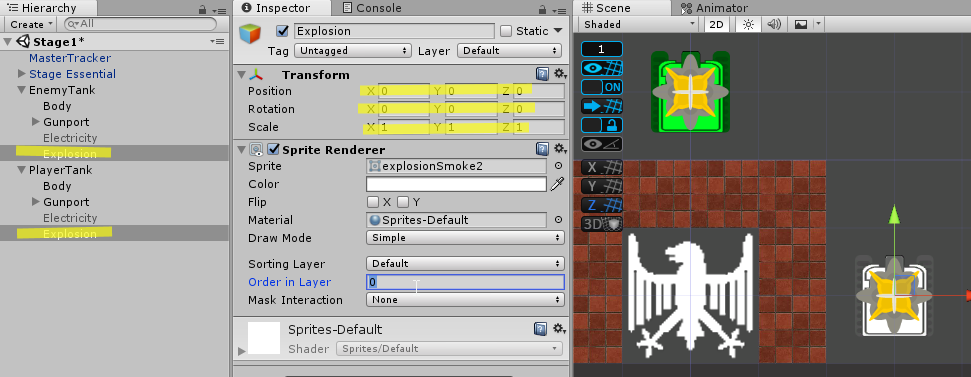
Now let’s do animation for the Explosion. Select your PlayerTank in the hierarchy.
Open the Animation Window via the Unity Editor Menu(
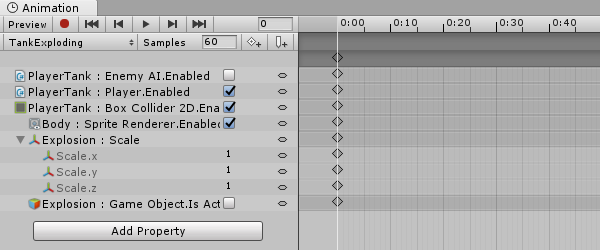
- Add 6 properties
Explosion->Is Active ,Explosion->Transform->Scale ,Enemy AI->Enabled ,Player->Enabled ,Box Collider2D->Enabled andBody->Sprite Renderer->Enabled from the Animation Window. Once added, you should be able to see something like the below.
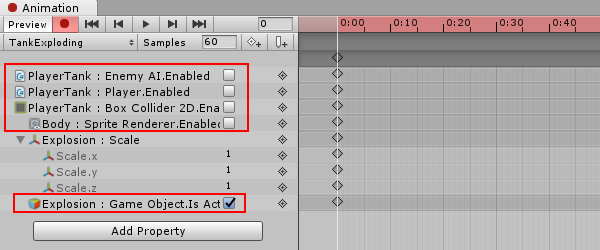
- Now click on the red circle(symbolizing record). If it is depressed, means we are in recording mode. Check the box for
Explosion: Game Object.Is Active . Uncheck the box forEnemyAI.Enabled, Player.Enabled, Box Collider2D.Enabled and Body Sprite Renderer.Enabled .
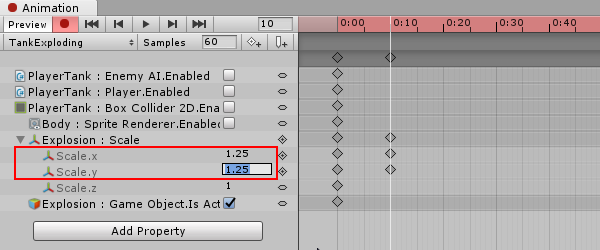
- Click on the timeline at point 0:10, you should have a white line that will move to that position. Once the white line is at point 0:10, Set value of
Scale.x and Scale.y to 1.25 and ensure the rest of the settings remains unchanged as compared to the first timeline change.
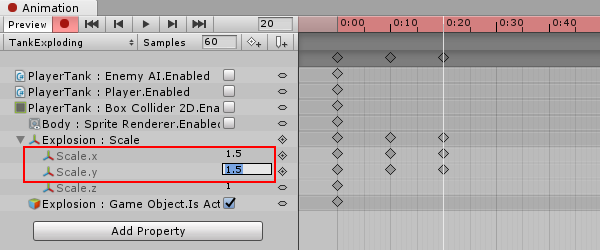
- Click on the timeline at point 0:20, you should have a white line that will move to that position. Once the white line is at point 0:20, Set value of
Scale.x and Scale.y to 1.5 and ensure the rest of the settings remains unchanged as compared to the first timeline change.
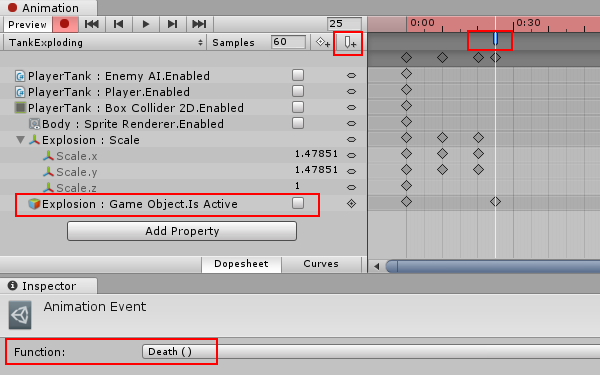
- Click on the timeline at point 0:25, you should have a white line that will move to that position. Once the white line is at point 0:25, uncheck the Explosion Game Object is Active and ensure the rest of the settings remains unchanged as compared to the first timeline change. Click on the Add Event button. A white ribbon(turns blue when selected) will appear just below the 0:25 timeline. And the inspector should come up with the title “
Animation Event ”. Select from the drop-downDeath() .
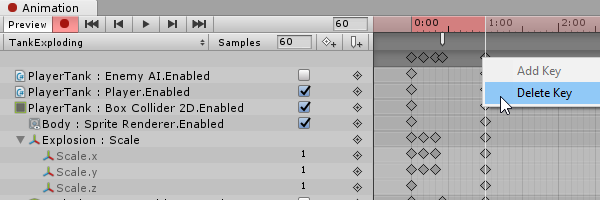
Right-click on one of the rhombus at the point 1:00 and click Delete Key. We do not need that.
- Click on the red circle symbolizing record to stop recording. Now your explosion is completed. Click on Play of the Animation to start enjoying being bomberman.

The next step is to add the TankExploding Animation as a state in the Animator. If you go to the Animator Window, you will realized the TankExploding state is already added to the Base Layer.
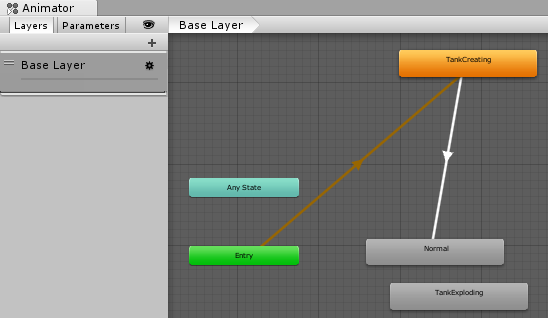
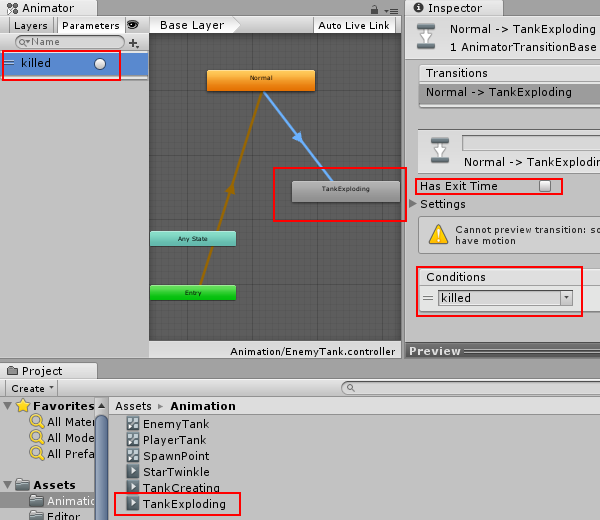
From the Animator Window, go to the Parameters tab and create a trigger named
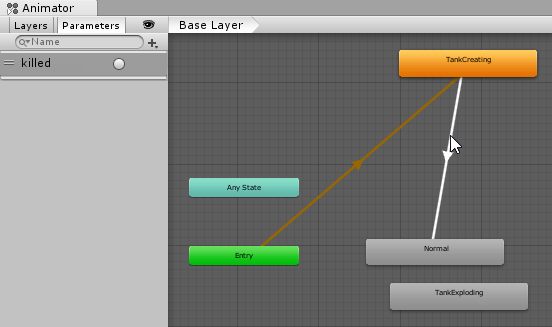
From the Animator Window, right click on the TankCreating box and select Make Transition. Drag the arrow to the TankExploding box. After the boxes are joined together by the arrow, click on the arrow and uncheck
Explosion Animation for Enemy Tank
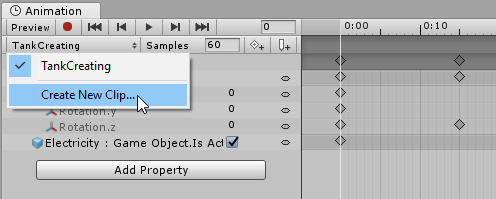
Now we can work on the part for Enemy Tank. Create a new Animator Controller called
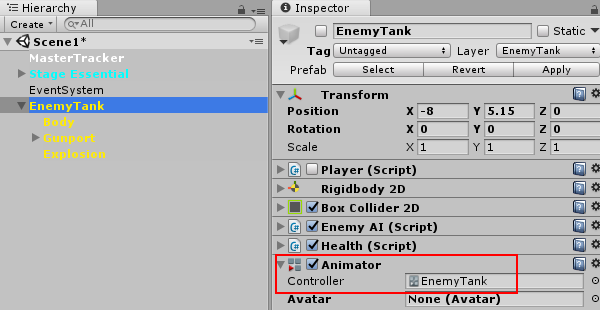
Go to the Animator Window, right-click on the Animator Window Base Layer and select
Some lines of Code required
Creating this explosion requires some little tweaks to be updated in the
First we need to declare 2 variables at the beginning. A Animator called
Animator anime;
Rigidbody2D rb2d;
//earlier codes are omitted for focus
private void Start()
{
	//earlier codes are omitted for focus
    anime = GetComponent<Animator>();
    rb2d = GetComponent<Rigidbody2D>();
}
Update the
public void TakeDamage()
{
    currentHealth--;
    if (currentHealth <= 0)
    {
        rb2d.velocity = Vector2.zero;
        anime.SetTrigger("killed");
    }
}
Let’s try out with just one enemy tank to see if the explosion animation is ok.
Alrighty! Working nicely. Next post, we will create the Score Scene.
This article is Part 16 in a 25-Part Series.
- Introduction - Battle City in Unity Prequel
- Part 1 - Battle City in Unity Part l: Single(ton) Sole Survivor
- Part 2 - Battle City in Unity Part 2: Level Creation using Tilemaps
- Part 3 - Battle City in Unity Part 3: Creation of the Protagonist and Antagonists(Tanks)
- Part 4 - Battle City in Unity Part 4: Tank Movement
- Part 5 - Battle City in Unity Part 5: Player Controller
- Part 6 - Battle City in Unity Part 6: Enemy AI
- Part 7 - Battle City in Unity Part 7: Creating Projectiles
- Part 8 - Battle City in Unity Part 8: Hurting the tanks
- Part 9 - Battle City in Unity Part 9: Firing the shots
- Part 10 - Battle City in Unity Part 10: The Spawn
- Part 11 - Battle City in Unity Part 11 : The Gamemaker - Starting the Stage and Game Over
- Part 12 - Battle City in Unity Part 12 : Level Manager
- Part 13 - Battle City in Unity Part 13 : The Gamemaker - Spawning
- Part 14 - Battle City in Unity Part 14 : The Gamemaker - Stage Cleared or Game Over
- Part 15 - Battle City in Unity Part 15 : Spawning Invincibility
- Part 16 - This Article
- Part 17 - Battle City in Unity Part 17 : Score Calculation
- Part 18 - Battle City in Unity Part 18 : Battle Status Board
- Part 19 - Battle City in Unity Part 19 : Bonus Crates - Generation
- Part 20 - Battle City in Unity Part 20 : Bonus Crates - Tank Extra Live
- Part 21 - Battle City in Unity Part 21 : Bonus Crates - Tank Invincibility
- Part 22 - Battle City in Unity Part 22 : Bonus Crates - Grenade
- Part 23 - Battle City in Unity Part 23 : Bonus Crates - Stopwatch
- Part 24 - Battle City in Unity Part 24 : Bonus Crates - Level Up
- Part 25 - Battle City in Unity Part 25 : Bonus Crates - Shovel

