Battle City in Unity Part 11 : The Gamemaker - Starting the Stage and Game Over
This article is Part 11 in a 25-Part Series.
- Introduction - Battle City in Unity Prequel
- Part 1 - Battle City in Unity Part l: Single(ton) Sole Survivor
- Part 2 - Battle City in Unity Part 2: Level Creation using Tilemaps
- Part 3 - Battle City in Unity Part 3: Creation of the Protagonist and Antagonists(Tanks)
- Part 4 - Battle City in Unity Part 4: Tank Movement
- Part 5 - Battle City in Unity Part 5: Player Controller
- Part 6 - Battle City in Unity Part 6: Enemy AI
- Part 7 - Battle City in Unity Part 7: Creating Projectiles
- Part 8 - Battle City in Unity Part 8: Hurting the tanks
- Part 9 - Battle City in Unity Part 9: Firing the shots
- Part 10 - Battle City in Unity Part 10: The Spawn
- Part 11 - This Article
- Part 12 - Battle City in Unity Part 12 : Level Manager
- Part 13 - Battle City in Unity Part 13 : The Gamemaker - Spawning
- Part 14 - Battle City in Unity Part 14 : The Gamemaker - Stage Cleared or Game Over
- Part 15 - Battle City in Unity Part 15 : Spawning Invincibility
- Part 16 - Battle City in Unity Part 16 : Exploding Tank animation
- Part 17 - Battle City in Unity Part 17 : Score Calculation
- Part 18 - Battle City in Unity Part 18 : Battle Status Board
- Part 19 - Battle City in Unity Part 19 : Bonus Crates - Generation
- Part 20 - Battle City in Unity Part 20 : Bonus Crates - Tank Extra Live
- Part 21 - Battle City in Unity Part 21 : Bonus Crates - Tank Invincibility
- Part 22 - Battle City in Unity Part 22 : Bonus Crates - Grenade
- Part 23 - Battle City in Unity Part 23 : Bonus Crates - Stopwatch
- Part 24 - Battle City in Unity Part 24 : Bonus Crates - Level Up
- Part 25 - Battle City in Unity Part 25 : Bonus Crates - Shovel
Introduction
The Gamemaker controls the flow of the entire gameplay:
- When and how to start the stage
- When and how to end the stage(Gameover or stage completion)
- When and how to spawn objects(Player, enemies and bonus crates)
We will start with the first part (When and how to start the stage).
Starting the Game Stage
Let’s start by looking at the Start Stage Animation.
 We can see the grey curtains pulling in from the top and bottom to the center to review the Stage Number. Then the grey curtain is pulling out from the center to top and bottom to reveal the stage. To create this effect, we will need 2 images for the curtain and a text field for the Stage Number Text. Create an image(
The image will be created as a child of the Canvas. Rename the image as
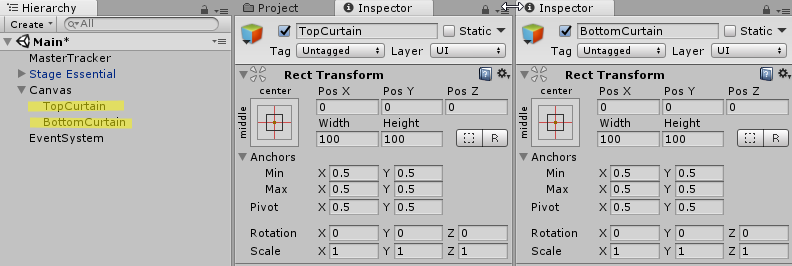
- Select the TopCurtain. Set Anchors Min X to 0, Min Y to 0.5, Max X to 1 and Max Y to 1 in the Inspector.
- Set the Rect Transform->Left, Top, Right, and Bottom to 0.
- Select the BottomCurtain. Set Anchors Min X to 0, Minx Y to 0, Max X to 1 and Max Y to 0.5 in the Inspector.
- Set the Rect Transform->Left, Top, Right, and Bottom to 0.
- Create a Text UI by right click on the Canvas (
UI->Text ). - Rename the Text UI as StageNumberText.
- Set the width of the Rect Transform to 200 and Height to 60.
- Set the Paragraph alignment to center-horizontal and center-vertical.
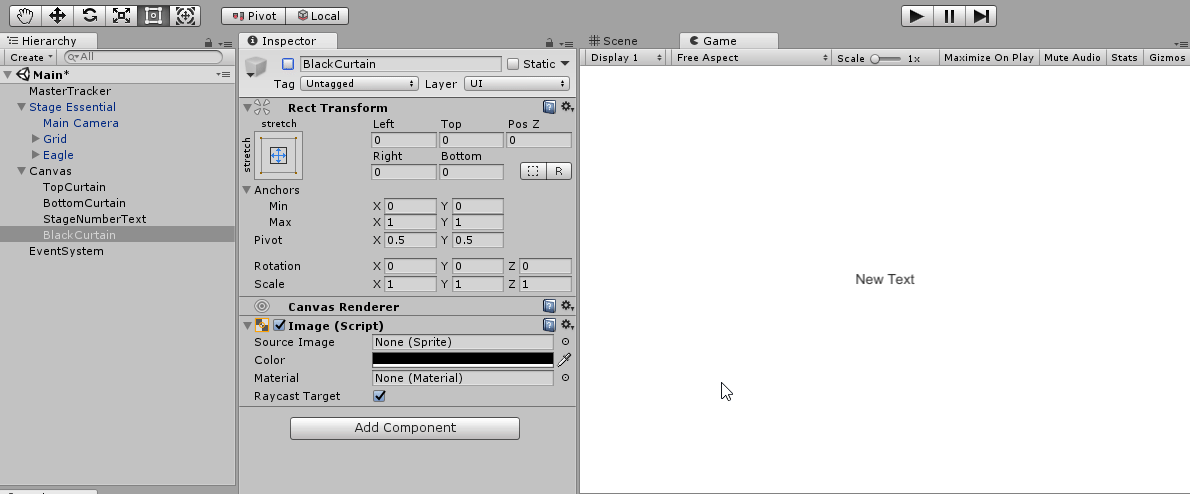
- Create a 3rd image in the Canvas. Rename it as BlackCurtain.
- Set its Image Color to Black. Click on the “middle/center” graph in the Inspector Rect Transform and then, while holding Alt key, press on “stretch/stretch”. This is to create the effect of grey curtains pulling in from the top and bottom to the center to reveal the Stage Number.
Coding the curtain effects
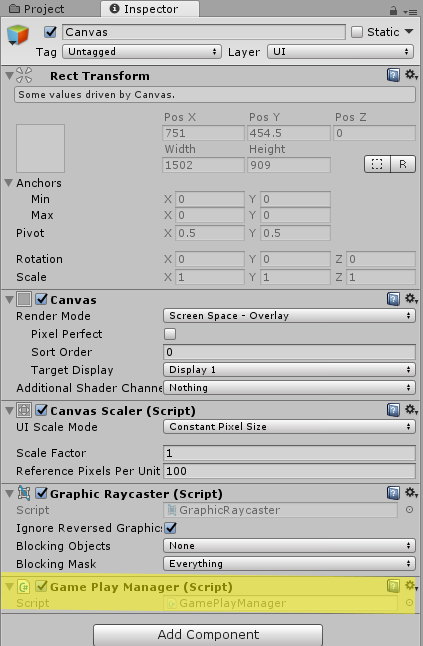
Create a Script Component named GamePlayManager under the Canvas Game Object.
We need to use the functions available to the UI so we can manipulate the UI Objects we added. Add “
Declare 4 serialized field variables:
- 3 Image variable called
topCurtain ,bottomCurtain andblackCurtain - 1 Text variable called
stageNumberText .
[SerializeField]
Image topCurtain, bottomCurtain, blackCurtain;
[SerializeField]
Text stageNumberText;
Let’s start with the revealing of Stage Number effect. All we need to do for this effect is to decrease the scale.y of the BlackCurtain until it reaches 0 so that it will show the Stage Number behind. To do that, we will use a coroutine(named
IEnumerator RevealStageNumber()
{
while (blackCurtain.rectTransform.localScale.y > 0)
{
blackCurtain.rectTransform.localScale = new Vector3(blackCurtain.rectTransform.localScale.x, Mathf.Clamp(blackCurtain.rectTransform.localScale.y - Time.deltaTime,0,1), blackCurtain.rectTransform.localScale.z);
yield return null;
}
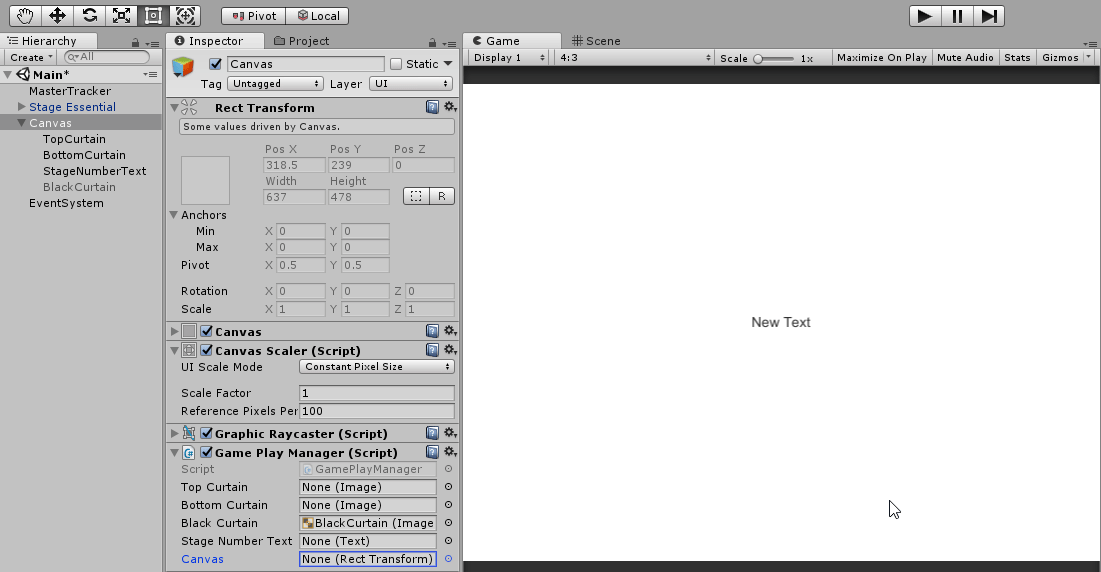
}Now let’s test it. Add the StartCoroutine RevealStageNumber to the
void Start () {
    StartCoroutine(RevealStageNumber());
}
Drag and drop the BlackCurtain Image Object to the GamePlayManager Component’s variable blackCurtain and press on Play.

Done. Now let’s move on the “grey curtain pulling out from the center to top and bottom to reveal the stage” effect. Let’s start by disabling the BlackCurtain Game Object. First, start by creating a
We will achieve the effect by pulling the TopCurtain to the top and pulling the BottomCurtain to the bottom. Let’s do all these via 2 coroutines called
[SerializeField]
RectTransform canvas;

IEnumerator RevealTopStage()
{
    float moveTopUpMin = topCurtain.rectTransform.position.y + (canvas.rect.height / 2)  + 10;
    stageNumberText.enabled = false;
    while (topCurtain.rectTransform.position.y < moveTopUpMin)
    {
        topCurtain.rectTransform.Translate(new Vector3(0, 500 * Time.deltaTime, 0));
        yield return null;
    }
}
IEnumerator RevealBottomStage()
{
    float moveBottomDownMin = bottomCurtain.rectTransform.position.y - (canvas.rect.height / 2) - 10 ;
    while (bottomCurtain.rectTransform.position.y > moveBottomDownMin)
    {
        bottomCurtain.rectTransform.Translate(new Vector3(0, -500 * Time.deltaTime, 0));
        yield return null;
    }
}
Now let’s test it. Add the StartCoroutine RevealTopStage and RevealBottomStage to the Start Monobehaviour. We will comment out the RevealStageNumber coroutine.
void Start () {
    //StartCoroutine(RevealStageNumber());
    StartCoroutine(RevealTopStage());
    StartCoroutine(RevealBottomStage());
}. Drag and drop the TopCurtain, BottomCurtain Image and StageNumberText and Canvas Objects to the GamePlayManager Component’s variable topCurtain, bottomCurtain, stageNumberText and canvas respectively and press on Play.
Let’s merge both via another coroutine to trigger the routine one after another. The routine will be called
void Start () {
        StartCoroutine(StartStage());
}
IEnumerator StartStage()
{
    StartCoroutine(RevealStageNumber());
    yield return new WaitForSeconds(5);
    StartCoroutine(RevealTopStage());
    StartCoroutine(RevealBottomStage());
}
Now let’s test the whole sequence again. Enable back the BlackCurtain if you have disabled it earlier.
That is all for the starting a stage sequence. The full code for
using System.Collections;
using System.Collections.Generic;
using UnityEngine;
using UnityEngine.UI;

public class GamePlayManager : MonoBehaviour {
    [SerializeField]
    Image topCurtain, bottomCurtain, blackCurtain;
    [SerializeField]
    Text stageNumberText;
    // Use this for initialization
    void Start () {
        StartCoroutine(StartStage());
    }
    IEnumerator StartStage()
    {
        StartCoroutine(RevealStageNumber());
        yield return new WaitForSeconds(5);
        StartCoroutine(RevealTopStage());
        StartCoroutine(RevealBottomStage());
    }
	IEnumerator RevealStageNumber()
    {
        while (blackCurtain.rectTransform.localScale.y > 0)
        {
            blackCurtain.rectTransform.localScale = new Vector3(1, Mathf.Clamp(blackCurtain.rectTransform.localScale.y - Time.deltaTime,0,1), 1);
            yield return null;
        }
    }
    IEnumerator RevealTopStage()
    {
        stageNumberText.enabled = false;
        while (topCurtain.rectTransform.position.y < 1250)
        {
            topCurtain.rectTransform.Translate(new Vector3(0, 500 * Time.deltaTime, 0));
            yield return null;
        }
    }
    IEnumerator RevealBottomStage()
    {
        while (bottomCurtain.rectTransform.position.y > -400)
        {
            bottomCurtain.rectTransform.Translate(new Vector3(0, -500 * Time.deltaTime, 0));
            yield return null;
        }
    }
}
Game over, play again?
Now, let’s take a look at the GameOver scene.
The GameOver portion is quite straightforward. Just a text mentioning Game Over scrolling up. We can do this easily in the GamePlayerManager script.
- Disable all the UI elements under
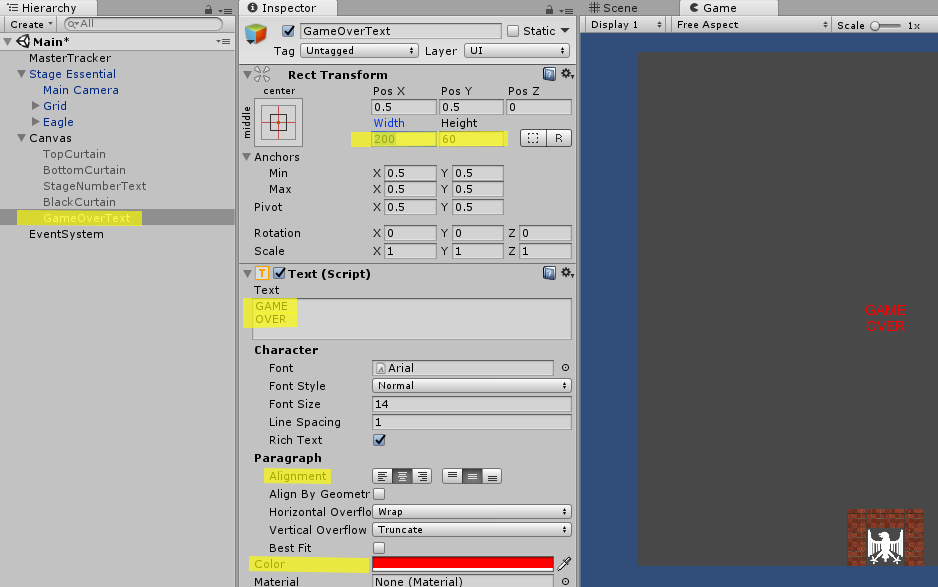
Canvas to concentrate just on the Game Over portion - Create a Text UI game object in the Canvas calling it
GameOverText . - Set the width of the Rect Transform to 200 and Height to 60.
- Set its Paragraph alignment to center-horizontal and center-vertical.
- Update its Text to GAME OVER.
- Change the color to Red like in the Battle City.
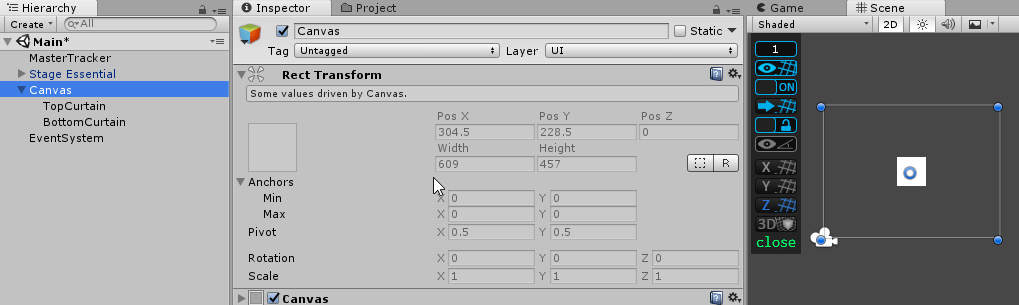
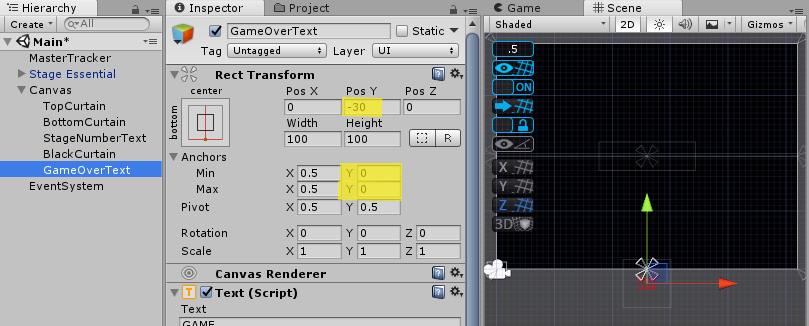
Let’s move the GameOverText to the below the Canvas so that we cannot see it anymore. We will do it by changing its Rec Transform (Anchor Min Y = 0, Achnor Max Y = 0, Rect Transform PosY = -30) in inspector shown below.
Code the Game Over
The code for Game Over is to move the GameOverText from the bottom to the center of the canvas. The Same thing as the Start Stage, we will be using a coroutine for the gradual move to position. We will need another Text Variable that is SerializeField(called
[SerializeField]
Text stageNumberText, gameOverText; // addon to the existing
Next is the coroutine(called
public IEnumerator GameOver()
{
    while (gameOverText.rectTransform.localPosition.y < 0)
    {
        gameOverText.rectTransform.localPosition = new Vector3(gameOverText.rectTransform.localPosition.x, gameOverText.rectTransform.localPosition.y + 120f * Time.deltaTime, gameOverText.rectTransform.localPosition.z);
        yield return null;
    }
}
Let’s test it now. Change the
void Start () {
StartCoroutine(GameOver());
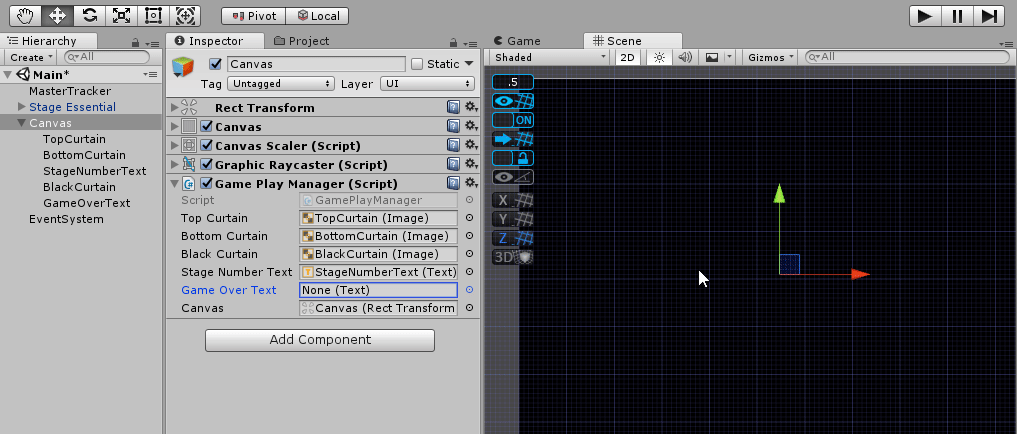
}Drag and drop the GameOverText Object to the GamePlayManager Component’s variable gameOverText and press on Play.
That’s it for the Start Stage and GameOver. Next stop, we are going to talk about the LevelManager, which allows us to do some settings on individual stages.
This article is Part 11 in a 25-Part Series.
- Introduction - Battle City in Unity Prequel
- Part 1 - Battle City in Unity Part l: Single(ton) Sole Survivor
- Part 2 - Battle City in Unity Part 2: Level Creation using Tilemaps
- Part 3 - Battle City in Unity Part 3: Creation of the Protagonist and Antagonists(Tanks)
- Part 4 - Battle City in Unity Part 4: Tank Movement
- Part 5 - Battle City in Unity Part 5: Player Controller
- Part 6 - Battle City in Unity Part 6: Enemy AI
- Part 7 - Battle City in Unity Part 7: Creating Projectiles
- Part 8 - Battle City in Unity Part 8: Hurting the tanks
- Part 9 - Battle City in Unity Part 9: Firing the shots
- Part 10 - Battle City in Unity Part 10: The Spawn
- Part 11 - This Article
- Part 12 - Battle City in Unity Part 12 : Level Manager
- Part 13 - Battle City in Unity Part 13 : The Gamemaker - Spawning
- Part 14 - Battle City in Unity Part 14 : The Gamemaker - Stage Cleared or Game Over
- Part 15 - Battle City in Unity Part 15 : Spawning Invincibility
- Part 16 - Battle City in Unity Part 16 : Exploding Tank animation
- Part 17 - Battle City in Unity Part 17 : Score Calculation
- Part 18 - Battle City in Unity Part 18 : Battle Status Board
- Part 19 - Battle City in Unity Part 19 : Bonus Crates - Generation
- Part 20 - Battle City in Unity Part 20 : Bonus Crates - Tank Extra Live
- Part 21 - Battle City in Unity Part 21 : Bonus Crates - Tank Invincibility
- Part 22 - Battle City in Unity Part 22 : Bonus Crates - Grenade
- Part 23 - Battle City in Unity Part 23 : Bonus Crates - Stopwatch
- Part 24 - Battle City in Unity Part 24 : Bonus Crates - Level Up
- Part 25 - Battle City in Unity Part 25 : Bonus Crates - Shovel

