Battle City in Unity Part 5: Player Controller
This article is Part 5 in a 25-Part Series.
- Introduction - Battle City in Unity Prequel
- Part 1 - Battle City in Unity Part l: Single(ton) Sole Survivor
- Part 2 - Battle City in Unity Part 2: Level Creation using Tilemaps
- Part 3 - Battle City in Unity Part 3: Creation of the Protagonist and Antagonists(Tanks)
- Part 4 - Battle City in Unity Part 4: Tank Movement
- Part 5 - This Article
- Part 6 - Battle City in Unity Part 6: Enemy AI
- Part 7 - Battle City in Unity Part 7: Creating Projectiles
- Part 8 - Battle City in Unity Part 8: Hurting the tanks
- Part 9 - Battle City in Unity Part 9: Firing the shots
- Part 10 - Battle City in Unity Part 10: The Spawn
- Part 11 - Battle City in Unity Part 11 : The Gamemaker - Starting the Stage and Game Over
- Part 12 - Battle City in Unity Part 12 : Level Manager
- Part 13 - Battle City in Unity Part 13 : The Gamemaker - Spawning
- Part 14 - Battle City in Unity Part 14 : The Gamemaker - Stage Cleared or Game Over
- Part 15 - Battle City in Unity Part 15 : Spawning Invincibility
- Part 16 - Battle City in Unity Part 16 : Exploding Tank animation
- Part 17 - Battle City in Unity Part 17 : Score Calculation
- Part 18 - Battle City in Unity Part 18 : Battle Status Board
- Part 19 - Battle City in Unity Part 19 : Bonus Crates - Generation
- Part 20 - Battle City in Unity Part 20 : Bonus Crates - Tank Extra Live
- Part 21 - Battle City in Unity Part 21 : Bonus Crates - Tank Invincibility
- Part 22 - Battle City in Unity Part 22 : Bonus Crates - Grenade
- Part 23 - Battle City in Unity Part 23 : Bonus Crates - Stopwatch
- Part 24 - Battle City in Unity Part 24 : Bonus Crates - Level Up
- Part 25 - Battle City in Unity Part 25 : Bonus Crates - Shovel
Heir to the Movement Script
I mentioned in the previous post the Movement Script is an abstract class which needs to be inherited from to be complete. There are two scripts which will inherit from the Movement Script; one will be AI script which the computer uses to decide when and where to move, the second will be the Player Controller script which we will talk about in this post.
The script will be quite straightforward, at least for now! It will get a bit complicated later once we add in more nitty and gritty stuff. Let’s start by creating a C# script from the Project Window and name it
public class Player : Movement {Detecting Input
In the previous post, I decide on using Input.GetAxisRaw as means for input detection. The code is quite simple; it is just calling Input.GetAxisRaw and writing the value to two float variable h and v.
h = Input.GetAxisRaw("Horizontal");
v = Input.GetAxisRaw("Vertical");
The complicated part of this is deciding where to call this code. The movement is handled via coroutine which is designed to complete at the end of a frame, so the best part to have the Input.GetAxisRaw code will be in Update as that runs at every frame. This will ensure minimal delay in getting input at the next available chance.
float h, v;
void Update()
{
    h = Input.GetAxisRaw("Horizontal");
    v = Input.GetAxisRaw("Vertical");
}Calling the coroutine to start moving
Next part is to decide when to call the coroutine since the coroutine is to handle movement and we do not want the movement to miss any collision detection(which is physics based), so the best place to call the coroutine is at FixedUpdate which Physics calculation and update will occur after every FixedUpdate.
Since our coroutines take in 2 parameters, 1 for the GetAxisRaw value and 1 for rigidbody2d. We will need to do a
As we are not going to allow diagonal movement, it is necessary to prioritize horizontal or vertical input. I decided to give Horizontal the priority since evasive actions will most likely be from the right and left as we will be moving from down to up to defeat the enemies.(OK I made that up, just choose either one for priority). So just do a check for horizontal(or vertical if you preferred that) if it is of value 0 before checking on vertical(or vice-versa)
We also need to check if a movement coroutine is already in progress before starting another, so we need to check if the isMoving flag (from the Movement script) is set to false.
Rigidbody2D rb2d;

void Start()
{
    rb2d = GetComponent<Rigidbody2D>();
}

void FixedUpdate()
{
    if (h != 0 && !isMoving) StartCoroutine(MoveHorizontal(h, rb2d));
    else if (v != 0 && !isMoving) StartCoroutine(MoveVertical(v, rb2d));
}
Try it out!
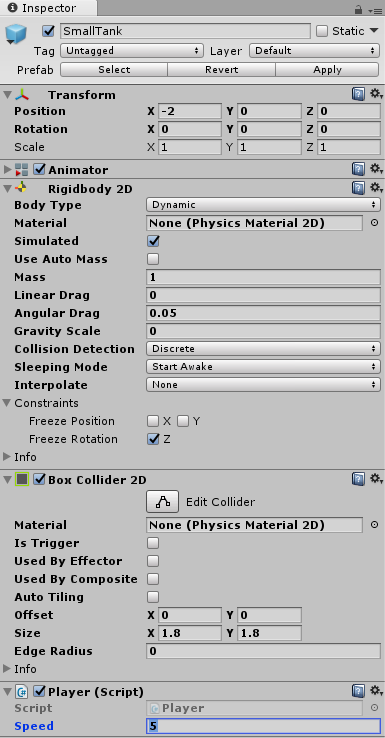
Let’s save our code and test it. Drag and drop the Player script from the Project Window to the tank Game Object you left behind in the hierarchy. This will create a Player (script) component in the Game Object’s inspector.
- Add a Rigidbody 2D component(
Physics 2D->Rigidbody 2D ) so that we can move it. - Set the
gravity scale in the RigidBody 2D component to 0(to prevent it from falling off!). - Set the
Constraints to check Freeze Rotation Z(to stop it from spinning when colliding with the edge of a collider). - Add a Box Collider 2D component(
Physics 2D->Box Collider 2D ) to the inspector to detect collisions.
Once done, your inspector for the Game Object should look like mine.

Now let’s play! Use your keyboard direction keys; it should move the tank smoothly.
Summary & Full Code
That concludes the part on Player Controller. Short and sweet. Next up is on Enemy AI. Full code of the PlayerMovement until now as below.
using UnityEngine;
public class Player : Movement {
    float h, v;
    Rigidbody2D rb2d;
    void Start () {
        rb2d = GetComponent<Rigidbody2D>();
    }
    private void FixedUpdate()
    {
        if (h != 0 && !isMoving) StartCoroutine(MoveHorizontal(h, rb2d));
        else if (v != 0 && !isMoving) StartCoroutine(MoveVertical(v, rb2d));
    }
    void Update () {
        h = Input.GetAxisRaw("Horizontal");
        v = Input.GetAxisRaw("Vertical");
    }
}
This article is Part 6 in a 26-Part Series.
- Part 1 - Battle City in Unity Prequel
- Part 2 - Battle City in Unity Part l: Single(ton) Sole Survivor
- Part 3 - Battle City in Unity Part 2: Level Creation using Tilemaps
- Part 4 - Battle City in Unity Part 3: Creation of the Protagonist and Antagonists(Tanks)
- Part 5 - Battle City in Unity Part 4: Tank Movement
- Part 6 - This Article
- Part 7 - Battle City in Unity Part 6: Enemy AI
- Part 8 - Battle City in Unity Part 7: Creating Projectiles
- Part 9 - Battle City in Unity Part 8: Hurting the tanks
- Part 10 - Battle City in Unity Part 9: Firing the shots
- Part 11 - Battle City in Unity Part 10: The Spawn
- Part 12 - Battle City in Unity Part 11 : The Gamemaker - Starting the Stage and Game Over
- Part 13 - Battle City in Unity Part 12 : Level Manager
- Part 14 - Battle City in Unity Part 13 : The Gamemaker - Spawning
- Part 15 - Battle City in Unity Part 14 : The Gamemaker - Stage Cleared or Game Over
- Part 16 - Battle City in Unity Part 15 : Spawning Invincibility
- Part 17 - Battle City in Unity Part 16 : Exploding Tank animation
- Part 18 - Battle City in Unity Part 17 : Score Calculation
- Part 19 - Battle City in Unity Part 18 : Battle Status Board
- Part 20 - Battle City in Unity Part 19 : Bonus Crates - Generation
- Part 21 - Battle City in Unity Part 20 : Bonus Crates - Tank Extra Live
- Part 22 - Battle City in Unity Part 21 : Bonus Crates - Tank Invincibility
- Part 23 - Battle City in Unity Part 22 : Bonus Crates - Grenade
- Part 24 - Battle City in Unity Part 23 : Bonus Crates - Stopwatch
- Part 25 - Battle City in Unity Part 24 : Bonus Crates - Level Up
- Part 26 - Battle City in Unity Part 25 : Bonus Crates - Shovel
This article is Part 5 in a 25-Part Series.
- Introduction - Battle City in Unity Prequel
- Part 1 - Battle City in Unity Part l: Single(ton) Sole Survivor
- Part 2 - Battle City in Unity Part 2: Level Creation using Tilemaps
- Part 3 - Battle City in Unity Part 3: Creation of the Protagonist and Antagonists(Tanks)
- Part 4 - Battle City in Unity Part 4: Tank Movement
- Part 5 - This Article
- Part 6 - Battle City in Unity Part 6: Enemy AI
- Part 7 - Battle City in Unity Part 7: Creating Projectiles
- Part 8 - Battle City in Unity Part 8: Hurting the tanks
- Part 9 - Battle City in Unity Part 9: Firing the shots
- Part 10 - Battle City in Unity Part 10: The Spawn
- Part 11 - Battle City in Unity Part 11 : The Gamemaker - Starting the Stage and Game Over
- Part 12 - Battle City in Unity Part 12 : Level Manager
- Part 13 - Battle City in Unity Part 13 : The Gamemaker - Spawning
- Part 14 - Battle City in Unity Part 14 : The Gamemaker - Stage Cleared or Game Over
- Part 15 - Battle City in Unity Part 15 : Spawning Invincibility
- Part 16 - Battle City in Unity Part 16 : Exploding Tank animation
- Part 17 - Battle City in Unity Part 17 : Score Calculation
- Part 18 - Battle City in Unity Part 18 : Battle Status Board
- Part 19 - Battle City in Unity Part 19 : Bonus Crates - Generation
- Part 20 - Battle City in Unity Part 20 : Bonus Crates - Tank Extra Live
- Part 21 - Battle City in Unity Part 21 : Bonus Crates - Tank Invincibility
- Part 22 - Battle City in Unity Part 22 : Bonus Crates - Grenade
- Part 23 - Battle City in Unity Part 23 : Bonus Crates - Stopwatch
- Part 24 - Battle City in Unity Part 24 : Bonus Crates - Level Up
- Part 25 - Battle City in Unity Part 25 : Bonus Crates - Shovel

