Battle City in Unity Part 17 : Score Calculation
This article is Part 17 in a 25-Part Series.
- Introduction - Battle City in Unity Prequel
- Part 1 - Battle City in Unity Part l: Single(ton) Sole Survivor
- Part 2 - Battle City in Unity Part 2: Level Creation using Tilemaps
- Part 3 - Battle City in Unity Part 3: Creation of the Protagonist and Antagonists(Tanks)
- Part 4 - Battle City in Unity Part 4: Tank Movement
- Part 5 - Battle City in Unity Part 5: Player Controller
- Part 6 - Battle City in Unity Part 6: Enemy AI
- Part 7 - Battle City in Unity Part 7: Creating Projectiles
- Part 8 - Battle City in Unity Part 8: Hurting the tanks
- Part 9 - Battle City in Unity Part 9: Firing the shots
- Part 10 - Battle City in Unity Part 10: The Spawn
- Part 11 - Battle City in Unity Part 11 : The Gamemaker - Starting the Stage and Game Over
- Part 12 - Battle City in Unity Part 12 : Level Manager
- Part 13 - Battle City in Unity Part 13 : The Gamemaker - Spawning
- Part 14 - Battle City in Unity Part 14 : The Gamemaker - Stage Cleared or Game Over
- Part 15 - Battle City in Unity Part 15 : Spawning Invincibility
- Part 16 - Battle City in Unity Part 16 : Exploding Tank animation
- Part 17 - This Article
- Part 18 - Battle City in Unity Part 18 : Battle Status Board
- Part 19 - Battle City in Unity Part 19 : Bonus Crates - Generation
- Part 20 - Battle City in Unity Part 20 : Bonus Crates - Tank Extra Live
- Part 21 - Battle City in Unity Part 21 : Bonus Crates - Tank Invincibility
- Part 22 - Battle City in Unity Part 22 : Bonus Crates - Grenade
- Part 23 - Battle City in Unity Part 23 : Bonus Crates - Stopwatch
- Part 24 - Battle City in Unity Part 24 : Bonus Crates - Level Up
- Part 25 - Battle City in Unity Part 25 : Bonus Crates - Shovel
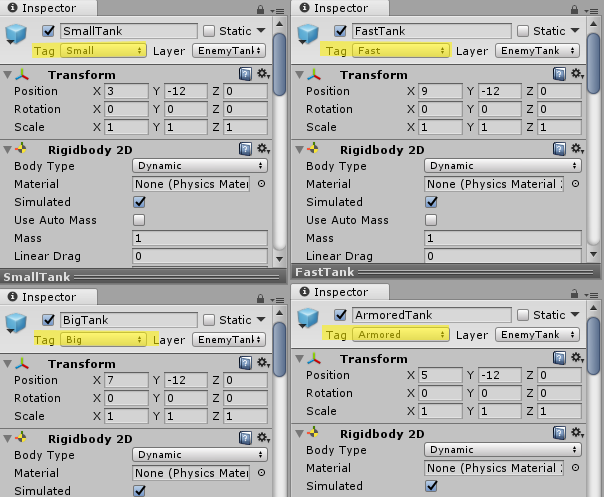
I would like you to go back and create the other 3 enemy tanks using the EnemyTank prefab you already have. You can do a recap on Part 3 if you are unsure. Set the following below for the tanks as well
| Prefab Name | Tag |
|---|---|
| SmallTank | Small |
| FastTank | Fast |
| BigTank | Big |
| ArmoredTank | Armored |
At the end you should have 4 enemy tanks prefabs like the below.
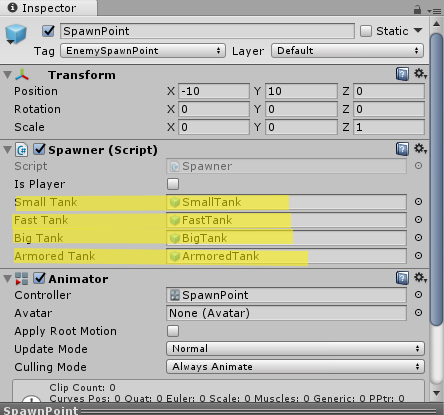
Then update the SpawnPoints’s Spawner (Script) component with the updated prefabs.
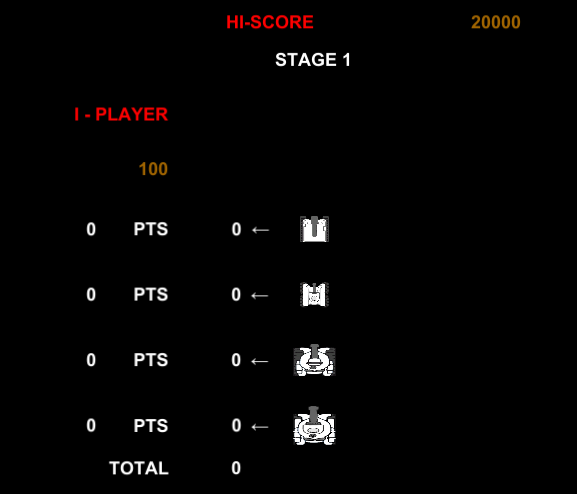
How the Score Calculation looks
Let’s take a look at the Score Calculation Scene from Battle City
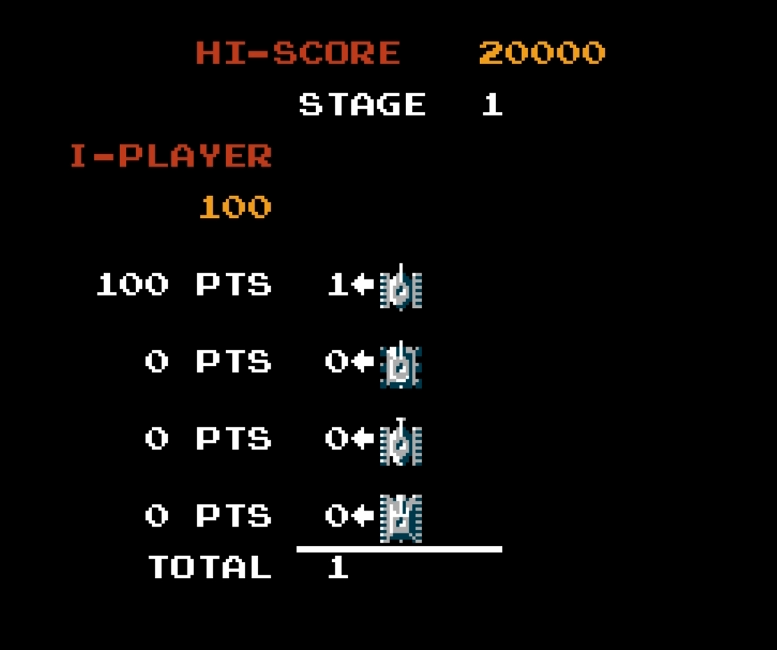
This is the scene that will show the score. You can see that all the information it requires can be taken from the
First create an empty Game Object (call it
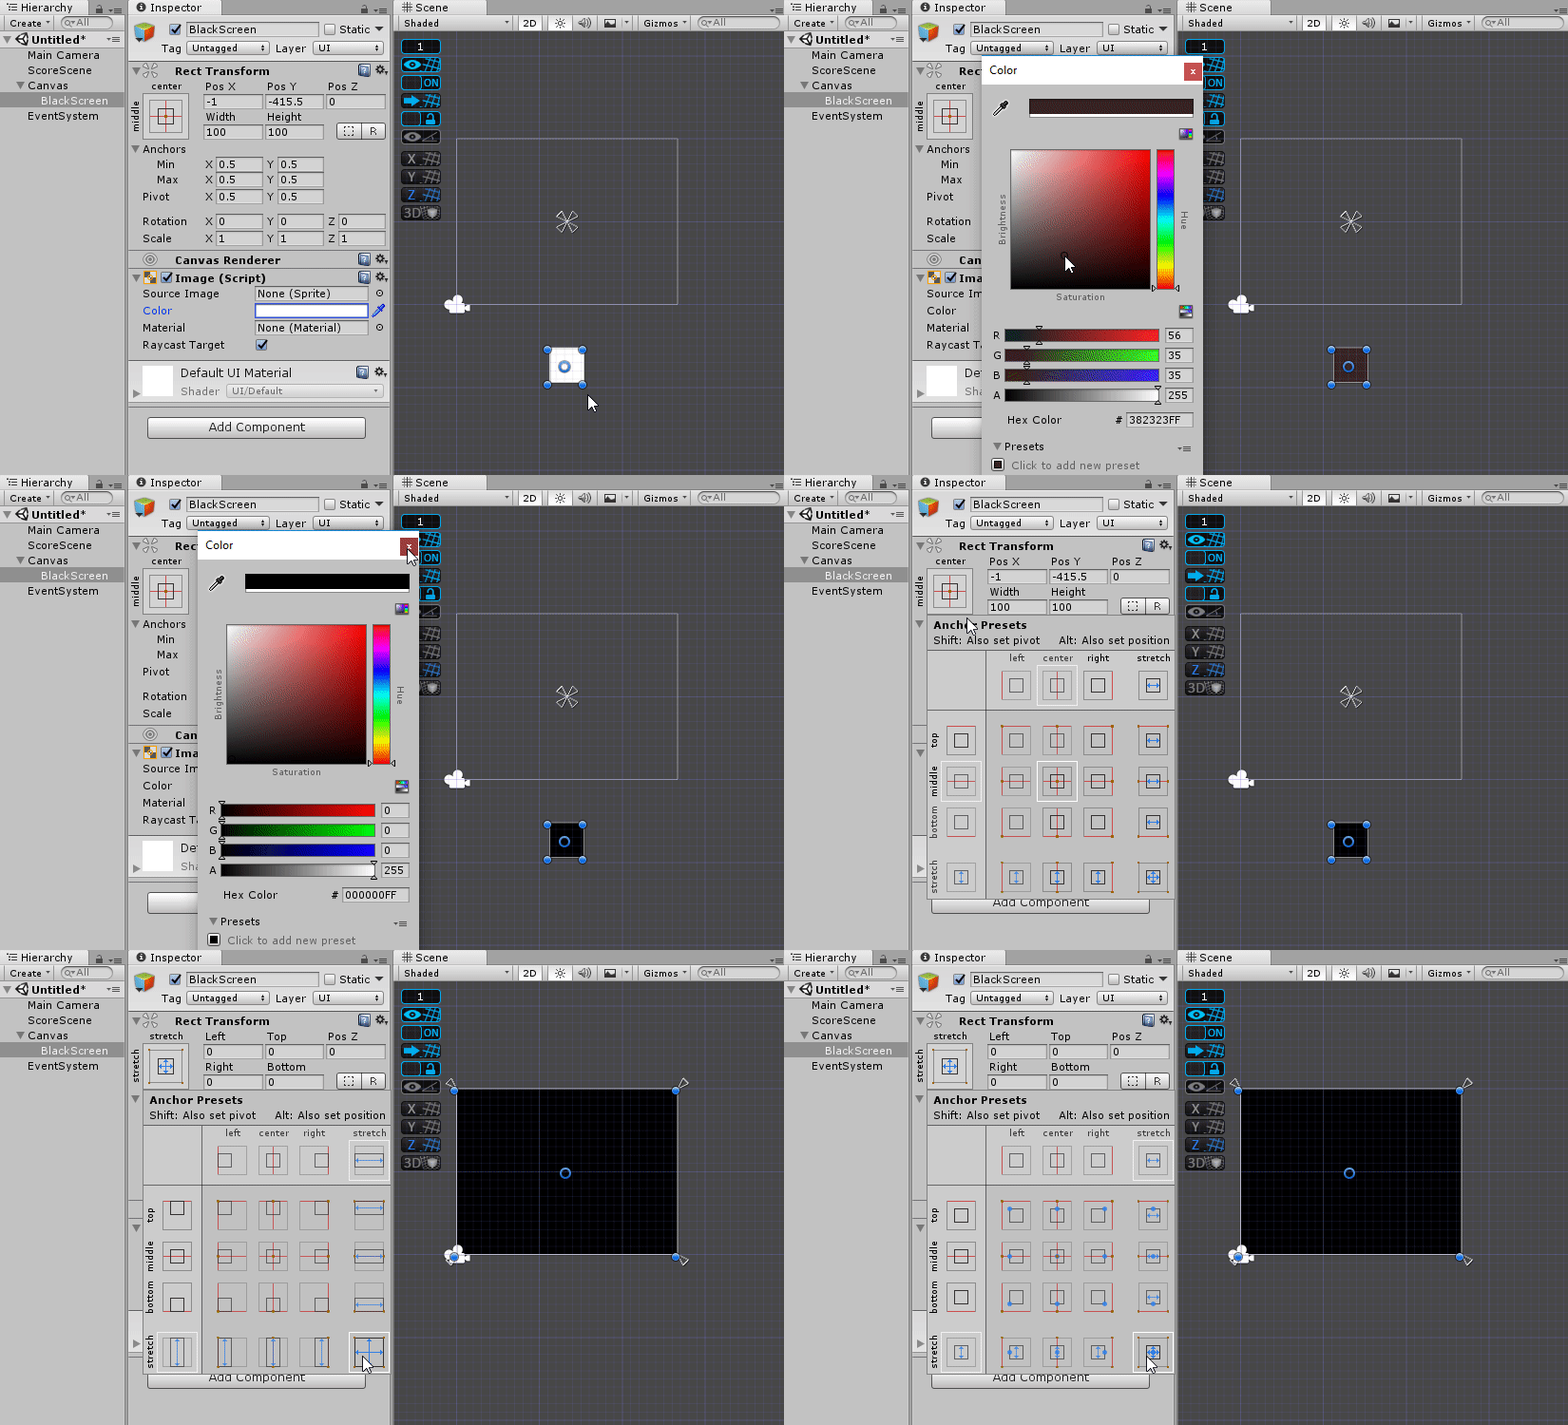
The rest of the UI items are created inside 3 panels inside the Canvas. Below are the settings I made to create the effect similar to Battle
City.
| Name | MinX | MinY | MaxX | MaxY | Comments |
|---|---|---|---|---|---|
| Panel1 | 0 | 0.8 | 1 | 1 | Child to the Canvas. Change the Panel Color alpha to 0 |
| Panel2 | 0 | 0.6 | 1 | 0.8 | Child to the Canvas. Change the Panel Color alpha to 0 |
| Panel3 | 0 | 0 | 1 | 0.6 | Child to the Canvas. Change the Panel Color alpha to 0 |
| TextHiScore | 0 | 0.5 | 0.5 | 1 | Child to the Panel1. Display the HI-SCORE word |
| HiScoreText | 0.5 | 0.5 | 1 | 1 | Child to the Panel1. Text to display will be passed by code |
| StageText | 0 | 0 | 1 | 0.5 | Child to the Panel1. Text to display will be passed by code |
| PlayerText | 0 | 0.5 | 0.3 | 1 | Child to the Panel2. Display the I-PLAYER word |
| PlayerScoreText | 0 | 0 | 0.3 | 0.5 | Child to the Panel2. Text to display will be passed by code |
| PtsText1 | 0.2 | 0.8 | 0.3 | 1 | Child to the Panel3. Display the PTS word |
| PtsText2 | 0.2 | 0.6 | 0.3 | 0.8 | Child to the Panel3. Display the PTS word |
| PtsText3 | 0.2 | 0.4 | 0.3 | 0.6 | Child to the Panel3. Display the PTS word |
| PtsText4 | 0.2 | 0.2 | 0.3 | 0.4 | Child to the Panel3. Display the PTS word |
| TotalText | 0 | 0 | 0.3 | 0.2 | Child to the Panel3. Display the TOTAL word |
| SmallTankScore | 0 | 0.8 | 0.2 | 1 | Child to the Panel3. Text to display will be passed by code |
| FastTankScore | 0 | 0.6 | 0.2 | 0.8 | Child to the Panel3. Text to display will be passed by code |
| BigTankScore | 0 | 0.4 | 0.2 | 0.6 | Child to the Panel3. Text to display will be passed by code |
| ArmoredTankScore | 0 | 0.2 | 0.2 | 0.4 | Child to the Panel3. Text to display will be passed by code |
| SmallTanksDestroyed | 0.3 | 0.8 | 0.4 | 1 | Child to the Panel3. Text to display will be passed by code |
| FastTanksDestroyed | 0.3 | 0.6 | 0.4 | 0.8 | Child to the Panel3. Text to display will be passed by code |
| BigTanksDestroyed | 0.3 | 0.4 | 0.4 | 0.6 | Child to the Panel3. Text to display will be passed by code |
| ArmoredTanksDestroyed | 0.3 | 0.2 | 0.4 | 0.4 | Child to the Panel3. Text to display will be passed by code |
| TotalTanksDestroyed | 0.3 | 0 | 0.4 | 0.2 | Child to the Panel3. Text to display will be passed by code |
| Arrow1 | 0.4 | 0.85 | 0.45 | 0.95 | Child to the Panel3. Display the arrow symbol |
| Arrow2 | 0.4 | 0.65 | 0.45 | 0.75 | Child to the Panel3. Display the arrow symbol |
| Arrow3 | 0.4 | 0.45 | 0.45 | 0.55 | Child to the Panel3. Display the arrow symbol |
| Arrow4 | 0.4 | 0.25 | 0.45 | 0.35 | Child to the Panel3. Display the arrow symbol |
| SmallTankImage | 0.48 | 0.86 | 0.52 | 0.94 | Child to the Panel3. For display the tank image. Values are adjusted to fit my images so it might not fit yours |
| FastTankImage | 0.48 | 0.66 | 0.52 | 0.74 | Child to the Panel3. For display the tank image. Values are adjusted to fit my images so it might not fit yours |
| BigTankImage | 0.48 | 0.45 | 0.52 | 0.55 | Child to the Panel3. For display the tank image. Values are adjusted to fit my images so it might not fit yours |
| ArmoredTankImage | 0.48 | 0.24 | 0.52 | 0.36 | Child to the Panel3. For display the tank image. Values are adjusted to fit my images so it might not fit yours |
Coding the calculation of Score
Now we are ready to start coding. Create a script called TallyScore on the Canvas. First thing we need to do on the script is to add
- Declare the follwing
Text variables withSerializeField . hiScoreText, stageText, playerScoreText, smallTankScoreText, fastTankScoreText, bigTankScoreText, armoredTankScoreText, smallTanksDestroyed, fastTanksDestroyed, bigTanksDestroyed, armoredTanksDestroyed, totalTanksDestroyed. These are to store references to the Text elements in the UI so that we can update them. - Declare 4
integer variables smallTankScore, fastTankScore, bigTankScore, armoredTankScore. This is to help store values during the calculation of points - Declare 1
MasterTracker variable called masterTracker to store the reference to MasterTracker to access its public variables. - Declare 4
integer variables smallTankPointsWorth, fastTankPointsWorth, bigTankPointsWorth, armoredTankPointsWorth to store the values of MasterTracker public variables we need.
At the Start MonoBehaviour, update to the below for the routine.
void Start () {
    masterTracker = GameObject.Find("MasterTracker").GetComponent<MasterTracker>();
    smallTankPointsWorth = masterTracker.smallTankPointsWorth;
    fastTankPointsWorth = masterTracker.fastTankPointsWorth;
    bigTankPointsWorth = masterTracker.bigTankPointsWorth;
    armoredTankPointsWorth = masterTracker.armoredTankPointsWorth;
    stageText.text = "STAGE " + MasterTracker.stageNumber;
    playerScoreText.text = MasterTracker.playerScore.ToString();
}Create a coroutine called
IEnumerator UpdateTankPoints()
{
    for (int i = 0; i <= MasterTracker.smallTanksDestroyed; i++)
    {
        smallTankScore = smallTankPointsWorth * i;
        smallTankScoreText.text = smallTankScore.ToString();
        smallTanksDestroyed.text = i.ToString();
        yield return new WaitForSeconds(0.2f);
    }
    for (int i = 0; i <= MasterTracker.fastTanksDestroyed; i++)
    {
        fastTankScore = fastTankPointsWorth * i;
        fastTankScoreText.text = fastTankScore.ToString();
        fastTanksDestroyed.text = i.ToString();
        yield return new WaitForSeconds(0.2f);
    }
    for (int i = 0; i <= MasterTracker.bigTanksDestroyed; i++)
    {
        bigTankScore = bigTankPointsWorth * i;
        bigTankScoreText.text = bigTankScore.ToString();
        bigTanksDestroyed.text = i.ToString();
        yield return new WaitForSeconds(0.2f);
    }
    for (int i = 0; i <= MasterTracker.armoredTanksDestroyed; i++)
    {
        armoredTankScore = armoredTankPointsWorth * i;
        armoredTankScoreText.text = armoredTankScore.ToString();
        armoredTanksDestroyed.text = i.ToString();
        yield return new WaitForSeconds(0.2f);
    }
    totalTanksDestroyed.text = (MasterTracker.smallTanksDestroyed + MasterTracker.fastTanksDestroyed + MasterTracker.bigTanksDestroyed + MasterTracker.armoredTanksDestroyed).ToString();
    MasterTracker.playerScore += (smallTankScore + fastTankScore + bigTankScore + armoredTankScore);
}
At the end part of the coroutine, . Then we will add a delay for 5 seconds for the player to absorb their achievements before going to the next scene depending on whether the player has cleared the stage(stageCleared = true) or game over(stageCleared = false). Before going to the next scene, we will trigger another routine we will create (called ClearStatistics) to reset values in MasterTracker which will be reused again.
//continuation of UpdateTankPoints coroutine
    yield return new WaitForSeconds(5f);
    if (MasterTracker.stageCleared)
    {
        ClearStatistics();
        SceneManager.LoadScene("Stage" + (MasterTracker.stageNumber + 1));
    }
    else
    {
        ClearStatistics();
        //Load GameOver Scene
    }
}
void ClearStatistics()
{
    MasterTracker.smallTanksDestroyed = 0;
    MasterTracker.fastTanksDestroyed = 0;
    MasterTracker.bigTanksDestroyed = 0;
    MasterTracker.armoredTanksDestroyed = 0;
    MasterTracker.stageCleared = false;
}
Then finally we can trigger the coroutine by the Start Monobehaviour. Add StartCoroutine(UpdateTankPoints()) to the last part of the routine. The full code for TallyScore as below.
using System.Collections;
using System.Collections.Generic;
using UnityEngine;
using UnityEngine.UI;
using UnityEngine.SceneManagement;

public class TallyScore : MonoBehaviour {
    [SerializeField]
    Text hiScoreText, stageText, playerScoreText, smallTankScoreText, fastTankScoreText, bigTankScoreText, armoredTankScoreText, smallTanksDestroyed, fastTanksDestroyed, bigTanksDestroyed, armoredTanksDestroyed, totalTanksDestroyed;
    int smallTankScore, fastTankScore, bigTankScore, armoredTankScore;
    MasterTracker masterTracker;
    int smallTankPointsWorth, fastTankPointsWorth, bigTankPointsWorth, armoredTankPointsWorth;
    // Use this for initialization
    void Start () {
        masterTracker = GameObject.Find("MasterTracker").GetComponent<MasterTracker>();
        smallTankPointsWorth = masterTracker.smallTankPointsWorth;
        fastTankPointsWorth = masterTracker.fastTankPointsWorth;
        bigTankPointsWorth = masterTracker.bigTankPointsWorth;
        armoredTankPointsWorth = masterTracker.armoredTankPointsWorth;
        stageText.text = "STAGE " + MasterTracker.stageNumber;
        playerScoreText.text = MasterTracker.playerScore.ToString();
        StartCoroutine(UpdateTankPoints());
    }
    IEnumerator UpdateTankPoints()
    {
        for (int i = 0; i <= MasterTracker.smallTanksDestroyed; i++)
        {
            smallTankScore = smallTankPointsWorth * i;
            smallTankScoreText.text = smallTankScore.ToString();
            smallTanksDestroyed.text = i.ToString();
            yield return new WaitForSeconds(0.2f);
        }
        for (int i = 0; i <= MasterTracker.fastTanksDestroyed; i++)
        {
            fastTankScore = fastTankPointsWorth * i;
            fastTankScoreText.text = fastTankScore.ToString();
            fastTanksDestroyed.text = i.ToString();
            yield return new WaitForSeconds(0.2f);
        }
        for (int i = 0; i <= MasterTracker.bigTanksDestroyed; i++)
        {
            bigTankScore = bigTankPointsWorth * i;
            bigTankScoreText.text = bigTankScore.ToString();
            bigTanksDestroyed.text = i.ToString();
            yield return new WaitForSeconds(0.2f);
        }
        for (int i = 0; i <= MasterTracker.armoredTanksDestroyed; i++)
        {
            armoredTankScore = armoredTankPointsWorth * i;
            armoredTankScoreText.text = armoredTankScore.ToString();
            armoredTanksDestroyed.text = i.ToString();
            yield return new WaitForSeconds(0.2f);
        }
        totalTanksDestroyed.text = (MasterTracker.smallTanksDestroyed + MasterTracker.fastTanksDestroyed + MasterTracker.bigTanksDestroyed + MasterTracker.armoredTanksDestroyed).ToString();
        MasterTracker.playerScore += (smallTankScore + fastTankScore + bigTankScore + armoredTankScore);
        yield return new WaitForSeconds(5f);
        if (MasterTracker.stageCleared)
        {
            ClearStatistics();
            SceneManager.LoadScene("Stage" + (MasterTracker.stageNumber + 1));
        }
        else
        {
            ClearStatistics();
            //Load GameOver Scene
        }
    }
    void ClearStatistics()
    {
        MasterTracker.smallTanksDestroyed = 0;
        MasterTracker.fastTanksDestroyed = 0;
        MasterTracker.bigTanksDestroyed = 0;
        MasterTracker.armoredTanksDestroyed = 0;
        MasterTracker.stageCleared = false;
    }
}
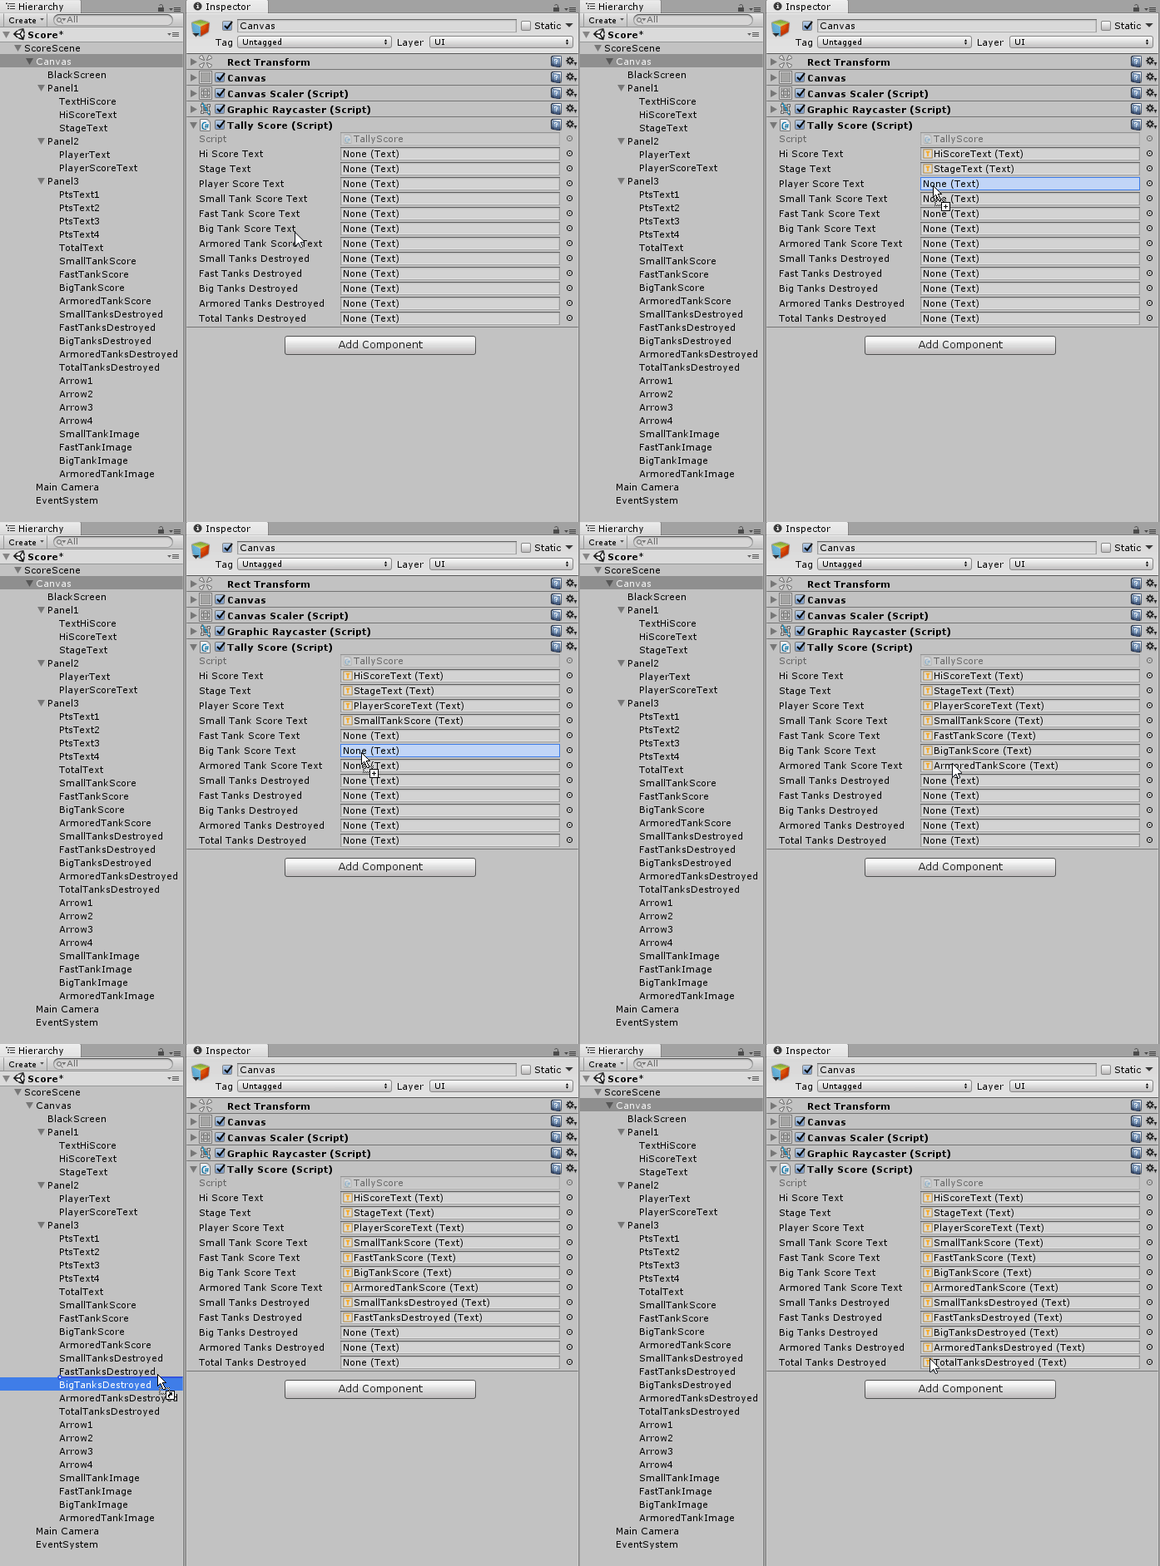
Drag and drop the right text component to its placeholder in Canvas’s Tally Score (Script) component.
Prefab the ScoreScene Game Object so that all its children will be part of the prefab and save the Score scene.
Now we are ready to test. If you have yet to create a 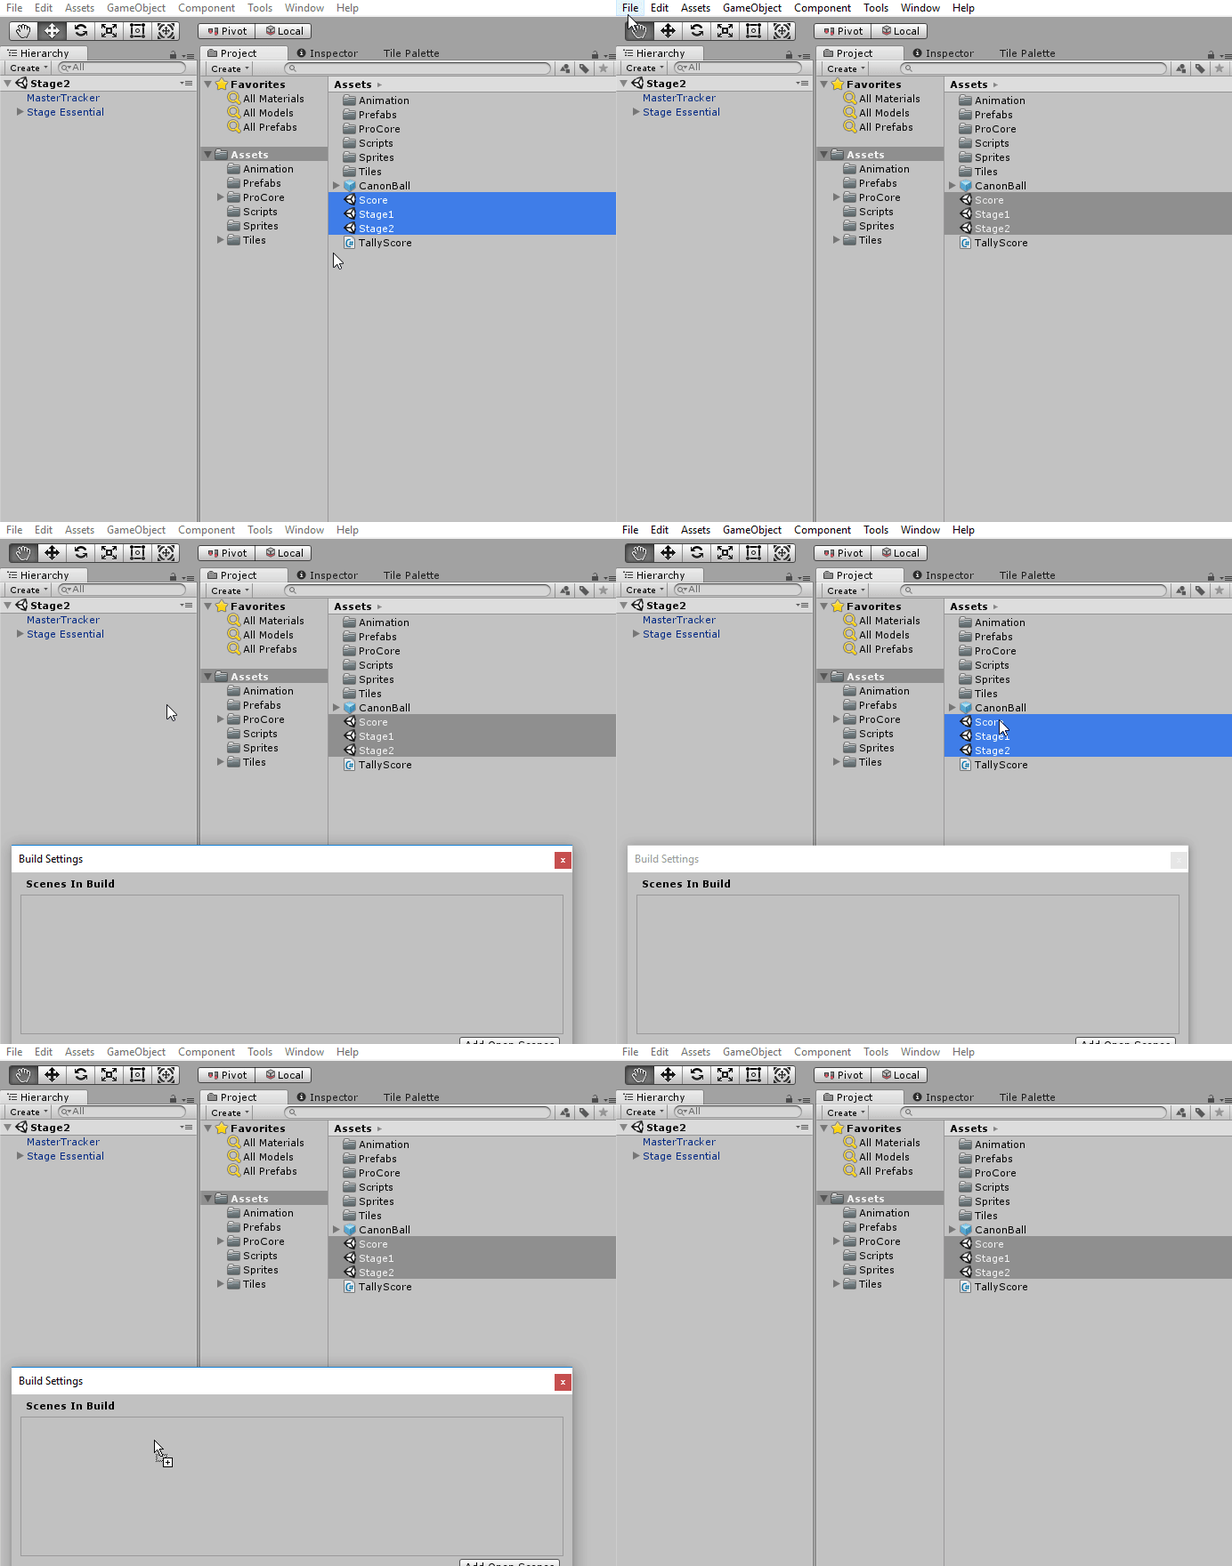
Now go back to Stage 1 and start the game!
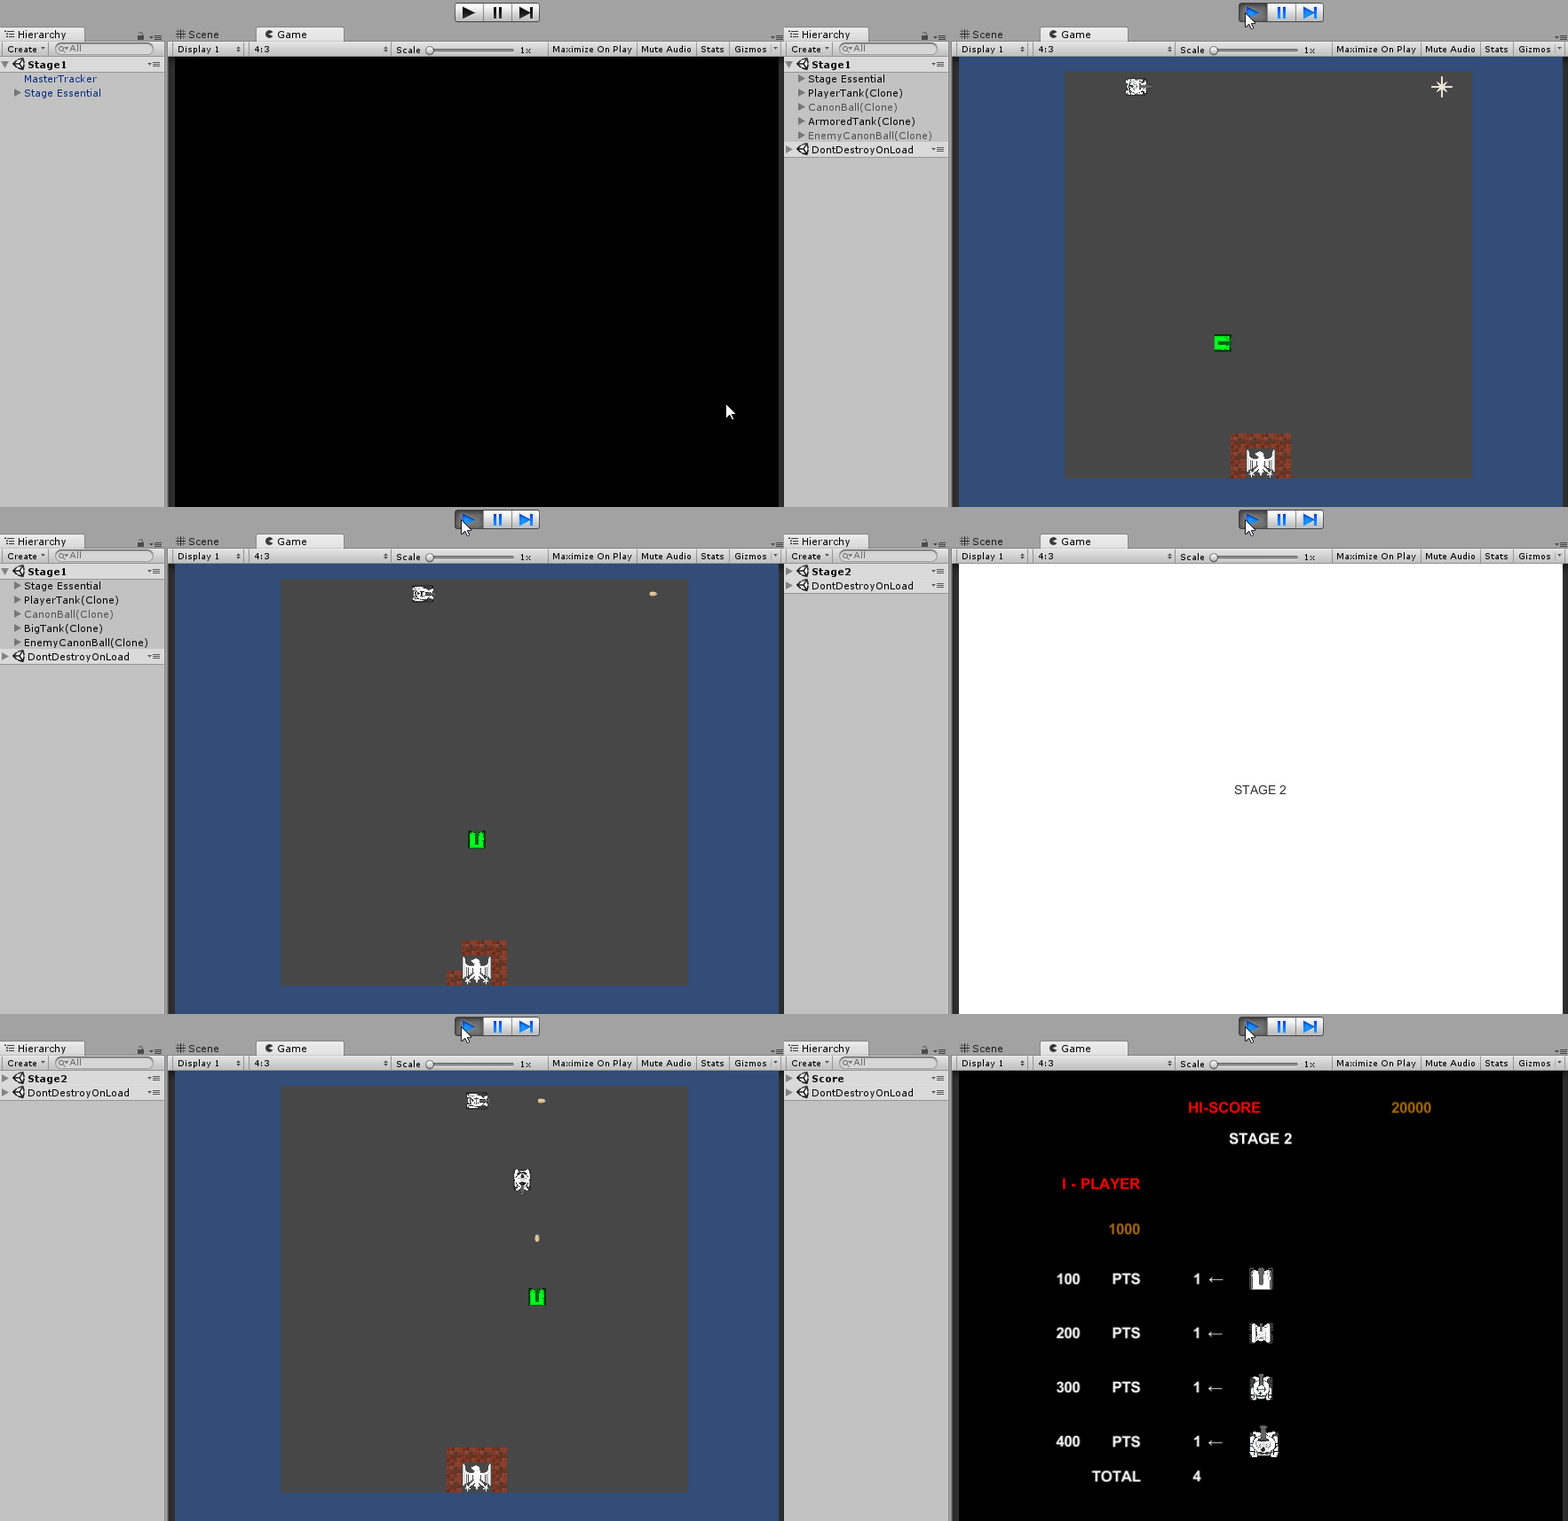
Time to design stages
Yeah! Its working and it will be very easy to create new stages. Next post will be the last and it’s on the Battle Status Board.
This article is Part 17 in a 25-Part Series.
- Introduction - Battle City in Unity Prequel
- Part 1 - Battle City in Unity Part l: Single(ton) Sole Survivor
- Part 2 - Battle City in Unity Part 2: Level Creation using Tilemaps
- Part 3 - Battle City in Unity Part 3: Creation of the Protagonist and Antagonists(Tanks)
- Part 4 - Battle City in Unity Part 4: Tank Movement
- Part 5 - Battle City in Unity Part 5: Player Controller
- Part 6 - Battle City in Unity Part 6: Enemy AI
- Part 7 - Battle City in Unity Part 7: Creating Projectiles
- Part 8 - Battle City in Unity Part 8: Hurting the tanks
- Part 9 - Battle City in Unity Part 9: Firing the shots
- Part 10 - Battle City in Unity Part 10: The Spawn
- Part 11 - Battle City in Unity Part 11 : The Gamemaker - Starting the Stage and Game Over
- Part 12 - Battle City in Unity Part 12 : Level Manager
- Part 13 - Battle City in Unity Part 13 : The Gamemaker - Spawning
- Part 14 - Battle City in Unity Part 14 : The Gamemaker - Stage Cleared or Game Over
- Part 15 - Battle City in Unity Part 15 : Spawning Invincibility
- Part 16 - Battle City in Unity Part 16 : Exploding Tank animation
- Part 17 - This Article
- Part 18 - Battle City in Unity Part 18 : Battle Status Board
- Part 19 - Battle City in Unity Part 19 : Bonus Crates - Generation
- Part 20 - Battle City in Unity Part 20 : Bonus Crates - Tank Extra Live
- Part 21 - Battle City in Unity Part 21 : Bonus Crates - Tank Invincibility
- Part 22 - Battle City in Unity Part 22 : Bonus Crates - Grenade
- Part 23 - Battle City in Unity Part 23 : Bonus Crates - Stopwatch
- Part 24 - Battle City in Unity Part 24 : Bonus Crates - Level Up
- Part 25 - Battle City in Unity Part 25 : Bonus Crates - Shovel
