Battle City in Unity Part 10: The Spawn
This article is Part 10 in a 25-Part Series.
- Introduction - Battle City in Unity Prequel
- Part 1 - Battle City in Unity Part l: Single(ton) Sole Survivor
- Part 2 - Battle City in Unity Part 2: Level Creation using Tilemaps
- Part 3 - Battle City in Unity Part 3: Creation of the Protagonist and Antagonists(Tanks)
- Part 4 - Battle City in Unity Part 4: Tank Movement
- Part 5 - Battle City in Unity Part 5: Player Controller
- Part 6 - Battle City in Unity Part 6: Enemy AI
- Part 7 - Battle City in Unity Part 7: Creating Projectiles
- Part 8 - Battle City in Unity Part 8: Hurting the tanks
- Part 9 - Battle City in Unity Part 9: Firing the shots
- Part 10 - This Article
- Part 11 - Battle City in Unity Part 11 : The Gamemaker - Starting the Stage and Game Over
- Part 12 - Battle City in Unity Part 12 : Level Manager
- Part 13 - Battle City in Unity Part 13 : The Gamemaker - Spawning
- Part 14 - Battle City in Unity Part 14 : The Gamemaker - Stage Cleared or Game Over
- Part 15 - Battle City in Unity Part 15 : Spawning Invincibility
- Part 16 - Battle City in Unity Part 16 : Exploding Tank animation
- Part 17 - Battle City in Unity Part 17 : Score Calculation
- Part 18 - Battle City in Unity Part 18 : Battle Status Board
- Part 19 - Battle City in Unity Part 19 : Bonus Crates - Generation
- Part 20 - Battle City in Unity Part 20 : Bonus Crates - Tank Extra Live
- Part 21 - Battle City in Unity Part 21 : Bonus Crates - Tank Invincibility
- Part 22 - Battle City in Unity Part 22 : Bonus Crates - Grenade
- Part 23 - Battle City in Unity Part 23 : Bonus Crates - Stopwatch
- Part 24 - Battle City in Unity Part 24 : Bonus Crates - Level Up
- Part 25 - Battle City in Unity Part 25 : Bonus Crates - Shovel
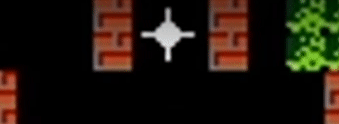
How does a spawn look like?
Let’s start by seeing a Spawn in action(Screenshot courtesy of Youtube)
So all we need is a Star. Let’s get to it. Drag and drop a Star Sprite into the Hierarchy, rename the Game Object created as 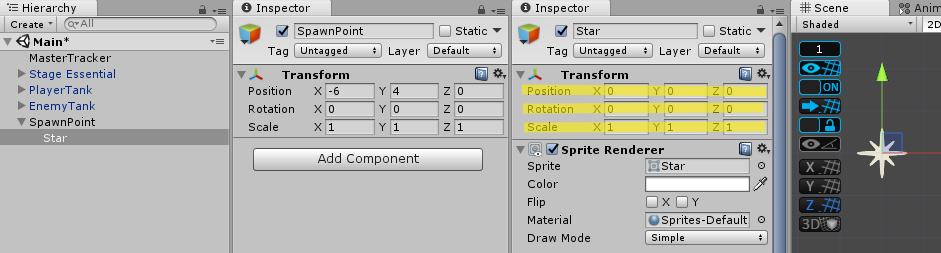
Some Coding
Add a new C# script to the SpawnPoint GameObject calling it
GameObject[] tanks;
GameObject tank;
[SerializeField]
bool isPlayer;
[SerializeField]
GameObject smallTank, fastTank, bigTank, armoredTank;
At the Start Monobehaviour routine of Spawner, add the below code to store the references to the prefabs of the tanks to tanks array (4 for enemy and smallTank Game Object only for the player)
void Start()
{
    if (isPlayer)
    {
        tanks = new GameObject[1] { smallTank };
    }
    else
    {
        tanks = new GameObject[4] { smallTank, fastTank, bigTank, armoredTank };
    }
}
Create a public routine called
public void StartSpawning()
{
    tank = Instantiate(tanks[Random.Range(0,tanks.Length)], transform.position, transform.rotation);
}
Create a public routine called
public void SpawnNewTank()
{
    if (tank != null) tank.SetActive(true);
}
Twinkle Twinkle Little Star
Now let’s do some animation for the Star. We are using animation as a means of a timer(it takes about 1 second from the Star twinkling to spawning a tank). Go to your Project Window, create an 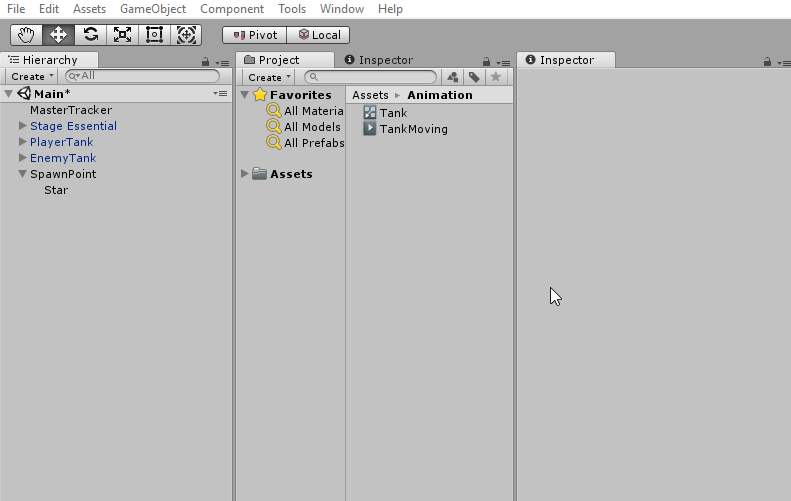
Open the Animation Window via the Unity Editor Menu(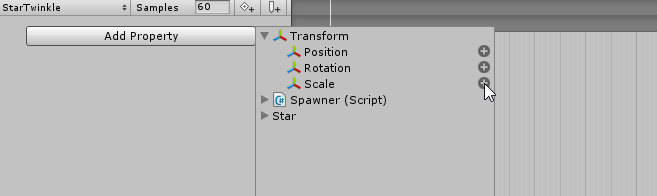
Once added, expand the drop-down for

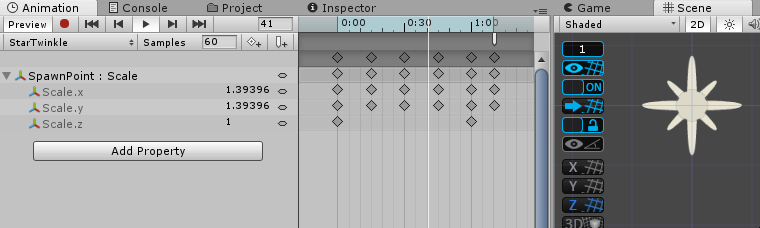
Now click on the red circle(symbolizing record). If it is depressed, means we are in recording mode. Click on the timeline at point 0:15, you should have a white line that will move to that position. Once the white line is at point 0:15, Set value of

Do the same for the above at timeline 0.45.
Now Click on the timeline at point 0:30, that white line should move to that position together. Once the white line is at point 0:30, Set value of Scale.x and Scale.y to 1.
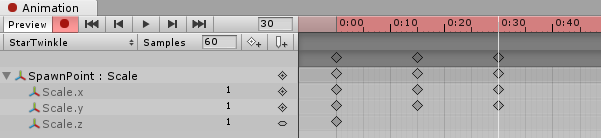
Do the same for the above at timeline 1.00.
Now Click on the timeline at point 1:10, that white line should move to that position together. Once the white line is at point 1:10, set the value of Scale.x and Scale.y to 0. Click on the Add Event button as indicated with the Mouse Pointer below.
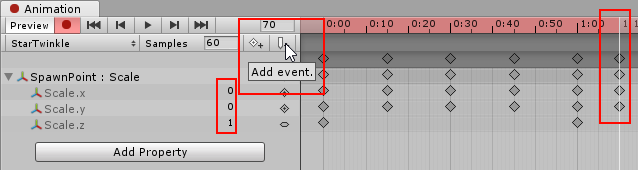
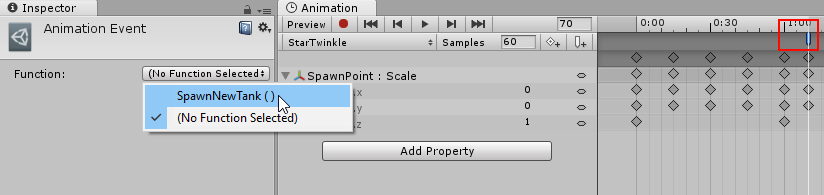
A white ribbon(turns blue when selected) will appear just below the 1.10 timeline. And the inspector should come up with the title “
Now Click back to the timeline at point 0:00, that white line should move to that position together. Once the white line is at point 0:00Click on the Add Event button as indicated with the Mouse Pointer below. A white ribbon(turns blue when selected) will appear just below the 0.00 timeline. And the inspector should come up with the title “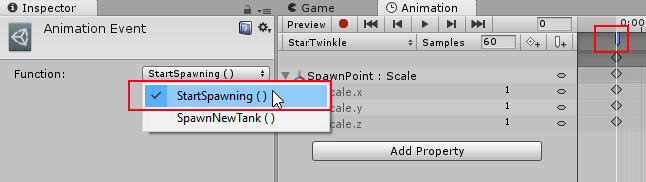
Click on the red circle symbolizing record to stop recording. Now your Star Twinkle animation is completed. Click on Play of the Animation to start singing Twinkle Twinkle Little Stars along with it.
Spawning the Enemies and Player
We are almost done. Now duplicate the SpawnPoint naming the duplicate

Now let’s place the SpawnPoint and PlayerSpawnPoint at different locations to see the spawn happening!
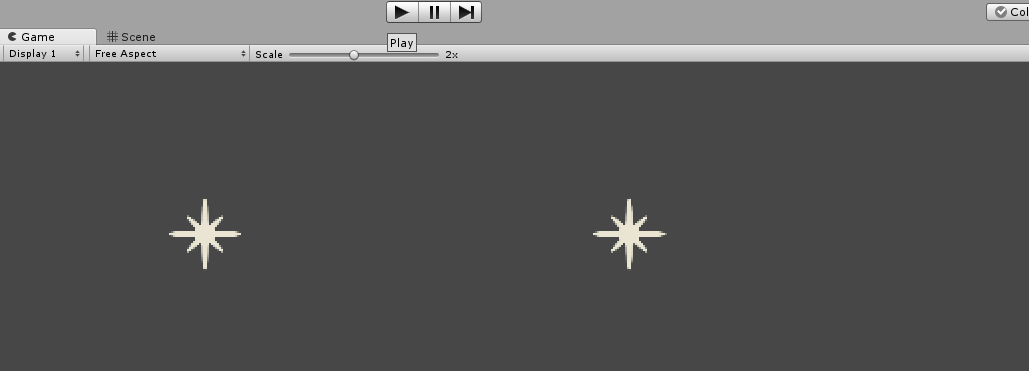
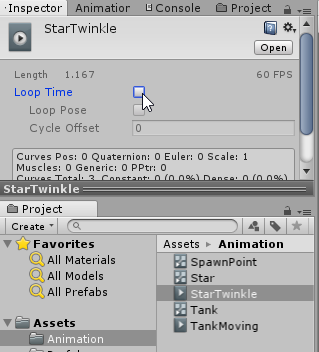
Ok. Not that good a demonstration. We will need to stop the animation from running, again and again, to prevent it spamming(I mean spawning).
Select the StarTwinkle animation and uncheck the
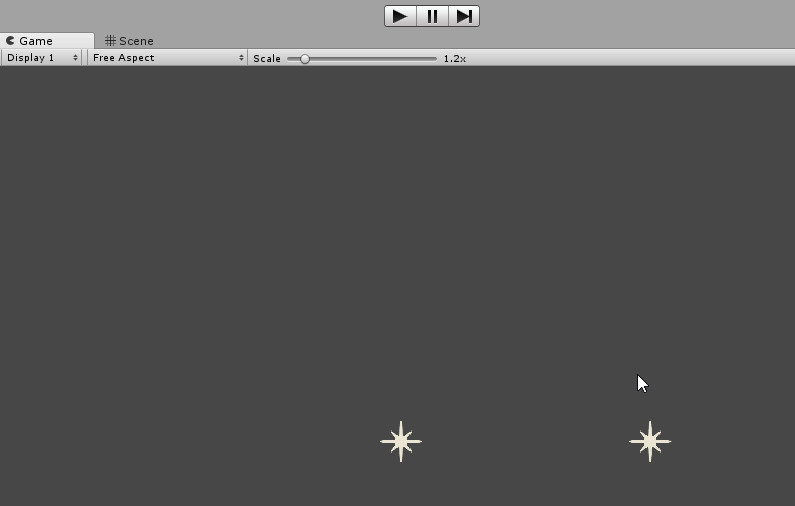
Let’s try again now!
Adding the finishing touches
Now to complete the spawning effects. Select both the SpawnPoint and PlayerSpawnPoint. Set both its Transform.Scale.x and Transform.Scale.y to 0. This is to make the Star disappear from view. The Star does not appear by default but only whenever there is a need to spawn a tank. So it is best to set it to invisible.

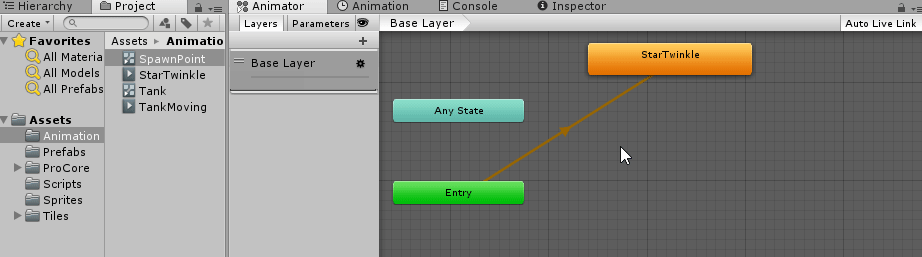
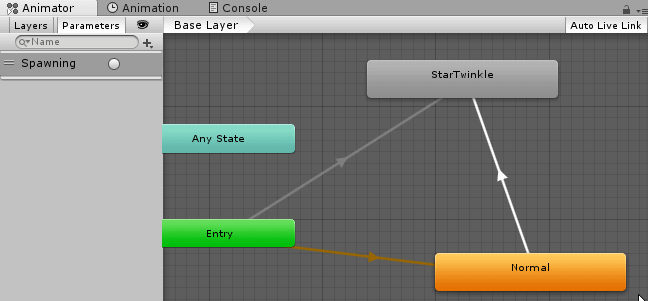
The next step is a means to trigger the spawning. As of now, we can only trigger it once which is by default. What we need to do is from the Animator add another state for the animation to transit to after spawning while waiting for another call to do the spawning again. Open up the Animator Window from Unity(
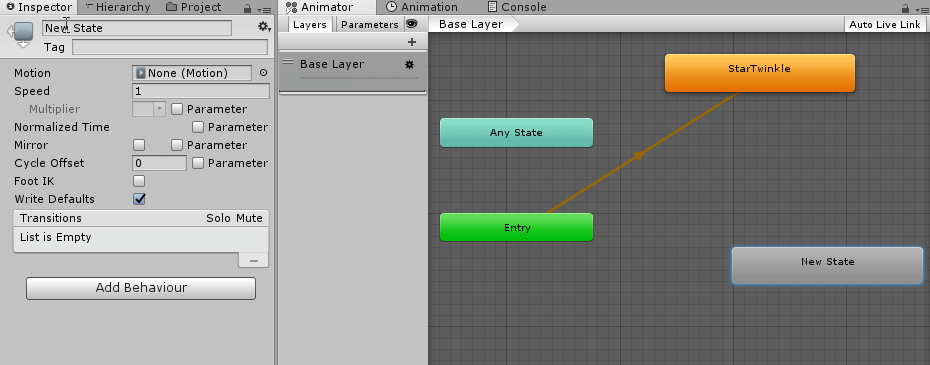
Right Click on the Animator Window Base Layer and select
Rename the New State as
From the Animator Window, go to the Parameters tab and create a trigger named
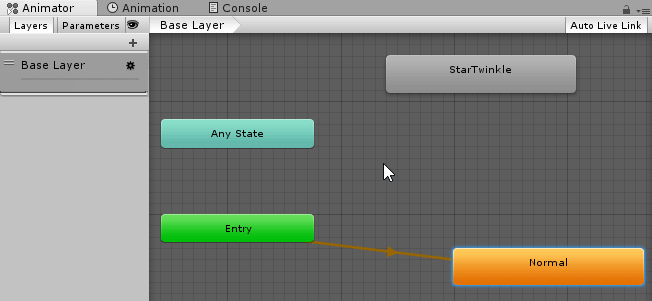
From the Animator Window, right click on the Entry box and select
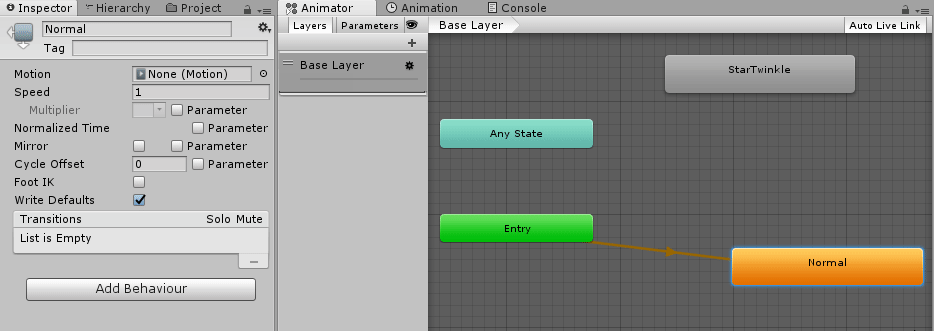
Add a Transition back from StarTwinkleBox to Normal.
Now let’s test the trigger for spawning.
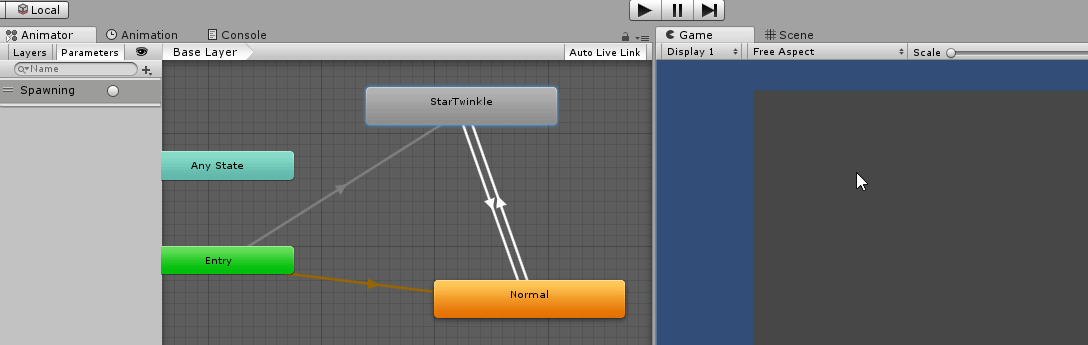
Perfect! So that is how we can do spawning.
This article is Part 10 in a 25-Part Series.
- Introduction - Battle City in Unity Prequel
- Part 1 - Battle City in Unity Part l: Single(ton) Sole Survivor
- Part 2 - Battle City in Unity Part 2: Level Creation using Tilemaps
- Part 3 - Battle City in Unity Part 3: Creation of the Protagonist and Antagonists(Tanks)
- Part 4 - Battle City in Unity Part 4: Tank Movement
- Part 5 - Battle City in Unity Part 5: Player Controller
- Part 6 - Battle City in Unity Part 6: Enemy AI
- Part 7 - Battle City in Unity Part 7: Creating Projectiles
- Part 8 - Battle City in Unity Part 8: Hurting the tanks
- Part 9 - Battle City in Unity Part 9: Firing the shots
- Part 10 - This Article
- Part 11 - Battle City in Unity Part 11 : The Gamemaker - Starting the Stage and Game Over
- Part 12 - Battle City in Unity Part 12 : Level Manager
- Part 13 - Battle City in Unity Part 13 : The Gamemaker - Spawning
- Part 14 - Battle City in Unity Part 14 : The Gamemaker - Stage Cleared or Game Over
- Part 15 - Battle City in Unity Part 15 : Spawning Invincibility
- Part 16 - Battle City in Unity Part 16 : Exploding Tank animation
- Part 17 - Battle City in Unity Part 17 : Score Calculation
- Part 18 - Battle City in Unity Part 18 : Battle Status Board
- Part 19 - Battle City in Unity Part 19 : Bonus Crates - Generation
- Part 20 - Battle City in Unity Part 20 : Bonus Crates - Tank Extra Live
- Part 21 - Battle City in Unity Part 21 : Bonus Crates - Tank Invincibility
- Part 22 - Battle City in Unity Part 22 : Bonus Crates - Grenade
- Part 23 - Battle City in Unity Part 23 : Bonus Crates - Stopwatch
- Part 24 - Battle City in Unity Part 24 : Bonus Crates - Level Up
- Part 25 - Battle City in Unity Part 25 : Bonus Crates - Shovel

