Battle City in Unity Part 9: Firing the shots
This article is Part 9 in a 25-Part Series.
- Introduction - Battle City in Unity Prequel
- Part 1 - Battle City in Unity Part l: Single(ton) Sole Survivor
- Part 2 - Battle City in Unity Part 2: Level Creation using Tilemaps
- Part 3 - Battle City in Unity Part 3: Creation of the Protagonist and Antagonists(Tanks)
- Part 4 - Battle City in Unity Part 4: Tank Movement
- Part 5 - Battle City in Unity Part 5: Player Controller
- Part 6 - Battle City in Unity Part 6: Enemy AI
- Part 7 - Battle City in Unity Part 7: Creating Projectiles
- Part 8 - Battle City in Unity Part 8: Hurting the tanks
- Part 9 - This Article
- Part 10 - Battle City in Unity Part 10: The Spawn
- Part 11 - Battle City in Unity Part 11 : The Gamemaker - Starting the Stage and Game Over
- Part 12 - Battle City in Unity Part 12 : Level Manager
- Part 13 - Battle City in Unity Part 13 : The Gamemaker - Spawning
- Part 14 - Battle City in Unity Part 14 : The Gamemaker - Stage Cleared or Game Over
- Part 15 - Battle City in Unity Part 15 : Spawning Invincibility
- Part 16 - Battle City in Unity Part 16 : Exploding Tank animation
- Part 17 - Battle City in Unity Part 17 : Score Calculation
- Part 18 - Battle City in Unity Part 18 : Battle Status Board
- Part 19 - Battle City in Unity Part 19 : Bonus Crates - Generation
- Part 20 - Battle City in Unity Part 20 : Bonus Crates - Tank Extra Live
- Part 21 - Battle City in Unity Part 21 : Bonus Crates - Tank Invincibility
- Part 22 - Battle City in Unity Part 22 : Bonus Crates - Grenade
- Part 23 - Battle City in Unity Part 23 : Bonus Crates - Stopwatch
- Part 24 - Battle City in Unity Part 24 : Bonus Crates - Level Up
- Part 25 - Battle City in Unity Part 25 : Bonus Crates - Shovel
Who’s calling the shots here
We have CanonBalls that can destroy bricks, steel walls, and tanks, but that is still not enough unless you don’t mind keep drag a CanonBall on to the Scene all the time. Let’s now give the ability of firing shots to the tanks!
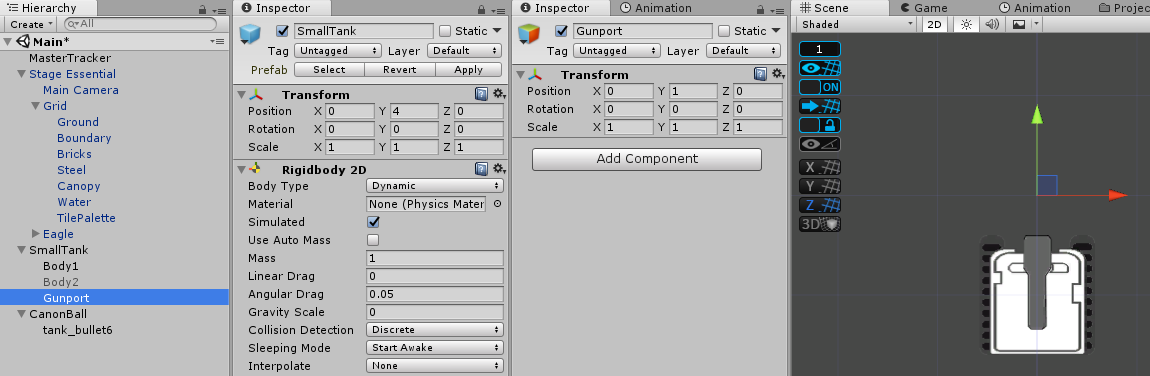
Spawning of canonballs needs to be from a logical position. If we were to take the tank’s position to spawn the canonball, it would appear that the tank gave birth to the canonball before it starts flying off. So we need to set the point where the CanonBall gets fired; it should be shot from a certain distance in front of the tank to prevent that childbirth illusion.
Let’s create a new Empty Game Object as a child of the Tank Game Object. We can call this Game Object
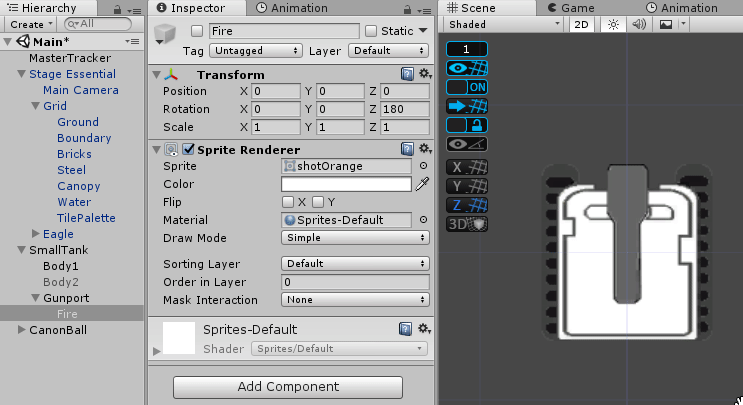
(Optional)No smoke without fire
Let’s also create an easy animation. Have a sprite with an image of fire ready and drag it to the Hierarchy. Unity will create a Game Object for you(I said that a lot of times), name it
What this does is that I can enable the Fire Game Object and then disable it to simulate a more realistic firing of Canon. Watch my mouse enable and disable the Fire Game Object to see what I mean.
Programming the fire sequence: Reload the CanonBall
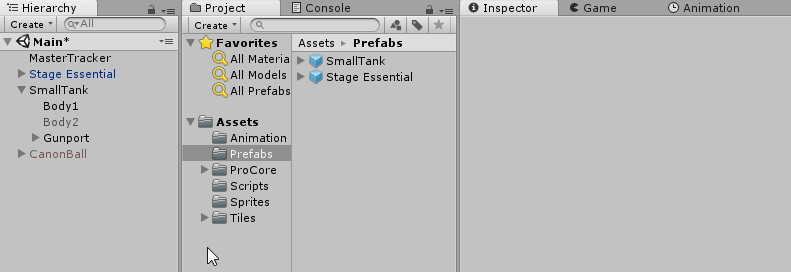
Let’s start by prefabing the
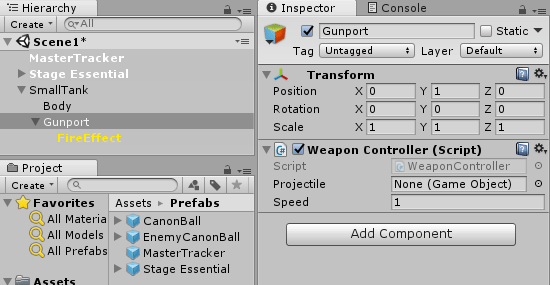
Now it’s time to get your hands dirty and start coding. Let’s start by creating a new C# script component under the Gunport, we will call it
We need to create a SerializeField GameObject called
[SerializeField]
GameObject projectile;
GameObject canonBall;
Projectile canon;
[SerializeField]
int speed=1;
Next, we will instantiate the CanonBall, setting its position and rotation to that of Gunport and store its reference to canonBall variable. And save the reference to the Projectile script to canon. Then pass the speed value to projectile’s speed variable value. We will do this in the
void Start ()
{
    canonBall = Instantiate(projectile, transform.position, transform.rotation) as GameObject;
    canon = canonBall.GetComponent<Projectile>();
    canon.speed = speed;
}
We will then create a public routine called
We will also need to check if the CanonBall is inactive before allowing everything else to prevent firing of more than 1 shot at any time.(The CanonBall can only be fired again when it hits an obstacle and set inactive).
public void Fire()
{
    if (canonBall.activeSelf == false)
    {
        canonBall.transform.position = transform.position;
        canonBall.transform.rotation = transform.rotation;
        canonBall.SetActive(true);
    }
}
Lastly, let’s add the code to tell when the CanonBall should destroy itself. Remember the
We will also add a check to make sure CanonBall is already instantiated before we run the DestroyProjectile command.
void OnDestroy()
{
    if (canonBall != null) canon.DestroyProjectile();
}
(optional) Hmm, I almost forgot about the animation. To have the animation, we need to get the reference to the FireEffect Game Object. We will create a new GameObject Variable called fire. And assign it the reference of the FireEffect GameObject by using Transform.GetChild(0). This grabs the first child of Gunport. There is only one child(FireEffect) for Gunport so we are safe. We then create a coroutine(I’m calling it
GameObject canonBall, fire; //with existing code
void Start () {
    canonBall = Instantiate(projectile, transform.position, transform.rotation) as GameObject; //existing code
    canon = canonBall.GetComponent<Projectile>();//existing code
    canon.speed = speed;//existing code
    fire = transform.GetChild(0).gameObject;
}
public void Fire()
{
    if (canonBall.activeSelf == false)
    {
        canonBall.transform.position = transform.position; //existing code
        canonBall.transform.rotation = transform.rotation; //existing code
        StartCoroutine(ShowFire());
        canonBall.SetActive(true); //existing code
    }
}
IEnumerator ShowFire()
{
    fire.SetActive(true);
    yield return new WaitForSeconds(0.3f);
    fire.SetActive(false);
}
That’s all we need for our WeaponController. Full code as below.
using System.Collections;
using System.Collections.Generic;
using UnityEngine;

public class WeaponController : MonoBehaviour {
    [SerializeField]
    GameObject projectile;
    GameObject canonBall, fire;
    Projectile canon;
    [SerializeField]
    int speed;
    void Start () {
        canonBall = Instantiate(projectile, transform.position, transform.rotation) as GameObject;
        canon = canonBall.GetComponent<Projectile>();
        canon.speed = speed
        fire = transform.GetChild(0).gameObject;
    }
    public void Fire()
    {
        if (canonBall.activeSelf == false)
        {
            canonBall.transform.position = transform.position;
            canonBall.transform.rotation = transform.rotation;
            StartCoroutine(ShowFire());
            canonBall.SetActive(true);
        }
    }
    IEnumerator ShowFire()
    {
    	fire.SetActive(true);
    	yield return new WaitForSeconds(0.3f);
    	fire.SetActive(false);
    }
    private void OnDestroy()
    {
        if (canonBall != null) canon.DestroyProjectile();
    }
}
Giving tanks authority to fire off: Player Tank
We move back to the
Let’s first create a
WeaponController wc;
void Start () {
    wc = GetComponentInChildren<WeaponController>();
    rb2d = GetComponent<Rigidbody2D>(); //existing code
}
We will use Input.GetKeyDown to detect the key pressed in the Update Monobehaviour routine. Using GetKeyDown means press and hold to fire rapidly is useless as it identifies only the moment you press down the key, we are shooting canonballs here not a machine gun! This also ensures we do not strain the Update function(I am a nice guy) to trigger the Fire command(triggered through the reference variable wc). It is useless anyway as we have coded as such in the WeaponController that you can only fire 1 shot at a time.
void Update () {
    h = Input.GetAxisRaw("Horizontal"); //existing code
    v = Input.GetAxisRaw("Vertical"); //existing code
    if (Input.GetKeyDown(KeyCode.Space))
    {
        wc.Fire();
    }
}
That’s all the code we need to let the player fire off canonballs. Now let’s try it out. Add the Player Script back to the Guniea Pig Tank and disable the EnemyAI script if you have it. Also,
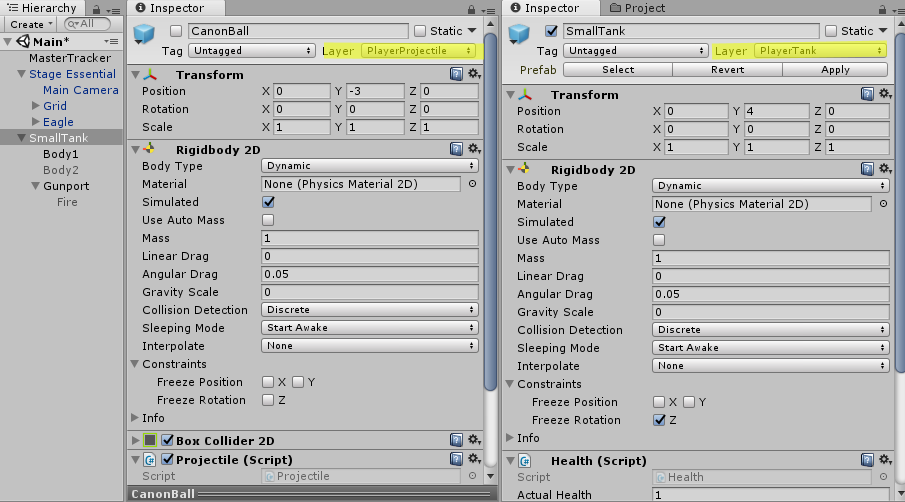
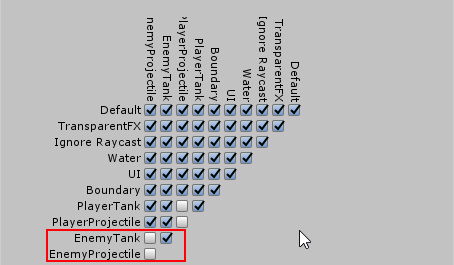
Create a new Layer called PlayerTank and assign the layer to the Guinea Pig Tank. Create a new Layer called PlayerProjectile and assign it to the Prefab of CanonBall.
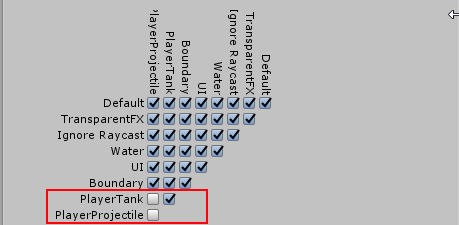
Go to Physics2D settings in Unity (Edit -> Project Settings -> Physics2D) and make the below highlighted changes. This is to ensure the Player’s CanonBall will not collide with the Player’s tank or another Player’s CanonBall.
OK. Live firing in progress, please stay out!

That’s all for Player script till now. Full Script as below.
using System.Collections;
using System.Collections.Generic;
using UnityEngine;

public class Player : Movement {
    float h, v;
    Rigidbody2D rb2d;
    WeaponController wc;
    void Start ()
    {
        wc = GetComponentInChildren<WeaponController>();
        rb2d = GetComponent<Rigidbody2D>();
    }
    void FixedUpdate()
    {
        if (h != 0 && !isMoving) StartCoroutine(MoveHorizontal(h, rb2d));
        else if (v != 0 && !isMoving) StartCoroutine(MoveVertical(v, rb2d));
    }
    void Update ()
    {
        h = Input.GetAxisRaw("Horizontal");
        v = Input.GetAxisRaw("Vertical");
        if (Input.GetKeyDown(KeyCode.Space))
        {
            wc.Fire();
        }
    }
}
Giving tanks authority to fire off: Enemy Tank
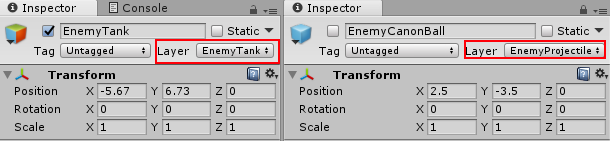
Let’s start by duplicating our Guinea Pig Tank and naming the Duplicate EnemyTank. Go to its Gunport GameObject and changing the Projectile variable in the Inspector to EnemyCanonBall.
Create 2 new layers named EnemyTank and EnemyProjectile. Assign the layer EnemyTank to EnemyTank Game Object and layer EnemyProjectile to the EnemyCanonBall prefab.
Go to Physics2D settings in Unity (
This is to ensure the Enemy’s CanonBall will not collide with the Enemy’s tank.
We move to the EnemyAI Script to give enemies the opportunity to fire off the CanonBalls! We start off by creating a WeaponController variable(I’m calling it wc) to store the reference of WeaponController script in the Gunport. We save the reference in the Start Monobehaviour routine using GetComponentInChildren as Gunport is a child of the Tank, so we are getting the component that belongs the child of Tank Game Object.
WeaponController wc;
void Start () {
    rb2d = GetComponent<Rigidbody2D>(); //existing code
    RandomDirection(); //existing code
    wc = GetComponentInChildren<WeaponController>();
}
Next is to create the random timer to fire off. What I will do is to mimic the
void Start()
{
    rb2d = GetComponent<Rigidbody2D>();
    RandomDirection();
    wc = GetComponentInChildren<WeaponController>();
    Invoke("FireWhenWanted", Random.Range(1f, 5f));
}
void FireWhenWanted()
{
    wc.Fire();
    Invoke("FireWhenWanted", Random.Range(1f, 5f));
}
Summary
Now we are ready to try a shoot out between the Good Guy and the Bad Guys! I change my sprite with green color so I can identify myself from the enemies. I have also duplicate some more enemy tanks so that I can test my skills!
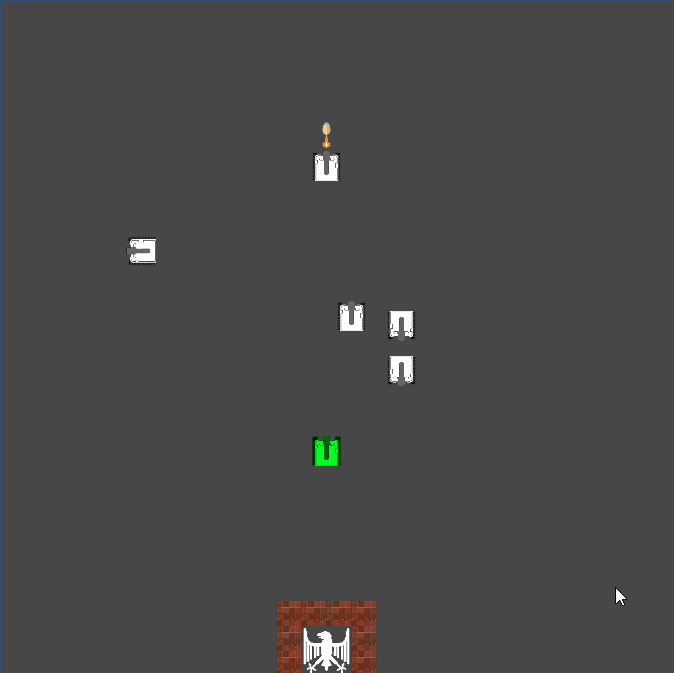
Great Game! But in the end I got overwhelmed by the enemies. Now
using System.Collections;
using System.Collections.Generic;
using UnityEngine;

public class EnemyAI : Movement {
    Rigidbody2D rb2d;
    float h, v;
    [SerializeField]
    LayerMask blockingLayer;
    WeaponController wc;
    enum Direction { Up, Down, Left, Right };
    void Start()
    {
        rb2d = GetComponent<Rigidbody2D>();
        RandomDirection();
        wc = GetComponentInChildren<WeaponController>();
        Invoke("FireWhenWanted", Random.Range(1f, 5f));
    }
    public void RandomDirection()
    {
        CancelInvoke("RandomDirection");
        List<Direction> lottery = new List<Direction>();
        if (!Physics2D.Linecast(transform.position, (Vector2)transform.position + new Vector2(0, 1), blockingLayer))
        {
            lottery.Add(Direction.Right);
        }
        if (!Physics2D.Linecast(transform.position, (Vector2)transform.position + new Vector2(0, -1), blockingLayer))
        {
            lottery.Add(Direction.Left);
        }
        if (!Physics2D.Linecast(transform.position, (Vector2)transform.position + new Vector2(1, 0), blockingLayer))
        {
            lottery.Add(Direction.Up);
        }
        if (!Physics2D.Linecast(transform.position, (Vector2)transform.position + new Vector2(-1, 0), blockingLayer))
        {
            lottery.Add(Direction.Down);
        }
        Direction selection = lottery[Random.Range(0, lottery.Count)];
        if (selection == Direction.Up)
        {
            v = 1;
            h = 0;
        }
        if (selection == Direction.Down)
        {
            v = -1;
            h = 0;
        }
        if (selection == Direction.Right)
        {
            v = 0;
            h = 1;
        }
        if (selection == Direction.Left)
        {
            v = 0;
            h = -1;
        }
        Invoke("RandomDirection", Random.Range(3, 6));
    }
    void FireWhenWanted()
    {
        print("FireWhenWanted");
        wc.Fire();
        Invoke("FireWhenWanted", Random.Range(1f, 5f));
    }
    void OnCollisionEnter2D(Collision2D collision)
    {
        RandomDirection();
    }
    void FixedUpdate()
    {
        if (v != 0 && isMoving == false) StartCoroutine(MoveVertical(v, rb2d));
        else if (h != 0 && isMoving == false) StartCoroutine(MoveHorizontal(h, rb2d));
    }
}
This article is Part 9 in a 25-Part Series.
- Introduction - Battle City in Unity Prequel
- Part 1 - Battle City in Unity Part l: Single(ton) Sole Survivor
- Part 2 - Battle City in Unity Part 2: Level Creation using Tilemaps
- Part 3 - Battle City in Unity Part 3: Creation of the Protagonist and Antagonists(Tanks)
- Part 4 - Battle City in Unity Part 4: Tank Movement
- Part 5 - Battle City in Unity Part 5: Player Controller
- Part 6 - Battle City in Unity Part 6: Enemy AI
- Part 7 - Battle City in Unity Part 7: Creating Projectiles
- Part 8 - Battle City in Unity Part 8: Hurting the tanks
- Part 9 - This Article
- Part 10 - Battle City in Unity Part 10: The Spawn
- Part 11 - Battle City in Unity Part 11 : The Gamemaker - Starting the Stage and Game Over
- Part 12 - Battle City in Unity Part 12 : Level Manager
- Part 13 - Battle City in Unity Part 13 : The Gamemaker - Spawning
- Part 14 - Battle City in Unity Part 14 : The Gamemaker - Stage Cleared or Game Over
- Part 15 - Battle City in Unity Part 15 : Spawning Invincibility
- Part 16 - Battle City in Unity Part 16 : Exploding Tank animation
- Part 17 - Battle City in Unity Part 17 : Score Calculation
- Part 18 - Battle City in Unity Part 18 : Battle Status Board
- Part 19 - Battle City in Unity Part 19 : Bonus Crates - Generation
- Part 20 - Battle City in Unity Part 20 : Bonus Crates - Tank Extra Live
- Part 21 - Battle City in Unity Part 21 : Bonus Crates - Tank Invincibility
- Part 22 - Battle City in Unity Part 22 : Bonus Crates - Grenade
- Part 23 - Battle City in Unity Part 23 : Bonus Crates - Stopwatch
- Part 24 - Battle City in Unity Part 24 : Bonus Crates - Level Up
- Part 25 - Battle City in Unity Part 25 : Bonus Crates - Shovel

