Battle City in Unity Part 3: Creation of the Protagonist and Antagonists(Tanks)
This article is Part 3 in a 25-Part Series.
- Introduction - Battle City in Unity Prequel
- Part 1 - Battle City in Unity Part l: Single(ton) Sole Survivor
- Part 2 - Battle City in Unity Part 2: Level Creation using Tilemaps
- Part 3 - This Article
- Part 4 - Battle City in Unity Part 4: Tank Movement
- Part 5 - Battle City in Unity Part 5: Player Controller
- Part 6 - Battle City in Unity Part 6: Enemy AI
- Part 7 - Battle City in Unity Part 7: Creating Projectiles
- Part 8 - Battle City in Unity Part 8: Hurting the tanks
- Part 9 - Battle City in Unity Part 9: Firing the shots
- Part 10 - Battle City in Unity Part 10: The Spawn
- Part 11 - Battle City in Unity Part 11 : The Gamemaker - Starting the Stage and Game Over
- Part 12 - Battle City in Unity Part 12 : Level Manager
- Part 13 - Battle City in Unity Part 13 : The Gamemaker - Spawning
- Part 14 - Battle City in Unity Part 14 : The Gamemaker - Stage Cleared or Game Over
- Part 15 - Battle City in Unity Part 15 : Spawning Invincibility
- Part 16 - Battle City in Unity Part 16 : Exploding Tank animation
- Part 17 - Battle City in Unity Part 17 : Score Calculation
- Part 18 - Battle City in Unity Part 18 : Battle Status Board
- Part 19 - Battle City in Unity Part 19 : Bonus Crates - Generation
- Part 20 - Battle City in Unity Part 20 : Bonus Crates - Tank Extra Live
- Part 21 - Battle City in Unity Part 21 : Bonus Crates - Tank Invincibility
- Part 22 - Battle City in Unity Part 22 : Bonus Crates - Grenade
- Part 23 - Battle City in Unity Part 23 : Bonus Crates - Stopwatch
- Part 24 - Battle City in Unity Part 24 : Bonus Crates - Level Up
- Part 25 - Battle City in Unity Part 25 : Bonus Crates - Shovel
Now we are in the most popular section(but not necessary most important) of any game development, the character creation. Probably due to the abundance of character sprites which looks very attractive, people seem to spend a lot of time on character creation and its animation.
For me, animations are nice to have and provide an excellent visual experience for players but not necessary something we need to focus much on until we sort out the gameplay itself. In fact, my tanks are crap derivatives to the artists who provided the artwork so pardon my graphics because my artwork sucks.
How I usually go about animation is by manipulating its transform position, scale and rotation or by looping using two sprites which have minimal differences to create an illusion of an animation.
Who’s your daddy!
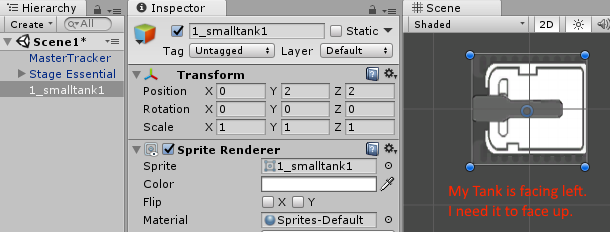
Let’s start by creating the smallest tank in the game. Drag and drop one of the sprites of your small tank to the Hierarchy and Unity will generate the Game Object for you. You will realize it might not be facing the direction you want.

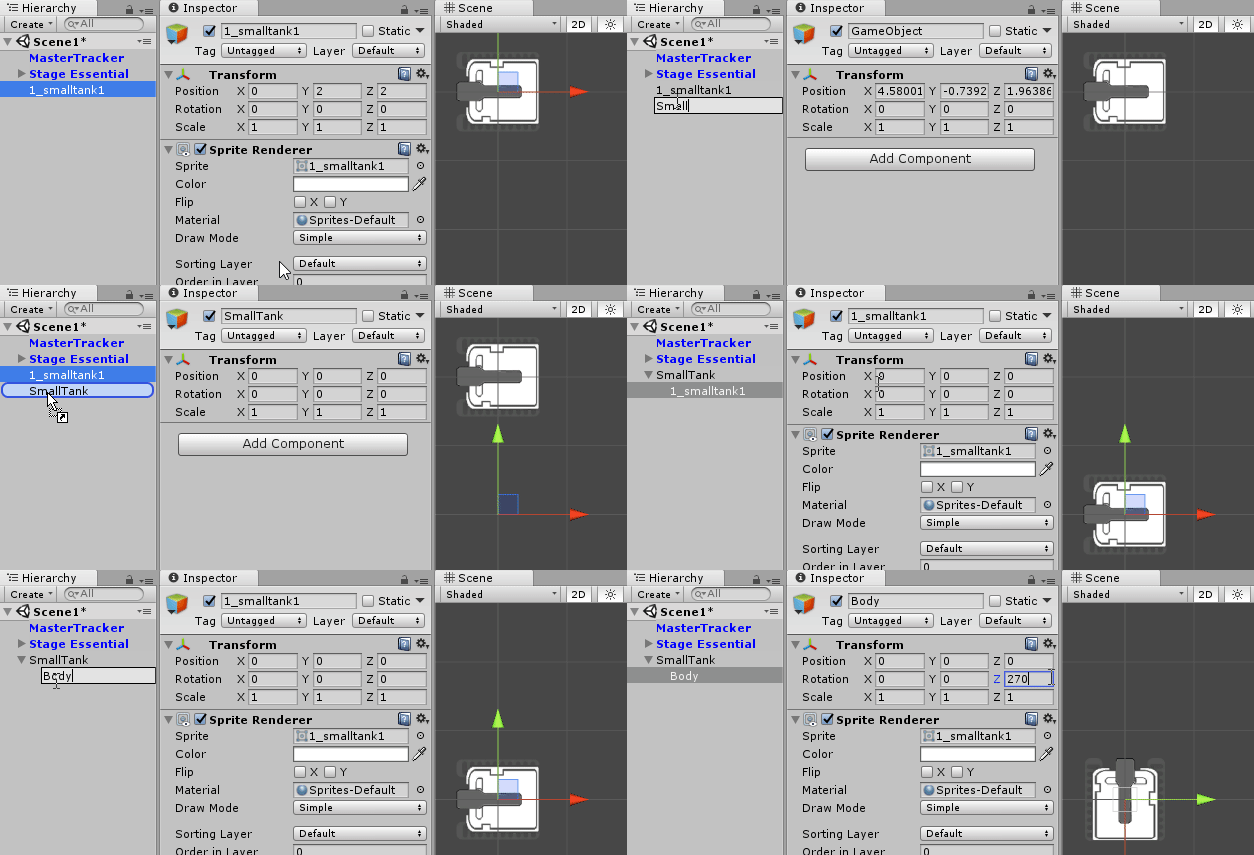
You could change the rotation of the Tank Game Object you create by changing it from the transform. But this will make things look a bit messy as the optimal is to have your Game Object Transform Rotation at 0 for X, Y, Z.
The way to overcome it is to create an empty Game Object and rename the empty Game Object as

Optional: If you wish to create animation for your tank. Check out my post for that, it teaches you how to create reusable animation with just 2 sprites!
Rest of the Tanks
Regardless if you intend to create animation or not, it will be straightforward to create the rest of the tanks. Just duplicate the SmallTank and rename the duplicate accordingly to the names you want for the rest of the tanks(mine are FastTank, BigTank and ArmoredTank). Change the sprite(s) in the child Game Object(s) to the different Sprites you have created for the other tanks, and you will have 4 tanks!

That marks the end of creation of the tanks. In the next post we will talk about how to move the tank.
This article is Part 3 in a 25-Part Series.
- Introduction - Battle City in Unity Prequel
- Part 1 - Battle City in Unity Part l: Single(ton) Sole Survivor
- Part 2 - Battle City in Unity Part 2: Level Creation using Tilemaps
- Part 3 - This Article
- Part 4 - Battle City in Unity Part 4: Tank Movement
- Part 5 - Battle City in Unity Part 5: Player Controller
- Part 6 - Battle City in Unity Part 6: Enemy AI
- Part 7 - Battle City in Unity Part 7: Creating Projectiles
- Part 8 - Battle City in Unity Part 8: Hurting the tanks
- Part 9 - Battle City in Unity Part 9: Firing the shots
- Part 10 - Battle City in Unity Part 10: The Spawn
- Part 11 - Battle City in Unity Part 11 : The Gamemaker - Starting the Stage and Game Over
- Part 12 - Battle City in Unity Part 12 : Level Manager
- Part 13 - Battle City in Unity Part 13 : The Gamemaker - Spawning
- Part 14 - Battle City in Unity Part 14 : The Gamemaker - Stage Cleared or Game Over
- Part 15 - Battle City in Unity Part 15 : Spawning Invincibility
- Part 16 - Battle City in Unity Part 16 : Exploding Tank animation
- Part 17 - Battle City in Unity Part 17 : Score Calculation
- Part 18 - Battle City in Unity Part 18 : Battle Status Board
- Part 19 - Battle City in Unity Part 19 : Bonus Crates - Generation
- Part 20 - Battle City in Unity Part 20 : Bonus Crates - Tank Extra Live
- Part 21 - Battle City in Unity Part 21 : Bonus Crates - Tank Invincibility
- Part 22 - Battle City in Unity Part 22 : Bonus Crates - Grenade
- Part 23 - Battle City in Unity Part 23 : Bonus Crates - Stopwatch
- Part 24 - Battle City in Unity Part 24 : Bonus Crates - Level Up
- Part 25 - Battle City in Unity Part 25 : Bonus Crates - Shovel

