Unity Asset Package: Lazy 2D Level Creator - Automated 2D Level creator in Unity
Introduction
One of the main hassles in 2D Game creation is level creation. In unity, people will usually create different scenes for each level. Imagine your 2D game have a few hundred levels(think puzzle games), are you going to create hundreds of scenes just for that and adding them to build settings? I will show you an easy way to create levels easily and yet only require one scene for all the levels. The key concept is adapted from quill18’s youtube video on Fast and Easy Level Editor
What is needed
All we need is to have a ScriptableObject to store all the information required and call it to generate the level. Simple! Wait, there is more. To make the process easier, we need to tweak a little by modifying the inspector of the ScriptableObject. Then all that’s left is to create a means to generate the level at will.
Explanation of the level generation
I highly recommend to look at quill18’s youtube video to better understand how the generation is done, after all, a video depicts a thousand pictures and a picture says a thousand words, so a video equals a million words. But if you find it a hassle, TL;DR it is to:
- Create an image file, read individual pixels in the file and gather all the unique colors
- Create a list of the unique colors assembled and mapped each color to a gameobject or tile/tilemap
- Read the image file and using the mapping created in step 2, generate the mapped gameobject or tile/tilemap against the color on the position on scene corresponding to the pixel position in the image file. (Pixel position 0,2 will have its mapped object created at position 0,2 in the scene)
Create the image file(map)
This part is actually out of scope, but I felt this could help people to understand how to create the level map easily. I will use the NES game Battle City as an example of this. We can get all the maps of the game Battle City from StrategyWiki website.
Below is the stage 1 map extracted from the website. 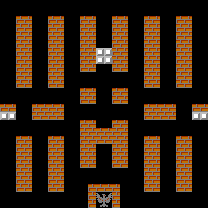 The maps of Battle City are of grid size 26 by 26, and the extracted map from the website is of size 208 by 208. So what we can do is to shrink the image by eight times(I used Paint.net’s Image->Resize…). We will get all the details on the map at the pixel level. We will get the below. (I removed the eagle from the map to simplify the image as I am only using this for demonstration purposes)
 You can also create your map by drawing pixel by pixel or use a map image you want and shrink them accordingly.
Create the ScriptableObject
Now we can create the scriptableObject. The information we will need is a list of texture2d(maps) to store all the maps we want to create the levels from. We will also need a list of color to gameobject or tile/tilemap mappings so we will know what is to be generated at each position. We will store this information into a separate class called ObjectList(I will use tile/tilemap). Lastly, we will need a single texture2D as a temporary placeholder. This single texture2D is to load a map then allow us to extract all the unique colors and add the map to the list of texture2D.
LevelData.cs
using System.Collections.Generic;
using UnityEngine;
using UnityEngine.Tilemaps;
[CreateAssetMenu]
public class LevelData : ScriptableObject
{
    public Texture2D map;
    public List<ObjectList> items = new List<ObjectList>();
    public List<Texture2D> maps = new List<Texture2D>();
}
[System.Serializable]
public class ObjectList
{
    public Color color;
    /* To be used if you are using tile/tilemap */
    public TileBase tile;
    public GameObject tilemap;

    public ObjectList(Color color)
    {
        this.color = color;
    }
}
Custom Inspector for the ScriptableObject
I created a custom inspector for the scriptableobject so that we can store the information and extract the unique colors from the map all from the ScriptableObject itself.
Basically what we will do is load a map to the single texture2D and click a button named “Add to ScriptableObject”, a routine will read the map and extract the unique colors in the map. We will only add unique colors(colors are “rounded” such that the max number of colors we can use is to 1000. This is to prevent every so slight deviation of color resulting in another different object.
We will then store the map into the list of texture2D(maps). As the automated loading of next level is sequential, it is necessary to get the sequence in the list of map correct, so I have made that list a reorderablelist so that we can perform reordering of the sequence on the fly.
On reading the map, we will also modify the import settings of the image so that it can be read by the program(set read/write enable) and there will be no loss of quality of the image(Compression none and Filter Mode Point)
LevelDataEditor.cs
using System.Collections;
using System;
using System.Linq;
using System.Collections.Generic;
using UnityEngine;
using UnityEditor;
using UnityEditorInternal;
[CustomEditor(typeof(LevelData))]
public class LevelDataEditor : Editor
{
ReorderableList mapList;
SerializedProperty map, colorToTileMapping;
LevelData levelData;
private void OnEnable() {
/* create the reorderablelist */
mapList = new ReorderableList(serializedObject, serializedObject.FindProperty("maps"), true, true, false, false);
mapList.drawHeaderCallback = (Rect rect) => {EditorGUI.LabelField(new Rect(rect.x + 10, rect.y, rect.width-10, rect.height),serializedObject.FindProperty("maps").displayName);};
mapList.drawElementCallback = (Rect rect, int index, bool isActive, bool isFocused) => {
var element = mapList.serializedProperty.GetArrayElementAtIndex(index);
rect.y += 2;
EditorGUI.ObjectField( new Rect(rect.x, rect.y, rect.width, EditorGUIUtility.singleLineHeight), element, GUIContent.none);
};
mapList.elementHeightCallback = (int indexer) => {return mapList.elementHeight;};
map = serializedObject.FindProperty("map");
colorToTileMapping = serializedObject.FindProperty("colorToTileMappings");
}
public override void OnInspectorGUI()
{
serializedObject.Update();
levelData = target as LevelData;
EditorGUILayout.PropertyField(map,true);
if (GUILayout.Button("Add to ScriptableObject")) AddToScriptableObject();
EditorGUILayout.PropertyField(colorToTileMapping,true);
serializedObject.ApplyModifiedProperties();
mapList.DoLayoutList();
}
private void AddToScriptableObject()
{
if (levelData.map != null)
{
/* update the import settings of the map */
TextureImporter tImporter = AssetImporter.GetAtPath(AssetDatabase.GetAssetPath(levelData.map)) as TextureImporter;
tImporter.isReadable = true;
tImporter.filterMode = FilterMode.Point;
tImporter.compressionQuality = 0;
tImporter.SaveAndReimport();
List<Color> pixel = CreateColorSelector().ToList();
/* Add the new map to the ScriptableObject */
levelData.maps.Add(levelData.map);
/* Get all the unique colors from the new map */
List<Color> colors = levelData.colorToTileMappings.Select(item => item.color).ToList();
/* Add the unique colors which are not yet stored in the ScriptableObject */
foreach (Color pix in pixel) if (!(colors.Contains(pix))) levelData.colorToTileMappings.Add(new ObjectList(pix));
levelData.map = null;
}
}
private HashSet<Color> CreateColorSelector()
{
HashSet<Color> pix = new HashSet<Color>();
int width = Mathf.FloorToInt(levelData.map.width);
int height = Mathf.FloorToInt(levelData.map.height);
for (int i = 0; i < width; i++)
{
for (int j = 0; j < height; j++)
{
Color colorToCheck = levelData.map.GetPixel(i, j);
/* color rounding before adding */
pix.Add(new Color((float)Math.Round(colorToCheck.r, 1), (float)Math.Round(colorToCheck.g, 1), (float)Math.Round(colorToCheck.b, 1)));
}
}
return pix;
}
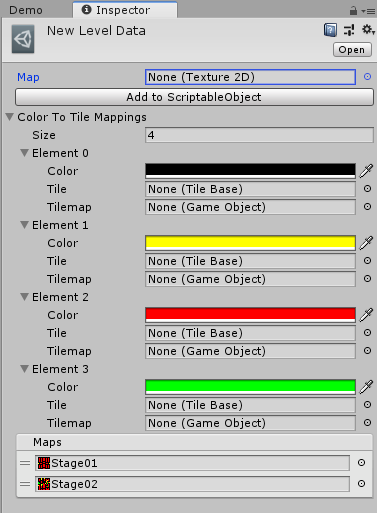
}After creating the custom inspector and proceed to add some maps to the ScriptableObject, we should see something like the below.
Loading of the GameObjects or Tile/Tilemap mappings in the ScriptableObject
For each of the color, we need to map it to a corresponding GameObject or Tile/Tilemap(I am using tile/tilemap) so that the program will know what is to be generated at the position on the scene equivalent to that of the pixel position in the image. If you want to do the GameObject you should use GameObject in ObjectList instead of TileBase and GameObject; I am demonstrating for tilemap as it has extra steps on top of GameObject which you all can figure out by just looking at the tilemap example here.
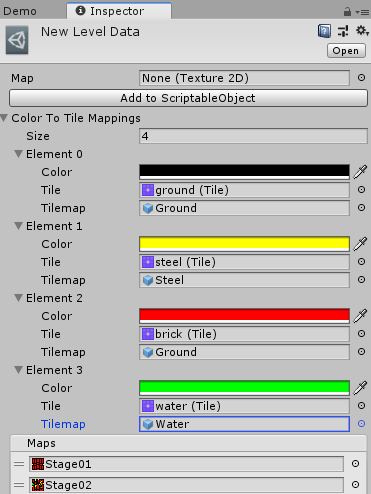
Let’s start by adding a tile. A tile is created when you add a tile to a tile palette. This will create a tile asset which you can add to the mapping. As for tilemap, you will need to build in the scene, make the necessary settings(e.g. tilemap colliders 2d, order in layer, composite collider 2d) and make it a prefab. Then add the prefab as part of the mapping. After adding the tile/tilemap, your ScriptableObject should look like the below:
Load the levels (finally!)
Now onto how to load the levels. The code below is creating an Editor Window to load the ScriptableObject and loop the mapList to get the map to generate the level. The part of generation is at the GenerateLevel routine where we get the map and read through each of the pixels and compare its color against the color mapping and load its corresponding gameobject or tile/tilemap. As we will be reusing the same scene to generate the next level, we should use a parent GameObject(for tile/tilemap I used a Grid GameObject as parent) to create tiles/gameobject under so that when we generate the next level, we can destroy the parent GameObject and recreate it to clean up the scene. I am using the tilemap, so I will need to run a loop twice, first to create the tilemap then to do setTile on the corresponding tilemap based on the position of tile equivalent to that of the pixel position.
Demo.cs
using UnityEngine;
using UnityEditor;
using System;
using UnityEngine.Tilemaps;
public class Demo : EditorWindow
{
    public LevelData levelData;
    static int levelToLoad = 0;
    [MenuItem("Lazy_Level_Creator/Demo")]
    private static void ShowWindow()
    {
        var window = GetWindow<Demo>();
        window.titleContent = new GUIContent("Demo");
        window.Show();
    }

    private void OnGUI()
    {
        ScriptableObject scriptableObj = this;
        SerializedObject serialObj = new SerializedObject(scriptableObj);
        SerializedProperty serialProp = serialObj.FindProperty("levelData");
        EditorGUILayout.PropertyField(serialProp, true);
        serialObj.ApplyModifiedProperties();
        if (GUILayout.Button("Generate Level Now!"))
        {
            if (levelData != null)
            {
                if (levelToLoad >= levelData.maps.Count) levelToLoad = 0;
                GenerateLevel(levelToLoad);
                levelToLoad++;
            }
            else Debug.Log("Please add level Data");
        }
    }
    void GenerateLevel(int index)
    {
        Texture2D mapToUse = levelData.maps[index];
        if (mapToUse == null) return;
        GameObject.DestroyImmediate(GameObject.Find("Grid"));
        GameObject Grid = new GameObject("Grid");
        Grid.AddComponent<Grid>();
        Grid.transform.position = Vector3.zero;
        foreach (ObjectList obj in levelData.colorToTileMappings)
        {
            if (obj.color != null && obj.tile != null && obj.tilemap != null)
            {
                GameObject tileMap = Instantiate(obj.tilemap, Vector3.zero, Quaternion.identity, Grid.transform);
                tileMap.name = obj.tilemap.name;
            }
        }
        for (int x = 0; x < mapToUse.width; x++)
        {
            for (int y = 0; y < mapToUse.height; y++)
            {
                Color pixelColor = mapToUse.GetPixel(x, y);
                pixelColor = new Color((float)Math.Round(pixelColor.r, 1), (float)Math.Round(pixelColor.g, 1), (float)Math.Round(pixelColor.b, 1));
                foreach (ObjectList obj in levelData.colorToTileMappings)
                {
                    if (obj.color != null && obj.tile != null && obj.tilemap != null && obj.color.Equals(pixelColor))
                    {
                        Vector3Int pos = new Vector3Int(x, y, 0);
                        Tilemap tileM = Grid.transform.Find(obj.tilemap.name).GetComponent<Tilemap>();
                        tileM.SetTile(pos, obj.tile);
                    }
                }
            }
        }
    }
}
Summary TL:DR?
This whole thing is too long? No worries, I have created this as an Asset Store package(Lazy 2D Level Creator). I have also included demos on it, sometimes practical is better than theroey so looking at it live is probably a better way to learn this.


