How to create a custom Hierarchy for your Unity 3D with an editor
The Hierarchy window in Unity is a placeholder of every GameObject in the current Scene. Information such as whether the game object is a clone of a prefab and whether the game object is inactive can be derived solely based on the hierarchy window without clicking on each game object in the hierarchy and looking at its inspector. Unfortunately, the design is as primitive as it can be. You can see that from the screenshot below.
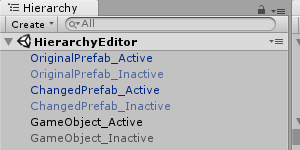 The prefab game object will be displayed with a blue color font while a game object that is not a prefab will be shown with the default black color font and inactive game objects are shown with a lighter color tone font.
So I decided to make the hierarchy better for my benefit and share it with you all for yours too. At the end of this, you should be able to have your hierarchy looking at the below. (I have named the game objects to show what type of game object it is representing)
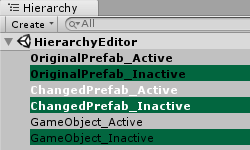
I will also throw in an editor so that you can change the colors if my taste in that does not suit you!
Core Code: Crediting Unity3Dcollege
Bulk of the codes here are from Unity3DCollege available in video walkthrough on youtube. What I will do is to tell about my differences and the rest is to check out the video tutorial from Jason of Unity3DCollege who gave a very detailed explanation of the code. In short:
- The code has a
InitializeOnLoad to run the static functions in the class immediately once the Unity Editor is available. - The
CustomHierarchy is to run the HandleHierarchyWindowItemOnGUI function at the OnGUI events of all items in the Hierarchy Window. - The
HandleHierarchyWindowItemOnGUI static function is the place where we put our code to modify the hierarchy items.
using UnityEditor;
using UnityEngine;
[InitializeOnLoad]
public class CustomHierarchy : MonoBehaviour
    static CustomHierarchy()
    {
        EditorApplication.hierarchyWindowItemOnGUI += HandleHierarchyWindowItemOnGUI;
    }
    private static void HandleHierarchyWindowItemOnGUI(int instanceID, Rect selectionRect)
    {
		//code to edit the hierarchy here
    }
}
Differentiating the prefab instance: Crediting Unity3Dcollege
Same as the Core Code, bulk of this code are from the Unity3DCollege youtube video tutorial so check out the tutorial for the explanation. In summary, it is to check if the item at the Hierarchy is a prefab. If it is, set it with a black color bold font.
Color fontColor = Color.Black; // default color
FontStyle styleFont = FontStyle.Normal; //default font style
var obj = EditorUtility.InstanceIDToObject(instanceID);
if (obj != null)
{
    var prefabType = PrefabUtility.GetPrefabType(obj);
    if (prefabType == PrefabType.PrefabInstance)
    {
        styleFont = FontStyle.Bold;
        fontColor = Color.Black;
    }
    Rect offsetRect = new Rect(selectionRect.position + offset, selectionRect.size);
	EditorGUI.LabelField(offsetRect, obj.name, new GUIStyle()
	{
	    normal = new GUIStyleState() { textColor = fontColor },
	    fontStyle = styleFont
	}
	);
}
Differentiating a prefab instance that has changes
Now on to my changes. To differentiate out a prefab instance that has changes from its prefab, we will use the PrefabUtility.GetPropertyModifications to get all the modifications done to the instance. We will need to filter out some of the changes which will occur when you create a prefab instance(i got those through trial and error). Any more modifications will mean that it is a prefab instance which has changed. If it has changed, then we will set its font to white.
PropertyModification[] prefabMods = PrefabUtility.GetPropertyModifications(obj);
foreach (PropertyModification prefabMod in prefabMods)
{
    if (prefabMod.propertyPath.ToString() != "m_Name" && prefabMod.propertyPath.ToString() != "m_LocalPosition.x" && prefabMod.propertyPath.ToString() != "m_LocalPosition.y" && prefabMod.propertyPath.ToString() != "m_LocalPosition.z" && prefabMod.propertyPath.ToString() != "m_LocalRotation.x" && prefabMod.propertyPath.ToString() != "m_LocalRotation.y" && prefabMod.propertyPath.ToString() != "m_LocalRotation.z" && prefabMod.propertyPath.ToString() != "m_LocalRotation.w" && prefabMod.propertyPath.ToString() != "m_RootOrder" && prefabMod.propertyPath.ToString() != "m_IsActive")
    {
        fontColor = Color.white;
        break;
    }
}Differentiating an inactive Game Object
This is the easiest of the lot. What we need to do is to get the Game Object that the item in Hierarchy is referring to and check if it is inactive. If it is, we will set a green highlight on the item in the hierarchy.
GameObject gameObj = EditorUtility.InstanceIDToObject(instanceID) as GameObject;
if (gameObj.activeInHierarchy == false)
{
    backgroundColor = new Color(0.01f, 0.4f, 0.25f;
}
//earlier codes are omitted for focus
EditorGUI.DrawRect(selectionRect, backgroundColor);
Because we are adding the DrawRect function with a new background color. We will need to declare a default background color so that we will not see any anomaly trying to set a null background color. We also need it to set the default selection background color when we are selecting an item. These are all part of the Youtube tutorial of Unity3DCollege.
using System.Linq;
Color backgroundColor = new Color(.76f, .76f, .76f);
//earlier code are omitted for focus
if (Selection.instanceIDs.Contains(instanceID))
{
    backgroundColor = new Color(0.24f, 0.48f, 0.90f);
}
Preparation for Editor
To create an editor for changing the colors on the fly, we will need to declare some public static variables. To be specific, these will be color variables which will be used to update the color. They will default to their original color.
public static Color gameObjectFontColor = Color.black;
public static Color prefabOrgFontColor = Color.black;
public static Color prefabModFontColor = Color.white;
public static Color inActiveColor = new Color(0.01f, 0.4f, 0.25f);
Merging all together
That is all for the code walkthrough. Below is the full code for the Custom Hierarchy. Next up will be creating the Editor.
using System.Linq;
using UnityEditor;
using UnityEngine;
//Adapted from Unity3DCollege YouTube Video Tutorial https://www.youtube.com/watch?v=pdDrY8Mc2lU
[InitializeOnLoad]
public class CustomHierarchy : MonoBehaviour
{
    private static Vector2 offset = new Vector2(0, 2);
    public static Color gameObjectFontColor = Color.black;
    public static Color prefabOrgFontColor = Color.black;
    public static Color prefabModFontColor = Color.white;
    public static Color inActiveColor = new Color(0.01f, 0.4f, 0.25f);
    static CustomHierarchy()
    {
        EditorApplication.hierarchyWindowItemOnGUI += HandleHierarchyWindowItemOnGUI;
    }
    private static void HandleHierarchyWindowItemOnGUI(int instanceID, Rect selectionRect)
    {
        Color fontColor = gameObjectFontColor;
        Color backgroundColor = new Color(.76f, .76f, .76f);
        FontStyle styleFont = FontStyle.Normal;
        var obj = EditorUtility.InstanceIDToObject(instanceID);
        GameObject gameObj = EditorUtility.InstanceIDToObject(instanceID) as GameObject;
        if (Selection.instanceIDs.Contains(instanceID))
        {
            backgroundColor = new Color(0.24f, 0.48f, 0.90f);
        }
        if (obj != null)
        {
            var prefabType = PrefabUtility.GetPrefabType(obj);
            if (gameObj.activeInHierarchy == false)
            {
                backgroundColor = inActiveColor;
            }
            if (prefabType == PrefabType.PrefabInstance)
            {
                styleFont = FontStyle.Bold;
                PropertyModification[] prefabMods = PrefabUtility.GetPropertyModifications(obj);
                foreach (PropertyModification prefabMod in prefabMods)
                {
                    if (prefabMod.propertyPath.ToString() != "m_Name" && prefabMod.propertyPath.ToString() != "m_LocalPosition.x" && prefabMod.propertyPath.ToString() != "m_LocalPosition.y" && prefabMod.propertyPath.ToString() != "m_LocalPosition.z" && prefabMod.propertyPath.ToString() != "m_LocalRotation.x" && prefabMod.propertyPath.ToString() != "m_LocalRotation.y" && prefabMod.propertyPath.ToString() != "m_LocalRotation.z" && prefabMod.propertyPath.ToString() != "m_LocalRotation.w" && prefabMod.propertyPath.ToString() != "m_RootOrder" && prefabMod.propertyPath.ToString() != "m_IsActive")
                    {
                        fontColor = prefabModFontColor;
                        break;
                    }
                }
                if (fontColor != prefabModFontColor) fontColor = prefabOrgFontColor;
            }
            Rect offsetRect = new Rect(selectionRect.position + offset, selectionRect.size);
            EditorGUI.DrawRect(selectionRect, backgroundColor);
            EditorGUI.LabelField(offsetRect, obj.name, new GUIStyle()
            {
                normal = new GUIStyleState() { textColor = fontColor },
                fontStyle = styleFont
            }
            );
        }
    }
}
Editor Code
Code for the editor is quite straightforward because of the prep works we did earlier.
using UnityEditor;

public class HierarchyEditor : EditorWindow
{
    [MenuItem("Tools/Hierarchy Editor")]
    public static void ShowWindow()
    {
        GetWindow<HierarchyEditor>("HierarchyEditor");
    }
    private void OnGUI()
    {
        CustomHierarchy.gameObjectFontColor = EditorGUILayout.ColorField("Original Font Color", CustomHierarchy.gameObjectFontColor);
        CustomHierarchy.prefabOrgFontColor = EditorGUILayout.ColorField("Prefab Original Font Color", CustomHierarchy.prefabOrgFontColor);
        CustomHierarchy.prefabModFontColor = EditorGUILayout.ColorField("Prefab Modified Font Color", CustomHierarchy.prefabModFontColor);
        CustomHierarchy.inActiveColor = EditorGUILayout.ColorField("Inactive Color", CustomHierarchy.inActiveColor);
    }
}
Enjoy fruits of your labor
Now you can launch your new editor window from Tools->Hierarchy Editor.
You can, of course, adapt it further to add more color to differentiate different game object types.

