How to save time using excel(Part 2): Editing your recorded Macro - Minimal code involved
This post is written specifically for people who uses excel a lot. There are a lot of tasks which are always repeated again and again when you work with excel. What if you can create a keyboard shortcut to all these repeatable tasks? I will teach you how to create your own one. (my repetive tasks might be different from yours). Second and last part of the series teaches how to edit the code. First part of the series teaches you how to record your repeatable task using macros. Please go through the first part if not you might be lost in the explanation below.
Uhide your Personal Macro Workbook
If you have followed through and done the first part, you will have know that your macro is actually stored in a location in your computer, just that it is not visible to you. Once you have saved the Personal Macro Workbook, excel will create PERSONAL.XLSB which is the baseline excel template that will be used when you create a new excel file. All your macros that you created and save in Personal Macro Workbook will be stored there. In order for us to modify the code of the macros that you recorded, you will need to unhide it. To do this, go to View Ribbon->Unhide->PERSONAL.XLSB->OK.
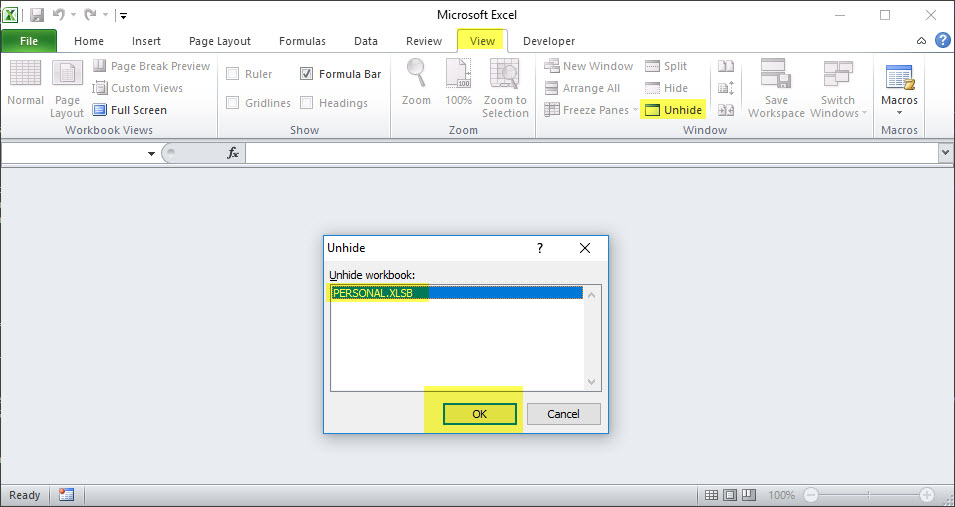
Doing so will open up the hidden Personal Macro Workbook.
Edit the macro
Now we will be able to edit the macros you have recorded. Go to Developer Ribbon->Macros->Select the Macro Name->Edit
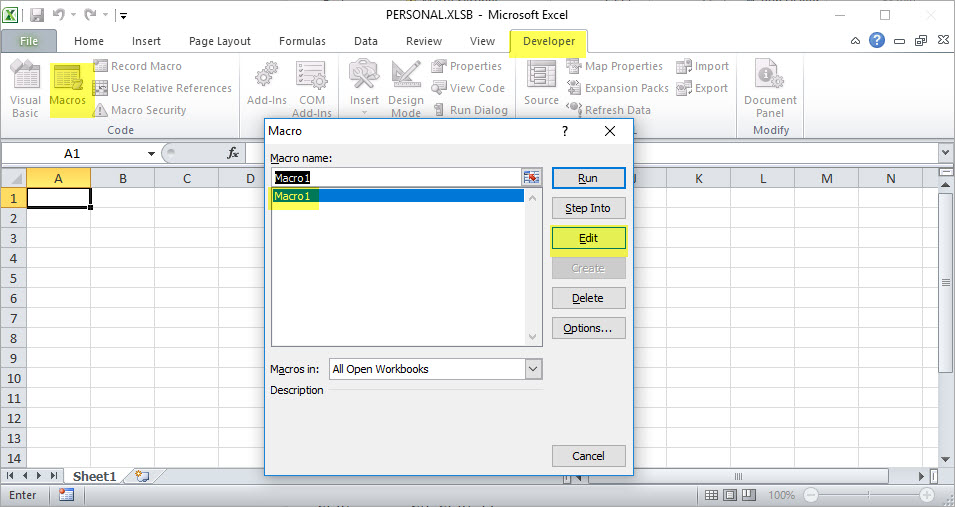
Start editing macro
Now you should see a new window appearing under Microsoft Visual Basic for Applications and the code you see will be the one that you actually “written” based on the few clicks of a button earlier when recording macro.
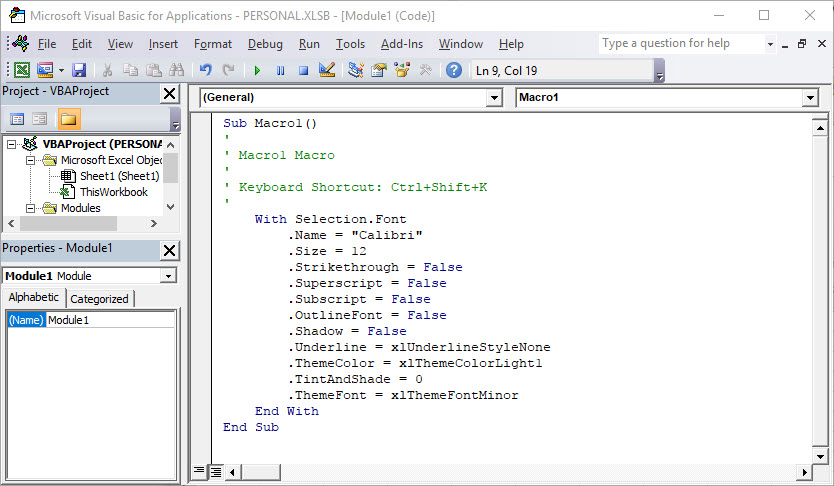
How to edit this?
What you see on the window might look daunting in the first place especially if you have zero background in programming. But you can actually see that the code is written in plain english. Like for example the code i showed above, you can see what is doing is changing the font and the values are named similar if not the same as what can be shown in the excel. Even if they are slightly different, you should be able to determine the mapping by looking at what is displayed in excel. (See illustration below)
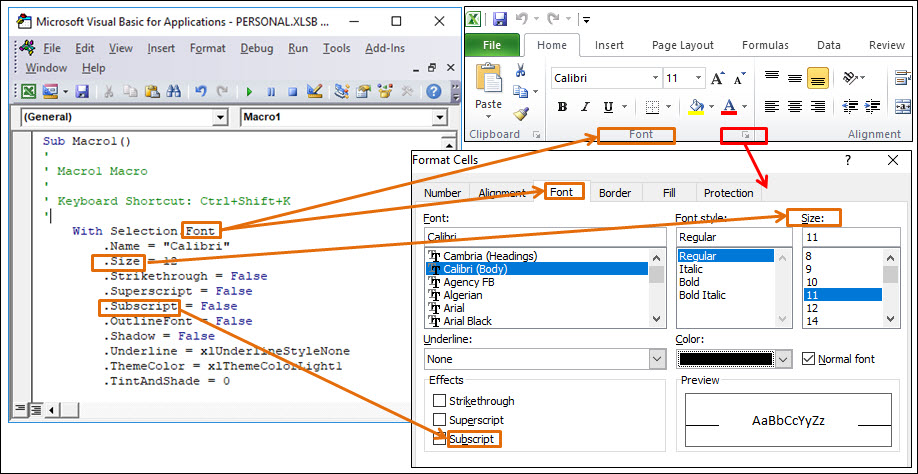
Note the key to amending the code is actually on the code Selection. Because most of your automation will be on what you have selected, so this portion of the code will be the most reused as automation(pressing your keyboard shortcut) will be relative to what is selected in exel and will be a good reference point for you to reuse and remember your shortcut. To know what code to put in, the best way is to record the macro and show its code.
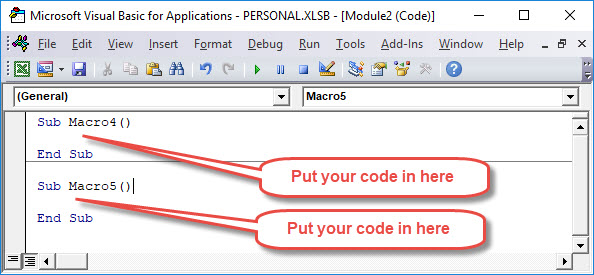
Adding new Macros using code without recording
You do not need to do another recording in order to create the automation anymore. You can manually input the code to create the macro. You just need to place your code within a Sub Macro Name()
Create keyboard shortcut after adding new macros using code
Your shortcuts will not be convenient for use unless you set a keyboard shortcut to it. To do that, save your PERSONAL.XLSB and click on Macros. This will show all the macros you have recorded and written using code. Select the macro you want to create a keyboard shortcut and click Options…
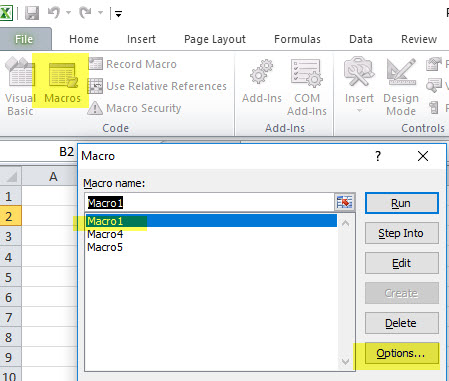
Now you should be able to see the Macro Options window to set your keyboard shortcut (See Part 1 to know how to do it)
Example codes
If you are feeling lazy to try out and create your own macro. You can use some of the below which i created to make my life easier. Let me know if you want some other automation using excel macro available, I will add to the below as well. You can just copy and paste everything below to your Microsoft Visual Basic for Applications Window and assign shortcut accordingly. I have named the macros so it is self explanatory what it does.
Sub InsertNewRowOnTop()
    Selection.EntireRow.Insert
End Sub

Sub InsertNewColumnToLeft()
    Selection.EntireColumn.Insert
End Sub

Sub CreateThinBordersToAllCellsInSelection()
'I use a a lot with CreateThickBorderToTheOtherMostCellsInSelection in order to format a table for printing
    With Selection.Borders(xlEdgeLeft)
        .LineStyle = xlContinuous
        .Weight = xlThin
    End With
    With Selection.Borders(xlEdgeTop)
        .LineStyle = xlContinuous
        .Weight = xlThin
    End With
    With Selection.Borders(xlEdgeBottom)
        .LineStyle = xlContinuous
        .Weight = xlThin
    End With
    With Selection.Borders(xlEdgeRight)
        .LineStyle = xlContinuous
        .Weight = xlThin
    End With
    With Selection.Borders(xlInsideVertical)
        .LineStyle = xlContinuous
        .Weight = xlThin
    End With
    With Selection.Borders(xlInsideHorizontal)
        .LineStyle = xlContinuous
        .Weight = xlThin
    End With
End Sub


Sub CreateThickBorderToTheOtherMostCellsInSelection()
'I use a a lot with CreateThinBordersToAllCellsInSelection in order to format a table for printing
    With Selection.Borders(xlEdgeLeft)
        .LineStyle = xlContinuous
        .ColorIndex = 0
        .TintAndShade = 0
        .Weight = xlMedium
    End With
    With Selection.Borders(xlEdgeTop)
        .LineStyle = xlContinuous
        .ColorIndex = 0
        .TintAndShade = 0
        .Weight = xlMedium
    End With
    With Selection.Borders(xlEdgeBottom)
        .LineStyle = xlContinuous
        .ColorIndex = 0
        .TintAndShade = 0
        .Weight = xlMedium
    End With
    With Selection.Borders(xlEdgeRight)
        .LineStyle = xlContinuous
        .ColorIndex = 0
        .TintAndShade = 0
        .Weight = xlMedium
    End With

End Sub


Sub WrapOrUnwrapText()
'Some additional codes(if else) which you need in order to have the toggle effect of wrap and unwrap text
If Selection.WrapText = False Then
    Selection.WrapText = True
Else: Selection.WrapText = False
End If

End Sub

Sub AlignTextToTopOfCell()
'Useful for a cell with a lot of information in it. You usually need to adjust the alignment in order to be able to see clearly or for printing
'Can combine with one of the HorizontalAlignment to create the effect you want in one macro so there is no need to trigger two macros
    Selection.VerticalAlignment = xlTop
End Sub

Sub AlginTextToBottomOfCell()
'Useful for a cell with a lot of information in it. You usually need to adjust the alignment in order to be able to see clearly or for printing
'Can combine with one of the HorizontalAlignment to create the effect you want in one macro so there is no need to trigger two macros
    Selection.VerticalAlignment = xlBottom
End Sub

Sub AlignTextToLeftOfCell()
'Useful for a cell with a lot of information in it. You usually need to adjust the alignment in order to be able to see clearly or for printing
'Can combine with one of the VerticalAlignment to create the effect you want in one macro so there is no need to trigger two macros
    Selection.HorizontalAlignment = xlLeft
End Sub

Sub AlignTextToRightofCell()
'Useful for a cell with a lot of information in it. You usually need to adjust the alignment in order to be able to see clearly or for printing
'Can combine with one of the VerticalAlignment to create the effect you want in one macro so there is no need to trigger two macros
    Selection.HorizontalAlignment = xlRight
End Sub

Sub AlignTextToCenterofCellUpDown()
'Useful for a cell with a lot of information in it. You usually need to adjust the alignment in order to be able to see clearly or for printing
'Can combine with one of the HorizontalAlignment to create the effect you want in one macro so there is no need to trigger two macros
    Selection.VerticalAlignment = xlCenter
End Sub

Sub AlignTextToCenterofCellRightLeft()
'Useful for a cell with a lot of information in it. You usually need to adjust the alignment in order to be able to see clearly or for printing
'Can combine with one of the VerticalAlignment to create the effect you want in one macro so there is no need to trigger two macros
    Selection.HorizontalAlignment = xlCenter
End Sub
