How to create multi row segmented control in Xcode with Swift
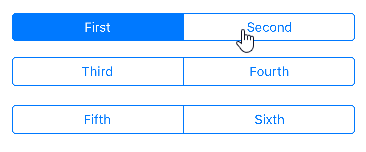
Segmented Control is iOS way of interpreting toggle action. It is visually more pleasing than radio button in terms of UI but there is a limitation of how many option it can present as it is restricted to single row. This post teaches how to create a multi row segmented control for more options available for toggling. At the end of the post, you should be able to create something similar to the below and interpret it accordingly.
Ingredients we need
All we need is a IBOutlet and IBAction per segmented control you are using. For easy reference in this post, I have created 3 segmented control.
1st segmented control: IBOutlet segment1 with two segments First & Second and IBAction named FirstSecond.
2nd segmented control: IBOutlet segment2 with two segments Third & Fourth and IBAction named ThirdFourth.
3rd segmented control: IBOutlet segment3 with two segments Fifth & Sixth and IBAction named FifthSixth.
Code for toggling
The code required for the toggling is pretty straight forward. All we need to do is just remove selected segment in the other 2 segmented control that is not selected.
@IBOutlet weak var segment1: UISegmentedControl!
@IBOutlet weak var segment2: UISegmentedControl!
@IBOutlet weak var segment3: UISegmentedControl!
@IBAction func FirstSecond(_ sender: UISegmentedControl) {
    segment2.selectedSegmentIndex = UISegmentedControlNoSegment
    segment3.selectedSegmentIndex = UISegmentedControlNoSegment
}
@IBAction func ThirdFourth(_ sender: UISegmentedControl) {
    segment1.selectedSegmentIndex = UISegmentedControlNoSegment
    segment3.selectedSegmentIndex = UISegmentedControlNoSegment
}
@IBAction func FifthSixth(_ sender: UISegmentedControl) {
    segment1.selectedSegmentIndex = UISegmentedControlNoSegment
    segment2.selectedSegmentIndex = UISegmentedControlNoSegment
}
How to use it
All we need to do is to use an array. The position of the array can be easily determined by adding the number of segments which are in the earlier segments.(In my example, position of Segment named Sixth will be Segment3.selectedSegmentIndex + 4 because there are 4 segments in the earlier segments Segment1 and Segment2)
let segmentvalue = ["First","Second","Third","Fourth","Fifth","Sixth"]
@IBAction func FirstSecond(_ sender: UISegmentedControl) {
    segment2.selectedSegmentIndex = UISegmentedControlNoSegment
    segment3.selectedSegmentIndex = UISegmentedControlNoSegment
    let valueINeed = segmentvalue[segment1.selectedSegmentIndex]
}
@IBAction func ThirdFourth(_ sender: UISegmentedControl) {
    segment1.selectedSegmentIndex = UISegmentedControlNoSegment
    segment3.selectedSegmentIndex = UISegmentedControlNoSegment
    let valueINeed = segmentvalue[segment2.selectedSegmentIndex + 2]
}
@IBAction func FifthSixth(_ sender: UISegmentedControl) {
    segment1.selectedSegmentIndex = UISegmentedControlNoSegment
    segment2.selectedSegmentIndex = UISegmentedControlNoSegment
    let valueINeed = segmentvalue[segment3.selectedSegmentIndex + 4]
}
Conclusion
That’s all the code you need to create a multi row Segmented Control.
Technically they are still acting as number of different segmented controls, but this teaches you how to “trick” into an impression of a extended segmented control and how to make use of it by simply performing addition to its index position.

